


Netskope SaaS Security Posture Management (SSPM) is a powerful, highly customizable platform which brings the security configuration and asset management of your entire SaaS portfolio under one umbrella. In our series of articles within the Netskope Community Site, we showcase some powerful capabilities and use cases to take your posture management to the next level.
In this article, we show you how you can use NGL to traverse the graph structure we use for modeling supported SaaS platforms to address advanced use cases for security, compliance and monitoring within your environments. The article is intended for a Google Workspace security administrator who has already onboarded their tenant to the platform and has an elementary understanding of how the Netskope SSPM platform works. For more information on how to get started with using SSPM with Google Workspace, you can view our earlier article on Securing Google Workspace.
Consider a User within Google Workspace, who is assigned the Super Admin role, which allows full access to create, edit and delete all aspects of your Google Workspace organization. As a best security practice, you should minimize the usage of such a role for operational activities and reserve it for billing, top-level administrative and emergency response situations. Malicious third-party applications tricking users to grant them their role and privileges is a common user-facing attack on cloud-based SaaS solutions such as Google Workspace. If a malicious third party application were to obtain a highly permissive OAuth-token through the super-admin user carelessly granting access, the impact would be extreme. As such, you should ensure that users that have highly privileged roles assigned do not have any third-party tokens linked.
The structure of the data model
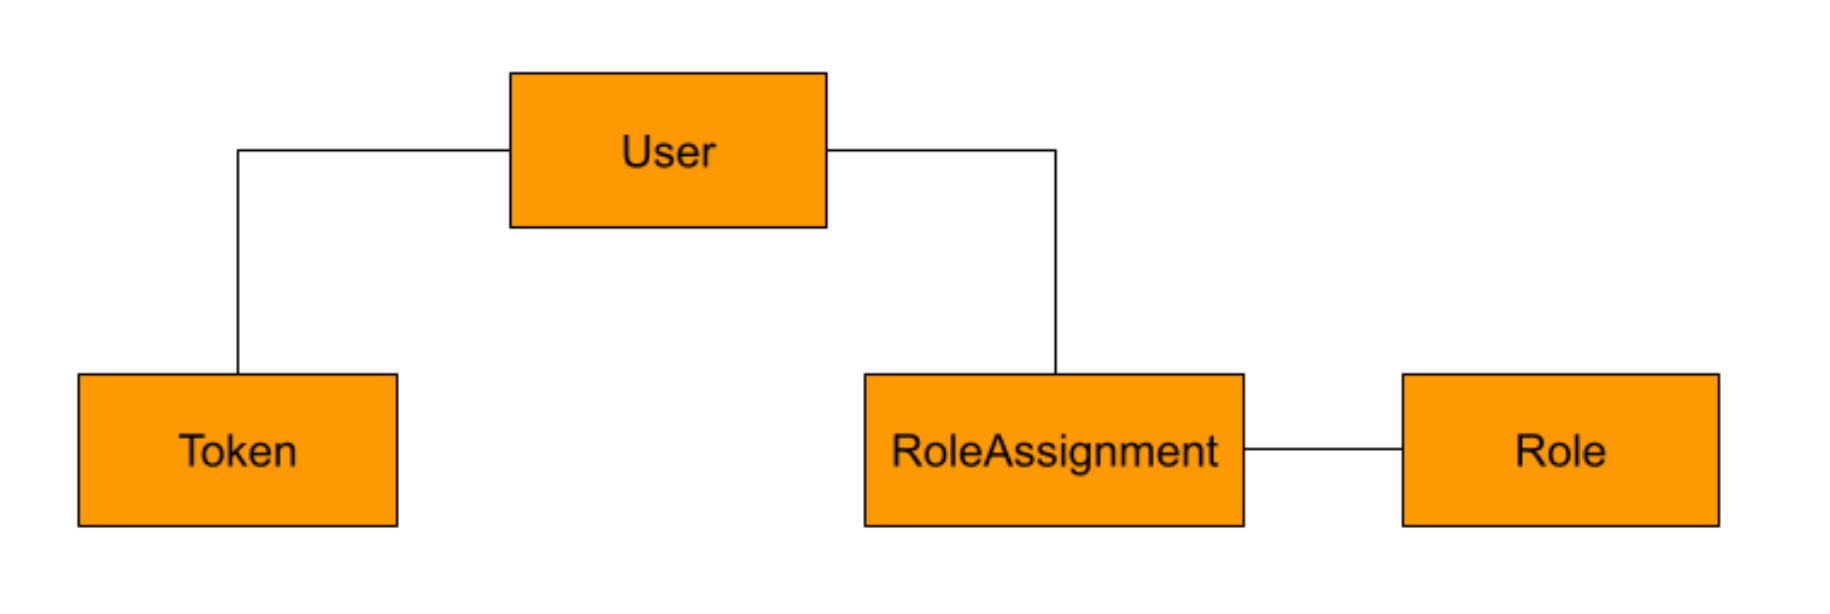
Below is a diagram depicting the underlying data model for the components involved in this use-case. As seen in the diagram, a GoogleWorkspace ‘User’ is linked to an assigned ‘Role’ via a ‘RoleAssignment’ object. A ‘User’ is also linked to one or more OAuth2.0 ‘Token’ objects used for API authorization by third-party applications. This mimics how the objects and their relations are treated in the native Google Workspace data model and how they are represented to the end-user via the APIs. For help with all the attributes and type-definitions for this SaaS application model within Netskope SSPM, refer to the Netskope Google Workspace DOM Documentation.
Searching for the misconfiguration
Using Netskope Governance Language (NGL), you may traverse and address the nodes shown in the diagram above and correlate results using a logical AND operation to identify tokens granted to highly privileged users.
Rule 1: NGL search query to identify privileged users with third-party tokens
GoogleWorkspace User should-have
    RoleAssignment with-attribute {
        any Role as r with-attribute {
            r.isSuperAdminRole = true
        }
    }
    and
    Token exists
The query explained
The example above is a complex query leveraging visibility and connections between multiple Google Workspace resources monitored by Netskope SSPM. To illustrate the advanced capabilities of the tool, we can break the rule down as follows:
GoogleWorkspace User should-have - since we are using NGL search, we would like to see the actual security violations in the environment. The should-have keyword will show User resources where the following conditions evaluate to true.
RoleAssignment with-attribute { any Role as r with-attribute { r.isSuperAdminRole = true } } - within the Netskope SSPM data model, Google Workspace Role Assignments carry a reference to User resources to represent the similar connection available in the native data model. Similarly, the RoleAssignment resource type is connected to the Role resource, thereby forming a 1-hop connection between a User and a Role. With this structure, we are checking for User(s) that have a RoleAssignment connection to a Role where the attribute 'isSuperAdminRole' is set to true. This allows us to search for any users who have been assigned the role of a super-admin despite this information not being available from the user resource directly.
and Token exists - Similar to the User being connected to a Role via a RoleAssignment, the User resource type is also connected to the Token resource in the underlying data model. We can further narrow down our query to resources where this connection exists, i.e. to the users that have at least one OAuth token. The AND operator then performs a logical AND operation to display User resources where both the conditions are true, i.e. the User has super-admin privileges AND Oauth tokens for that user exist.
Why do we use the any..as construct instead of directly linking to a Role node?
For more information, view the technical note at the bottom of the article.
Converting the search query to a continuous monitoring rule
The above NGL statement is a useful query meant to be used in the real-time NGL search of the Inventory for finding any excessively permissive Users that might have granted their privileges to third party applications. Additionally, with the Netskope SSPM, we can also use a similar expression for continuous monitoring that would alert us should any new tokens be granted by a super-admin in the future.
However, before using the convenient “Create Rule” button available next to our search prompt, we need to learn how the inventory search use cases for NGL are different from the continuous monitoring use cases and why we need to alter the NGL statement. With the understanding that nodes whose evaluation results in a FALSE status, coupled with a should-have construct are alerted on and that unlike the search query where we look for super-admins that have granted third-party tokens, a continuous monitoring rule should enforce the state where no such users exist. Therefore, to flip the alerting logic for the rule in this case, we need to change the should-have to should-not-have.
Rule 2: NGL rule code to continuously monitor assets for privileged users:
GoogleWorkspace User should-not-have
    RoleAssignment with-attribute {
        any Role as r with-attribute {
            r.isSuperAdminRole = true
        }
    }
    and
    Token exists
The differences between the rule-mode behaviours of the initial search statement and the altered statement are illustrated in the following truth table.
|
isSuperAdminRole |
Token exists |
Rule 1 evaluation: |
Rule 2 evaluation: |
|
TRUE |
TRUE |
PASS ✅ |
FAIL ❌ |
|
TRUE |
FALSE |
FAIL ❌ |
PASS ✅ |
|
FALSE |
TRUE |
FAIL ❌ |
PASS ✅ |
|
FALSE |
FALSE |
FAIL ❌ |
PASS ✅ |
The NGL statement that checks boolean conditions using the “should-have” keyword generates a 'PASS ✅' finding only when both of them evaluate to TRUE. When performing an inventory search, only entries that pass the search criteria are shown in the results. However, the continuous monitoring rule we want to deploy to our policy will generate an alert when the criteria given to it generates a 'FAIL ❌' evaluation result.
Therefore in order to be only alerted for cases where both conditions are set to TRUE, we invert the NGL evaluation by using “should-not-have” keyword to look for condition failing results instead of resources that are passing the match. If the user would run the second version on the inventory search, they would get a list of User resources without super-admin roles and/or without third-party application tokens assigned to them.
Verifying the findings
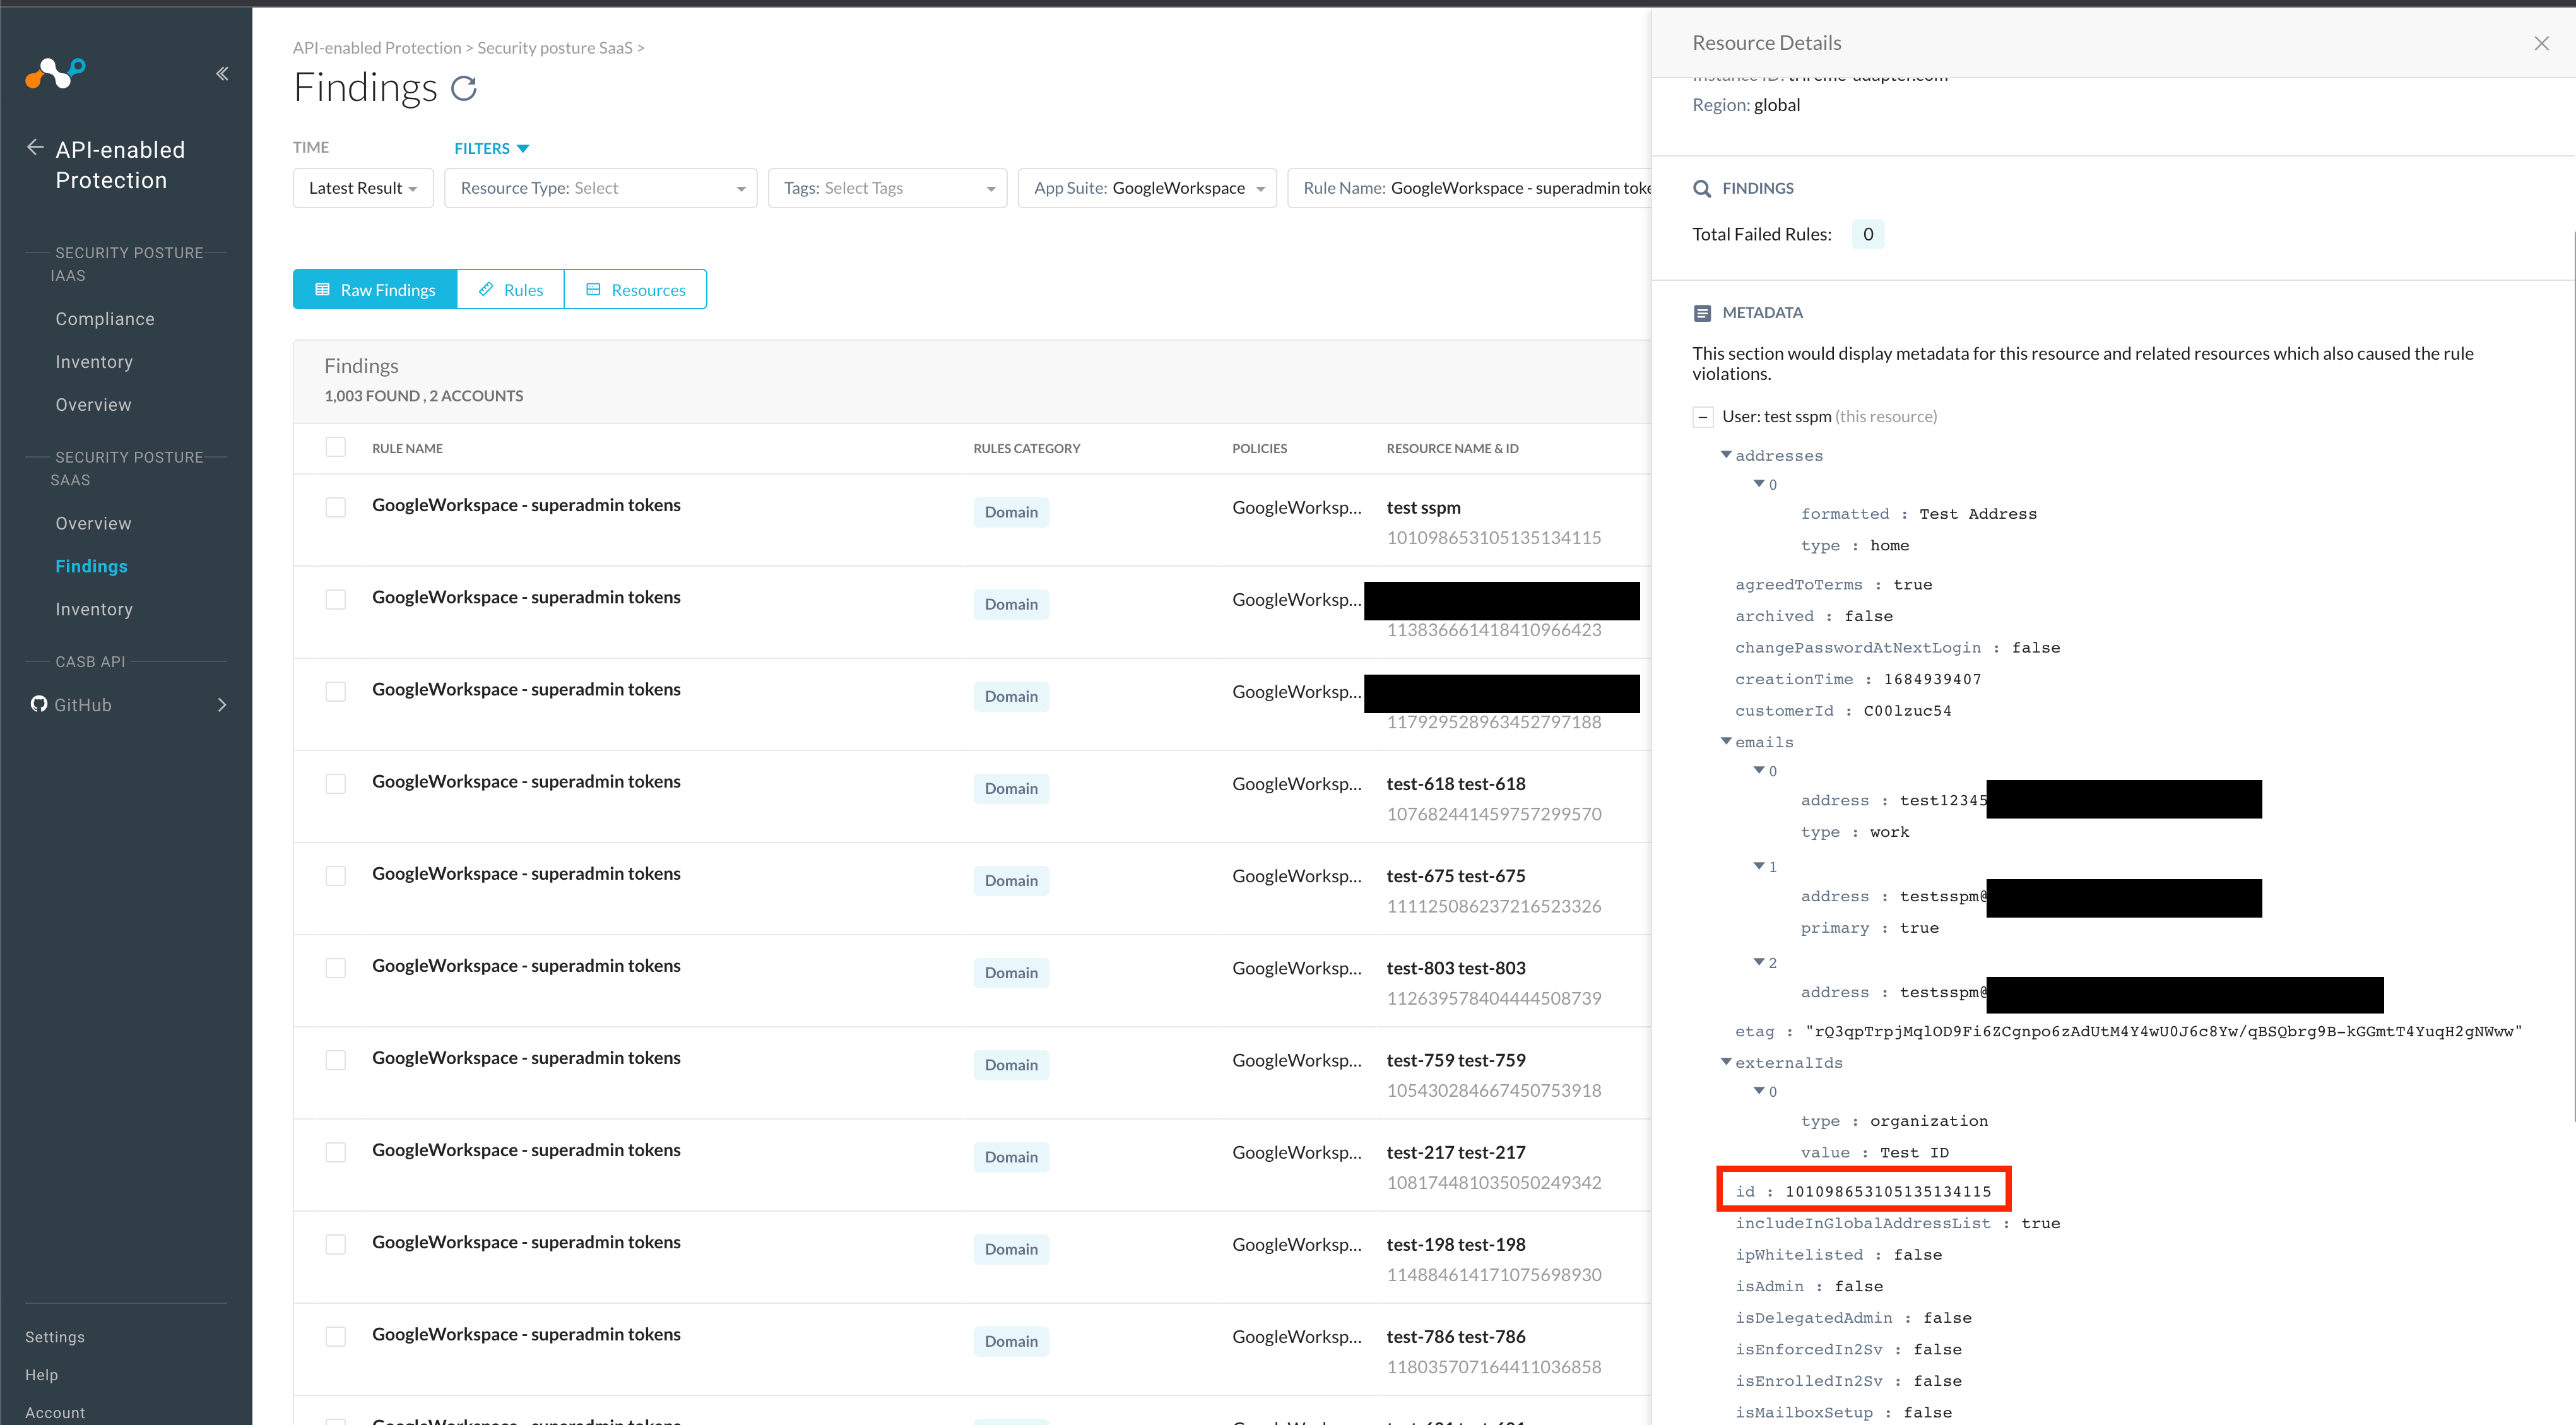
After deploying the continuous monitoring rule as instructed within the Netskope SSPM manual, we would now get alerts when super-admins have linked tokens in existence. Super admins without tokens, non-super-admins with tokens and non-super-admins without tokens are not alerted on. We showcase how this would look in our product with some screenshots below. With a continuous monitoring rule in place, you can use that rule as a filter in your findings browser. Considering the first finding and clicking on the ‘Resource Name & ID’ field, we can view the metadata for the user resource. Take note of the ‘id’ field which we will use in the next step to manually verify this finding.
Back in the Inventory view and using the NGL search for resources, we might want to search for other tokens granted by this user. For this we can use the following search query:
GoogleWorkspace Token should-have userKey = "<KEY_HERE>"
As seen in the results below, this user has multiple tokens tied to their identity.

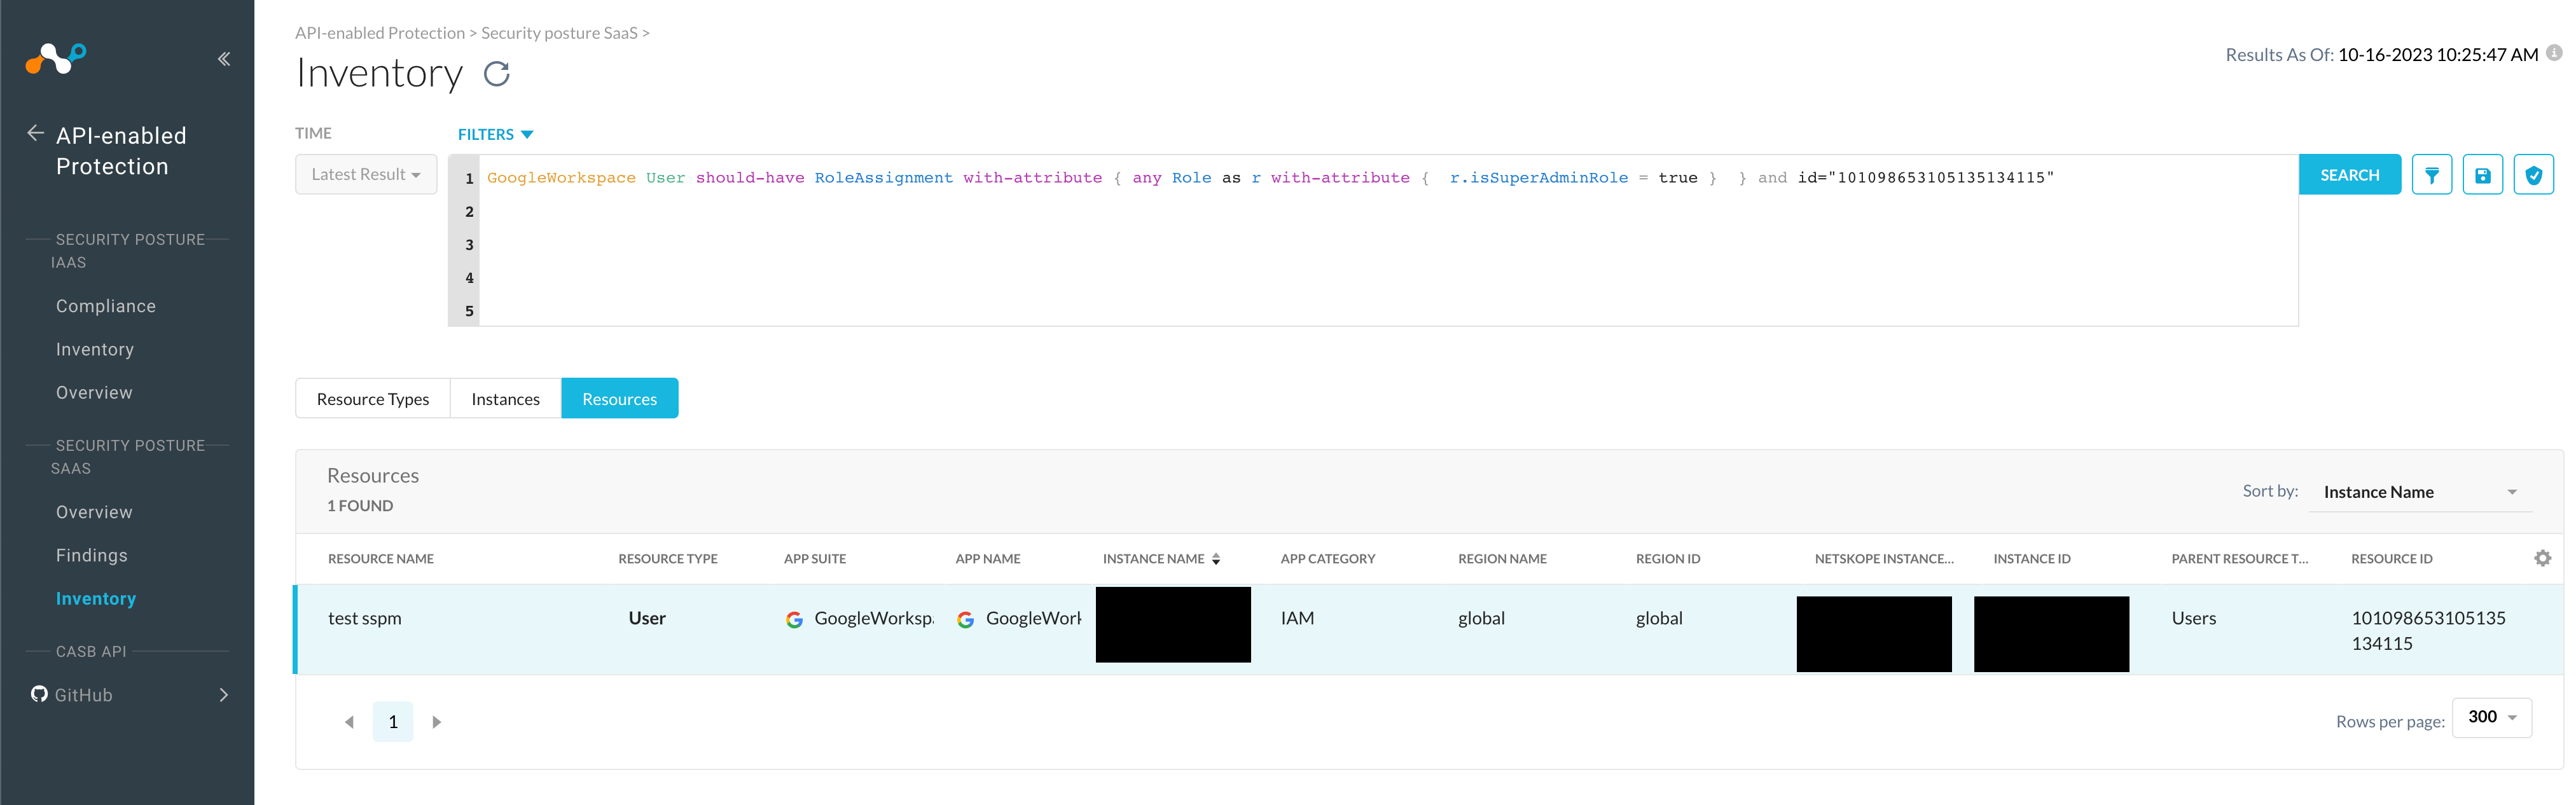
In order to verify whether the user with this id has a superadmin role attached, we can extend rule we created and saved before with additional condition.
GoogleWorkspace User should-have
    RoleAssignment with-attribute {
        any Role as r with-attribute {
            r.isSuperAdminRole = true
        }
    }
   and id = ”<KEY_HERE>”
As seen below, the user does in fact, have a superadmin role attached, therefore proving that the finding is valid.
|
Technical Note: The 'any..as' construct explained |
| The reason we use this construct when referring to RoleAssignment and Role resources is because of the cardinality of the nodes. A User may be linked to multiple Role(s) through RoleAssignment nodes. The any..as construct checks for at least one node to pass the condition stated in front of it. We need not use this in front of should-have and should-not-have since those constructs inherently check for at least one node matching the conditions after them. |
Stay tuned for more articles where we will demonstrate how to further explore underlying graph structures for continuous monitoring and security use-cases.