

In this article, we will cover how to deploy Netskope Cloud Exchange: A platform that facilitates the sharing of information between your different security vendors.
What is Cloud Exchange?
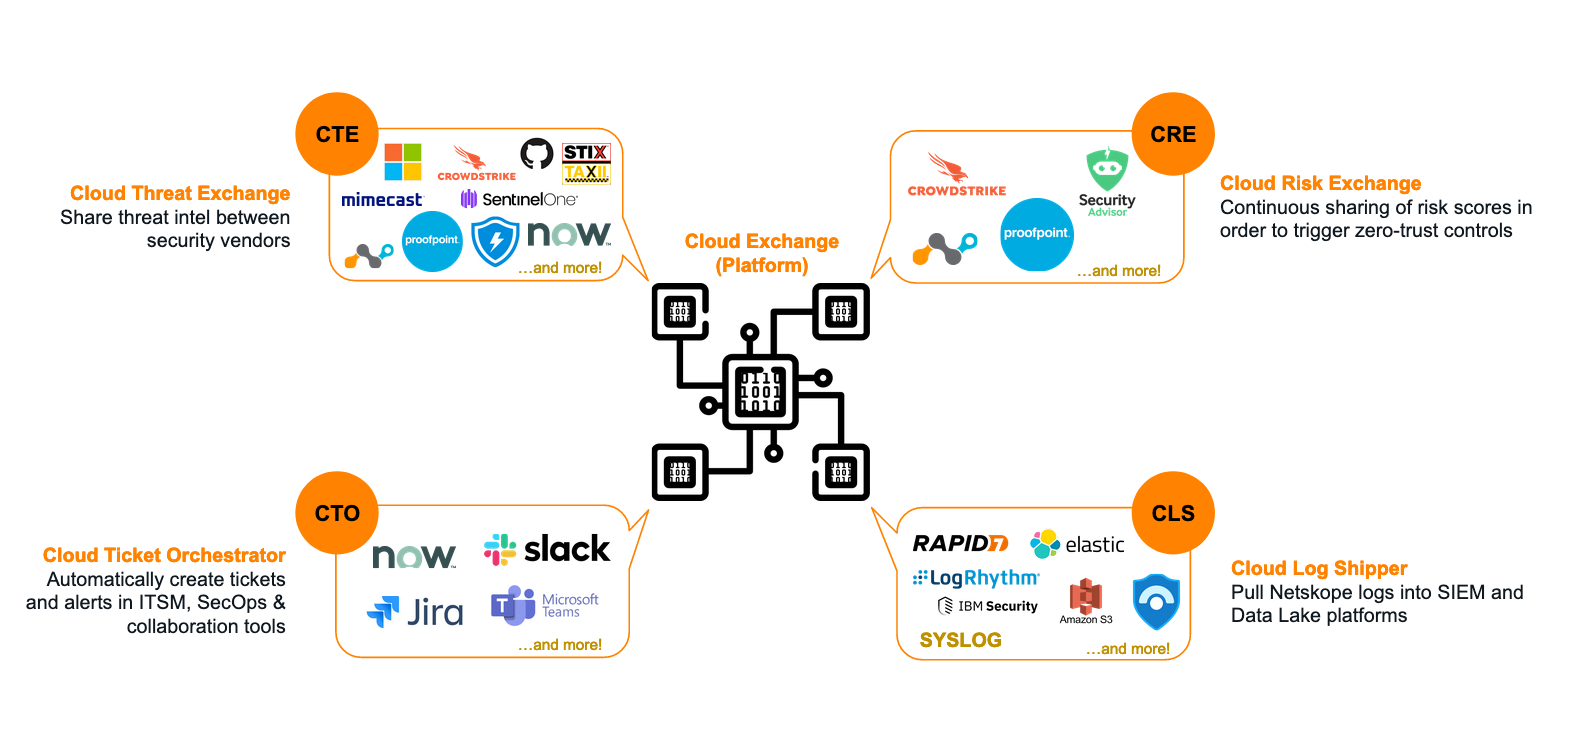
Cloud Exchange (CE) is a platform that facilitates the exchange of information between your security and operations platforms.
What can Cloud Exchange do?
Cloud Exchange is comprised of 5 key modules. You don’t have to use every module: only the ones that make sense based on the vendors in your current environment.
Threat Exchange
The Cloud Threat Exchange (CTE) module automates the sharing of threat indicators between security platforms in your environment.
Ticket Orchestrator
The Cloud Ticket Orchestrator (CTO) module automatically creates tickets and notifications in 3rd-party ITSM & collaboration systems (eg: ServiceNow, JIRA, Slack) to streamline incident response.
Risk Exchange
The Cloud Risk Exchange (CRE) module facilitates normalization of both user and SaaS application risk scores between security vendors. CRE is divided into two sub-modules: User Risk Exchange (URE) and Application Risk Exchange (ARE).
Log Shipper
The Cloud Log Shipper (CLS) module extracts the raw event, alert, and log data from your Netskope tenant, and streams it to one or more receivers, like Sentinel or Exabeam.
Deploying Cloud Exchange
Cloud Exchange is deployed as a series of Docker containers within your environment.
ℹ Heads Up!
Red Hat leverages Podman instead of Docker. Netskope has specific instructions for RHEL/Podman here.
Requirements
Operating System
- A system capable of supporting Docker, and Docker Compose (or Podman).
- Ubuntu 20.04 LTS and RHEL 7.9 & 8.0 are supported by Netskope.
Minimum System Specification
- 4 vCPUs
- 4 GB memory
- 40 GB storage
Netskope provides additional scaling numbers here.
Networking
- CE requires outbound connectivity to GitHub, Docker Hub, your Netskope tenant, and any platform you plan to integrate it with. See here for a list of URLs. HTTP(S) proxies are supported.
- CE requires inbound connectivity on 22 for server management, and 443 for the admin UI.
- Do NOT expose Cloud Exchange publicly on the internet.
Install Docker & Docker Compose
You will need to install Docker and Docker Compose. The commands below cover the installation of Docker on an Ubuntu host.
1. Update the system:
sudo apt update -y && sudo apt upgrade -y2. Install the initial packages:
sudo apt install apt-transport-https ca-certificates curl gnupg lsb-release -y
3. Add the GPG key for the Docker software repo:
sudo mkdir -p /etc/apt/keyrings && curl -fsSL https://download.docker.com/linux/ubuntu/gpg | sudo gpg --dearmor -o /etc/apt/keyrings/docker.gpg
4. Add the Docker software repo:
echo "deb barch=$(dpkg --print-architecture) signed-by=/etc/apt/keyrings/docker.gpg] https://download.docker.com/linux/ubuntu $(lsb_release -cs) stable" | sudo tee /etc/apt/sources.list.d/docker.list > /dev/null
5. Update the package index:
sudo apt update -y
ℹ Heads Up!
If you receive a GPG error, run command sudo chmod a+r /etc/apt/keyrings/docker.gpg and try again.
6. Install Docker:
sudo apt install docker-ce docker-ce-cli containerd.io docker-compose-plugin -y
7. Verify the installation:
sudo docker run hello-worldIf successful, the above command will print a confirmation message.
8. Install Docker Compose:
sudo curl -SL https://github.com/docker/compose/releases/download/v2.14.0/docker-compose-linux-x86_64 -o /usr/local/bin/docker-compose
9. Make the Docker Compose binary executable:
sudo chmod +x /usr/local/bin/docker-compose
10. Validate that Docker Compose is installed:
docker-compose --version

>> Docker Compose version v2.14.0
11. Set the Docker process to start at boot:
sudo systemctl enable docker
12. Check that the Docker service is running:
sudo systemctl status docker


● docker.service - Docker Container Engine

     Loaded: loaded (/lib/systemd/system/docker.service; enabled; vendor preset: enabled)

     Active: active (running) since Wed 2022-12-07 05:49:10 UTC; 1min 14s ago
13: Troubleshooting:
If you attempt to run the docker command without sudo, you will get an error similar to:
ERROR: Got permission denied while trying to connect to the Docker daemon socket
To be able to use the docker command without sudo, run the following command:
sudo usermod -aG docker ${USER}
Log out of the system for the changes to take effect.
Installing Cloud Exchange
Clone the Cloud Exchange repository from Netskope on GitHub.
mkdir netskope && cd netskope

git clone https://github.com/netskopeoss/ta_cloud_exchange

cd ta_cloud_exchange
Install Cloud Exchange:
python3 ./setup
🛑 Warning!
Special characters are not supported when setting the maintenance password.
When prompted during setup:
Type 1 to install the latest version.
Specify whether you are using a HTTP(S) proxy.
Enter your Netskope Tenant ID. Do not enter the .goksope.com part.
- Type HTTPS to access Cloud Exchange securely and 443 for a port (don’t use HTTP… just don’t)
Enter two separate passwords for auth token generation and maintenance.
Press ENTER or type No when prompted to enable TLS 1.2. TLS 1.3 is used by default.
For example setup script usage, see here.
Launching Cloud Exchange
To start Cloud Exchange:
./start
To stop Cloud Exchange:
./stop
On first run, the CE containers will be pulled from Docker Hub.
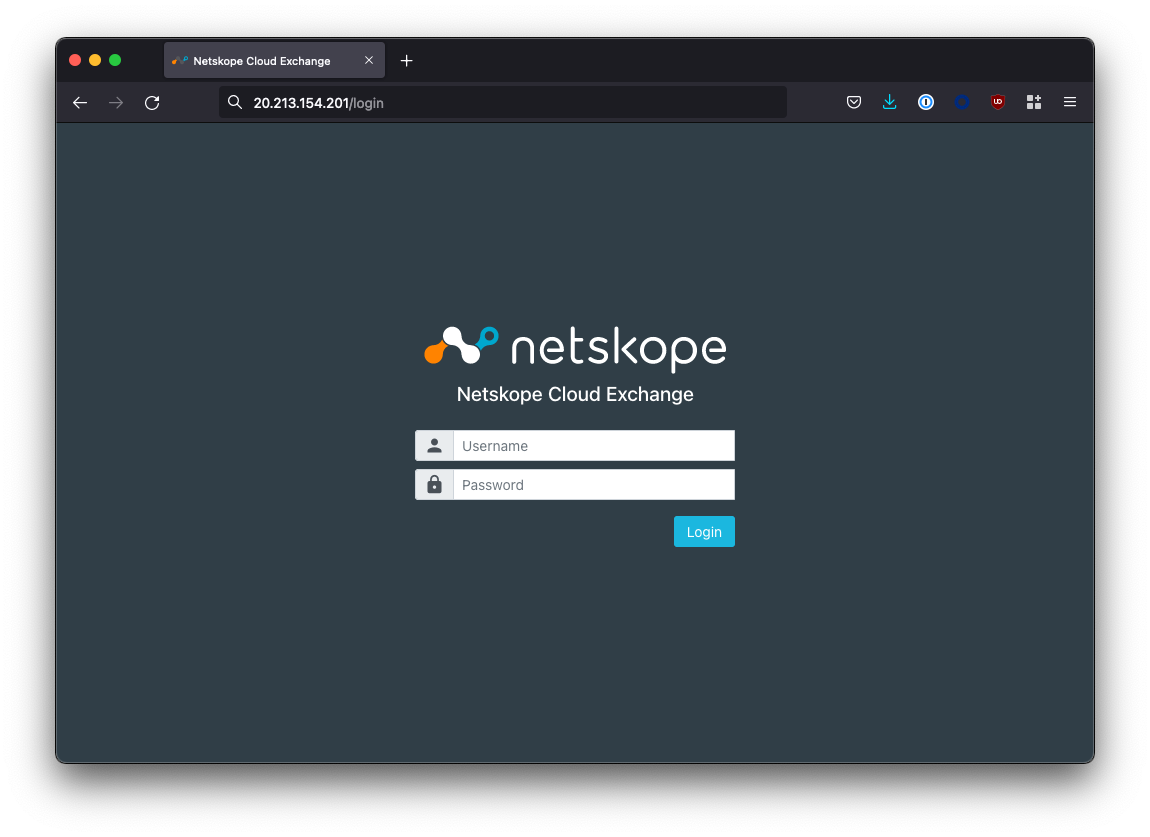
When complete, you will be able to access the Cloud Exchange UI in your browser:
https://<host ip address>
ℹ Heads Up!
Receiving an untrusted SSL certificate error is normal! You can replace the SSL certificate with one that is signed by a trusted CA to remove this warning: this is covered in the next section.
If you can’t access the UI, make sure that any firewalls (eg: ufw) and/or Network Security Group (NSG) permits port 443 inbound towards the host IP address.
(Optional) Changing the SSL Certificate
The self-signed SSL certificate that is used to secure the admin UI can be changed for one that is signed by a trusted CA in order to prevent any untrusted SSL certificate warnings.
1. Stop the Cloud Exchange service:
cd ~/netskope/ta_cloud_exchange

./stop
2. Remove the existing certificate and private key in the ta_cloud_exchange/data/ssl_certs/ directory:
cd ~/netskope/ta_cloud_exchange/data/ssl_certs/

rm -rf cte_cert.crt

rm -rf cte_cert_key.key
3. Rename your certificate and private key to cte_cert.crt and cte_cert_key.key and copy them to ta_cloud_exchange/data/ssl_certs/:
cp your_certificate.crt ~/netskope/ta_cloud_exchange/data/ssl_certs/cte_cert.crt


cp your_private_key.key ~/netskope/ta_cloud_exchange/data/ssl_certs/cte_cert_key.key
4. Restart Cloud Exchange:
cd ~/netskope/ta_cloud_exchange

./start
⚠️ Caution!
Rename your public and private key to cte_cert.crt and cte_cert_key.key respectively, or your certificate will not be used!
If the UI is no longer accessible after changing the certificate, check the format. Do not use a CA Bundle.
Configure Cloud Exchange
Now that you have deployed Cloud Exchange, we need to perform some initial configuration steps.
Logging into Cloud Exchange
The default username/password for the Super Admin account is admin/admin
Enabling Cloud Exchange Modules & Updates
You should enable all 5 of the CE modules under the Settings > General tab. Only the Super Administrator (the admin user) can turn these modules on/off: the toggles are not visible to normal admins.
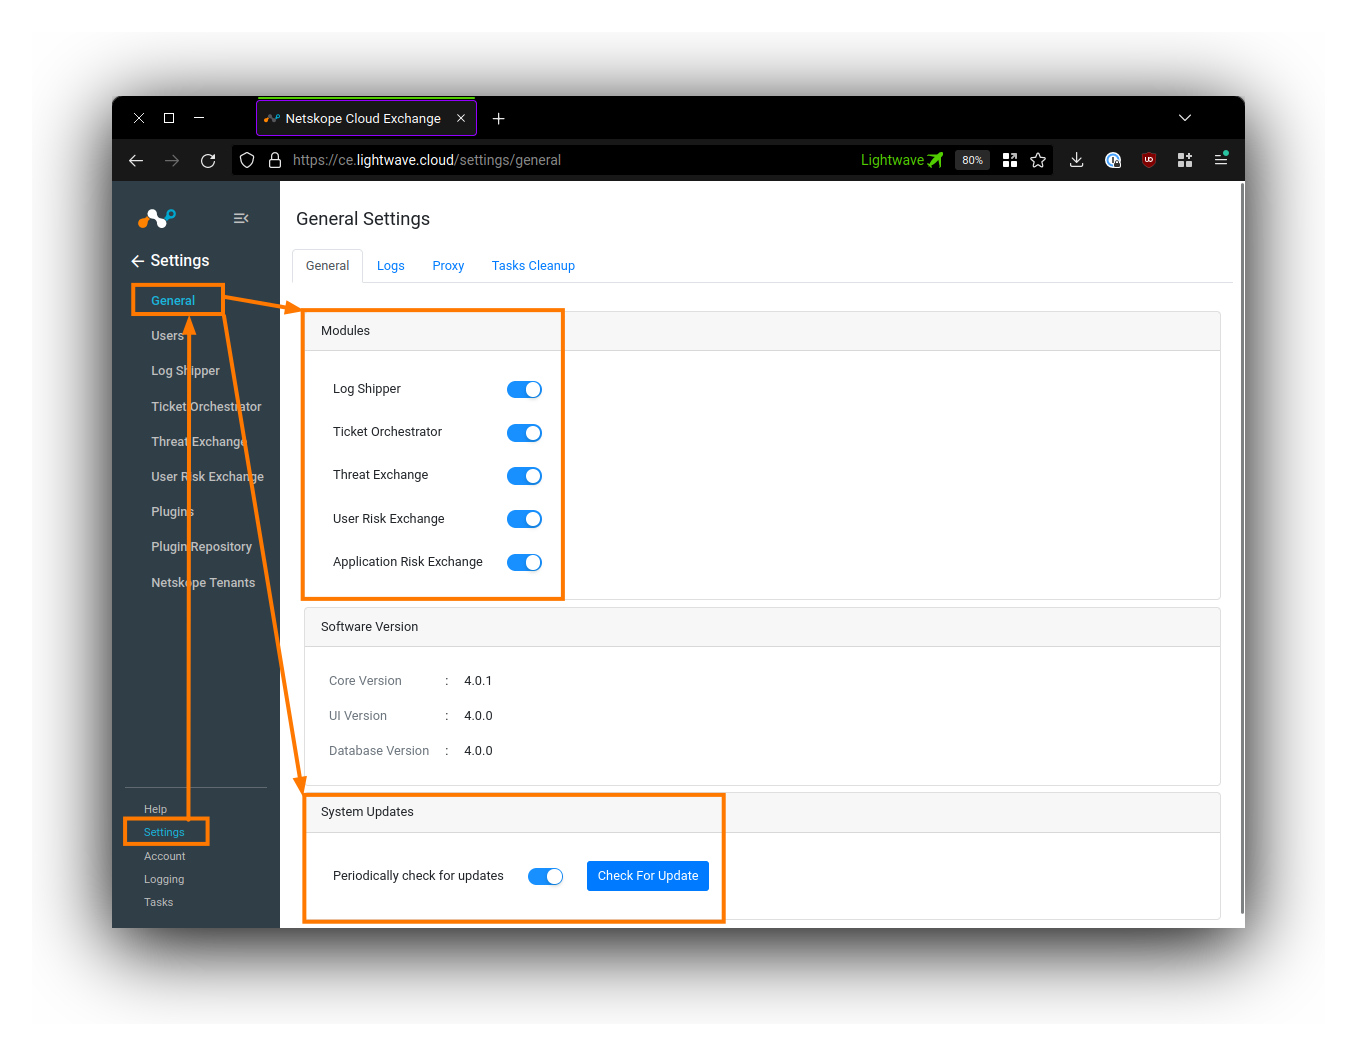
Under System Updates, toggle ON Periodically check for updates.
(Optional) Setting a Proxy
If you require the Cloud Exchange plugins to communicate through a proxy, you can configure this under the Proxy tab under Settings > General.
Adding Users & Configuring SSO
By default, Cloud Exchange uses a local login mechanism where users sign into CE directly.
User Management is located under Settings > Users. To create a user, click the plus button on the top right-hand side of the Users table.
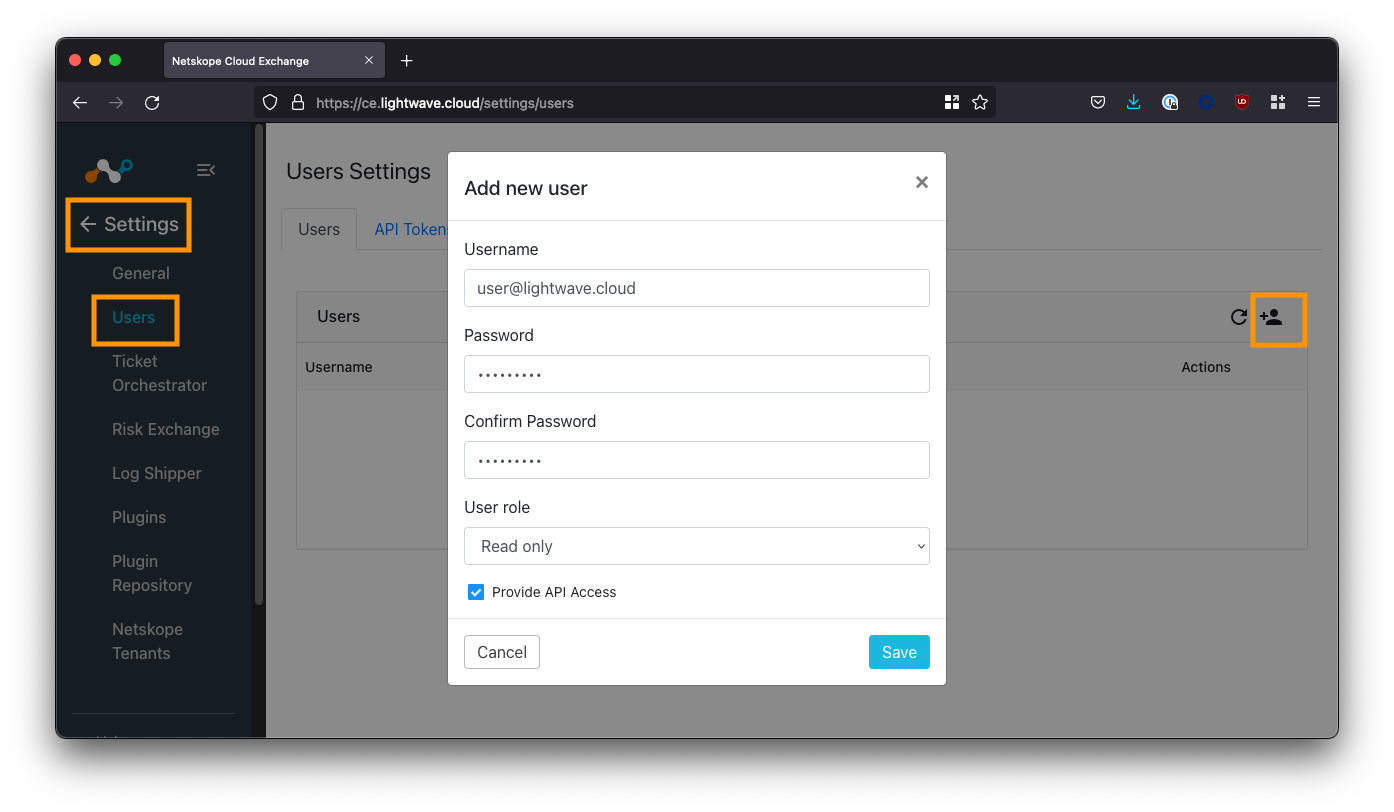
There are two roles available for assignment: Admin and Read-Only.
The Super Administrator role is only assigned to the default admin user. Only the default admin user can add/remove users, add/remove CE modules, and change CE module-specific config.
To configure Single-Sign-On, click the SSO tab under Settings > Users, and enable the SSO checkbox.
- >Guide] How-to configure SSO with Azure AD for Netskope Cloud Exchange
- >Guide] How-to configure SSO with Okta for Netskope Cloud Exchange
Add Your Netskope Tenant(s)
The last configuration step is to pair your Netskope tenant with your Cloud Exchange deployment in order for data to be synchronized. Multiple tenants are supported.
Get an API Key
Log into your Netskope tenant, and navigate to Settings > Tools > REST API v1

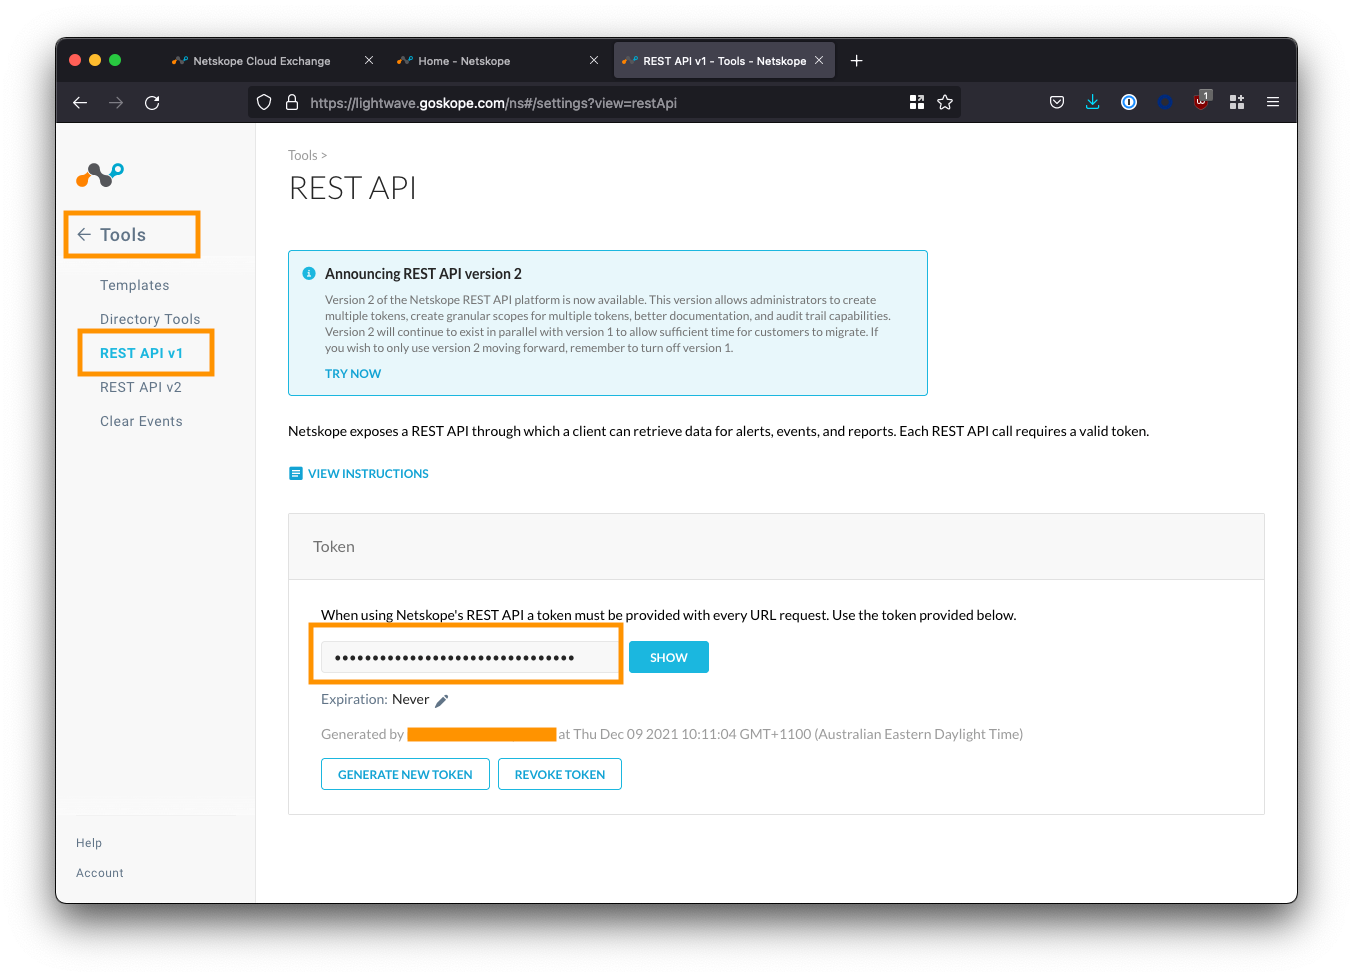
Copy the API token displayed. If this is your first time using the API, you may need to generate a new one.
Add your Netskope Tenant(s) in Cloud Exchange
Navigate to Settings > Netskope Tenants and click the Add Tenant button.
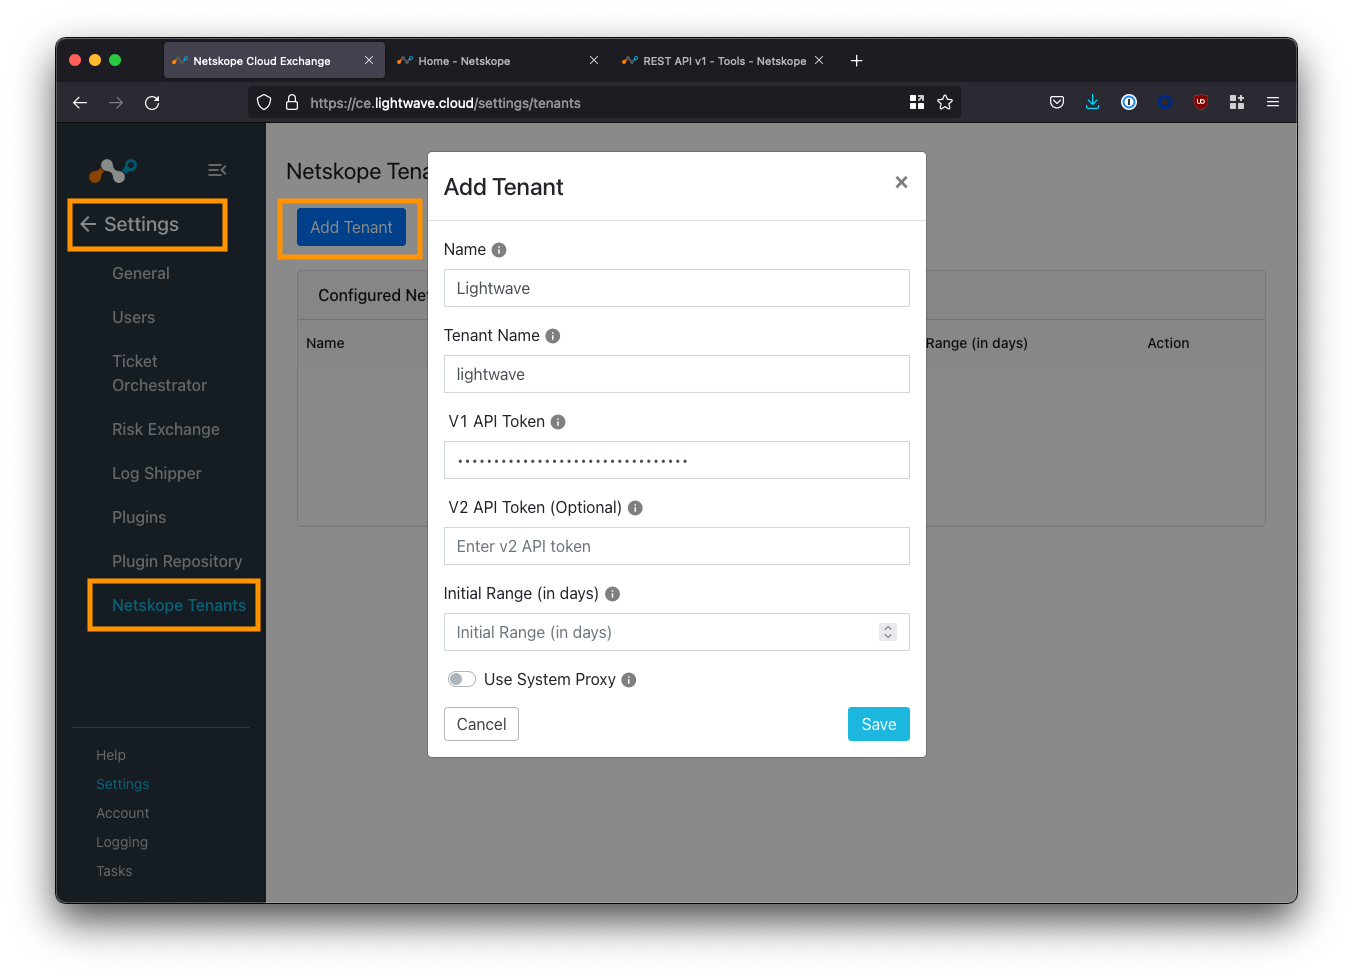
Fill in the fields according to the table below:
| Field | Description |
|---|---|
| Name | Enter an easy to remember name for the tenant. |
| Tenant Name | Enter the subdomain of your Netskope tenant - this is everything before the .goskope.com in the URL of your Netskope tenant. Eg: For lightwave.eu.goskope.com, enter lightwave.eu. |
| V1 API Token | Enter the API token copied from your tenant. |
| V2 API Token | N/A - Leave blank. |
| Initial Range | Number of days of historical data to sync with CE. 7 days is good as a default. |
Click Save to complete your configuration.
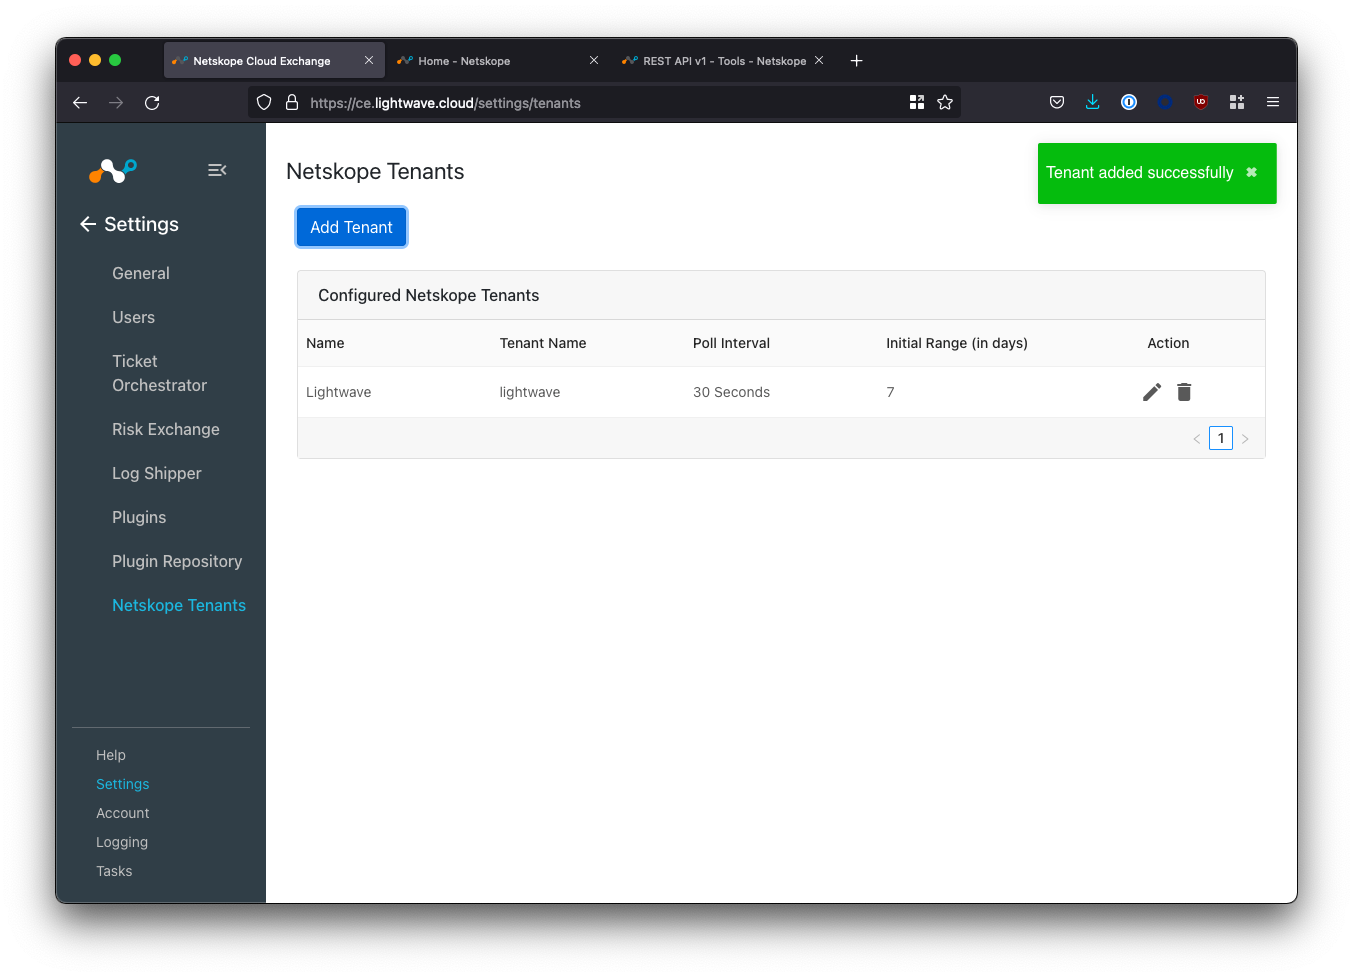
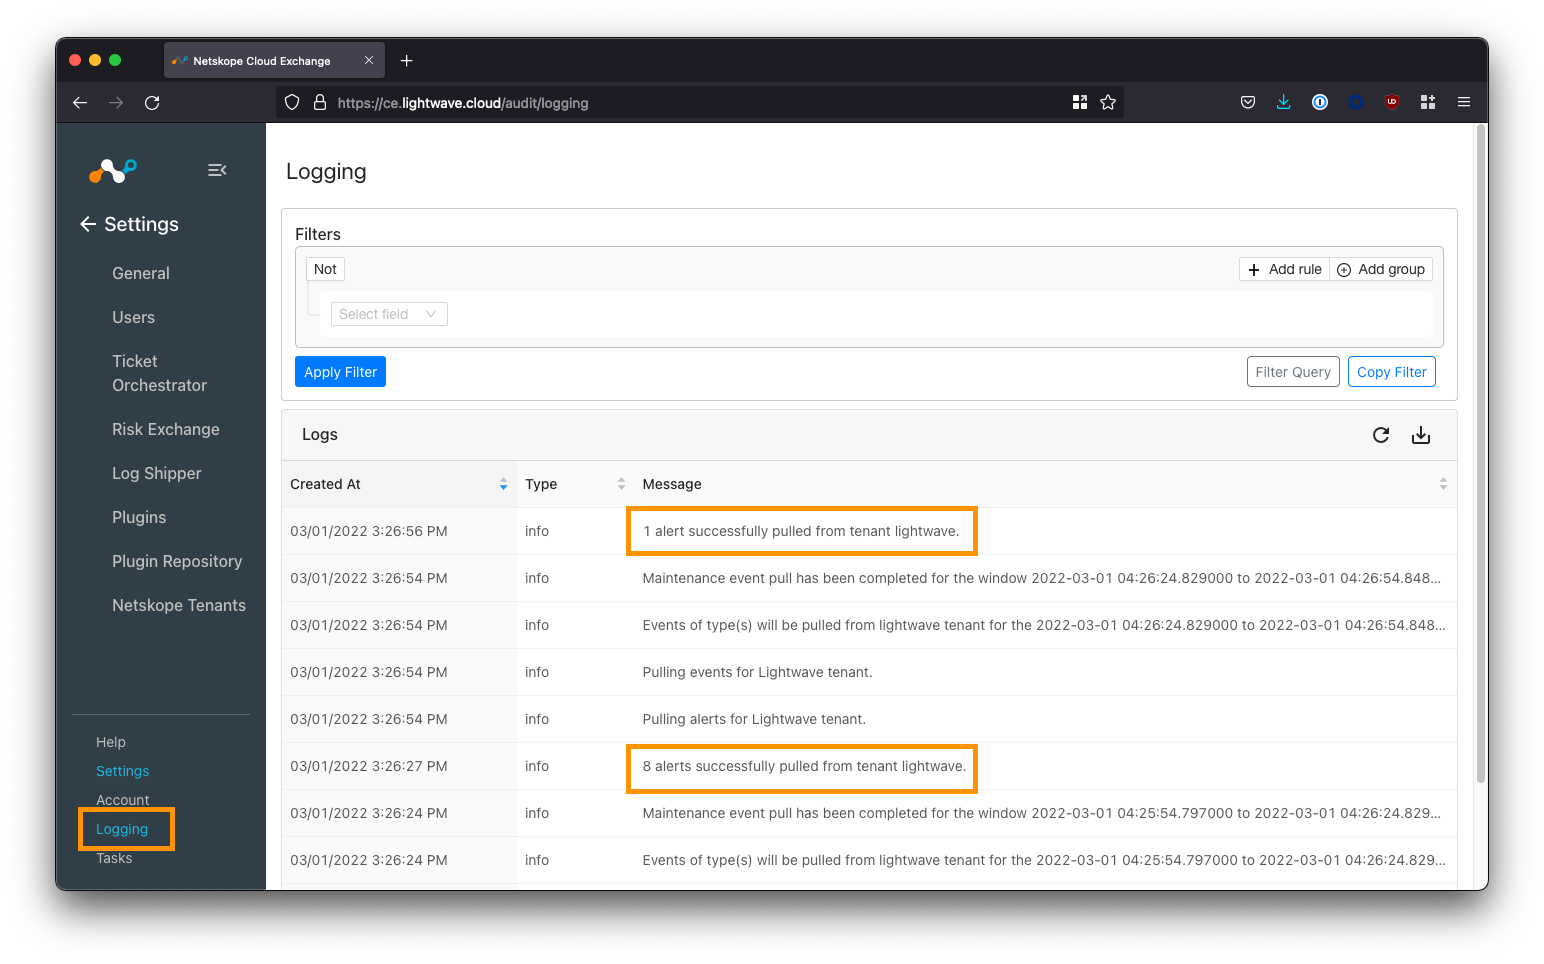
Verify the Netskope Tenant Configuration
Navigate to Logging in the bottom-left corner of the UI.
If your Netskope tenant was successfully added, you will start to see events synchronized.
Configure Plugins
Cloud Exchange uses the concept of “plugins” to determine where to send and receive data from:
Multiple inputs and outputs are supported.
Navigate to Settings > Plugins
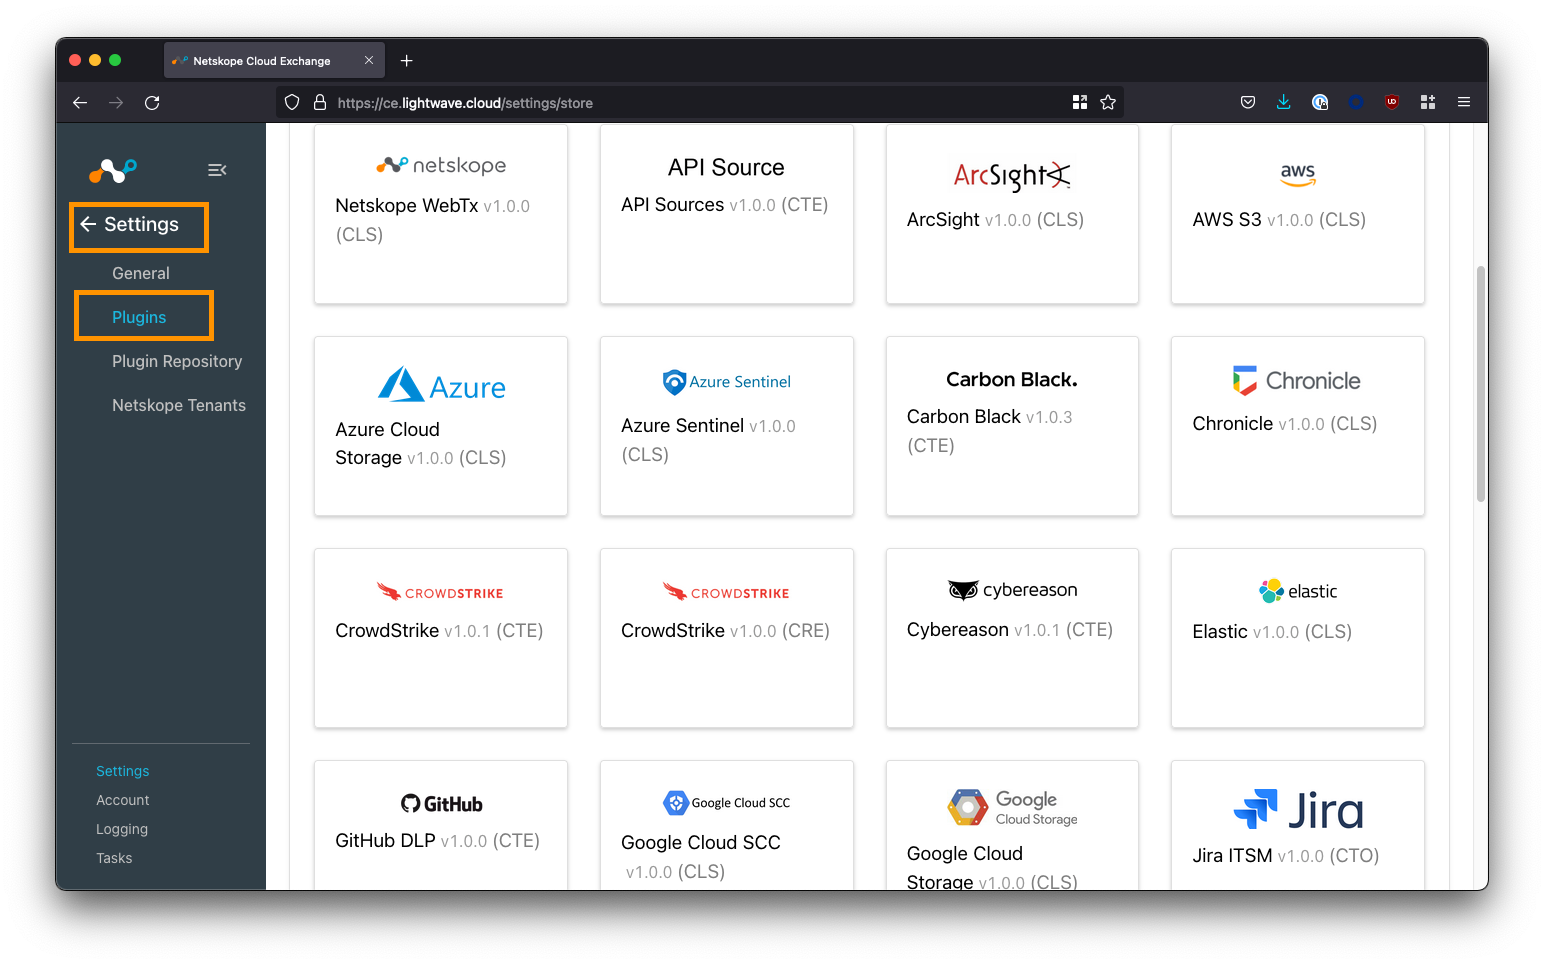
Here you will see a list of supported plugins; tagged according to the CE module the plugin aligns to:
| CE Tag | Associated CE Module |
|---|---|
| CTO | Cloud Threat Exchange. Synchronize threat intel, including IOCs, between vendors. |
| CRE | Cloud Risk Exchange. Synchronize risk scores between vendors. |
| CTO | Cloud Ticket Orchestrator. Automatically raise tickets and alerts in apps like Jira, ServiceNow, and Slack. |
| CLS | Cloud Log Shipper. Automatically pull and push logs to SIEM applications like Splunk and Sentinel. |
| ARE | Application Risk Exchange. Send Netskope SaaS app risk information to other security vendors. |
To start, you will want to configure the Netskope plugins for the associated modules you wish to use. For example, if you wish to share IOCs between Netskope and Crowdstrike, ensure you configure the Netskope CTE + Crowdstrike CTE plugins.
Vendors could potentially have multiple plugins depending on the CE modules supported. For example, Crowdstrike has both CTE and CRE plugins for sharing both threat and risk intel.
Finish
Where to from here? It’s time to start exploring the different plugins across each of the Cloud Exchange modules.
- List of 3rd party plugins (see the Cloud Exchange UI for the most up-to-date list)