


Overview
In this post, you'll learn how to integrate Netskope Private Access with Azure Active Directory (Azure AD). When you integrate Netskope Private Access with Azure AD, you can:
- Control in Azure AD who has access to Netskope Private Access
- Enable your users to Authenticate and do periodic re-authentication using their Azure AD accounts to access Netskope Private Access.
- Manage your accounts in one central location i.e., the Azure portal.
Pre-Requisites
To get started with Secure Hybrid Access through Azure AD and Netskope, you will need the following.
- Netskope Private Access Publisher is installed.
Integration Steps
This integration requires the following steps to be performed in the order specified.
- Generate Netskope OAuth Token and Retrieve SCIM Server URL
- Add Netskope Azure AAD Application (Netskope User Authentication) from Azure AD Gallery
- Configure Netskope Azure AAD Application (Netskope User Authentication) For User Account Provisioning
- Assign AAD Users to Netskope Azure AAD Application (Netskope User Authentication)
- Confirm synchronization of the users or groups provisioning
- Add Netskope Azure AAD Application (Netskope User Authentication) from Azure AD Gallery for SAML Authentication
- Retrieve Netskope SMAL Config
- Configure Netskope Azure AAD Application (Netskope User Authentication) For SAML Authentication
- Assign AAD Users to Netskope Azure AAD Application (Netskope User Authentication) for Network Private Access
- Setup AAD as SAML Provider in Netskope
- Configure Netskope for Forward Proxy SAML Authentication
- Install Netskope Client in IDP Mode
- Enable Periodic Re-Authentication with Network Private Access
- Install Netskope Client in IDP Mode
- Create Policy to enable Netskope Network Private Access
- Verify Private App Access Through Netskope Network Private Access
- Create Conditional Access Policy using Azure Active Directory (Optional).
Step 1: Generate Netskope OAuth Token and Retrieve SCIM Server URL
The Netskope OAuth token will be used to configure Azure AD for SCIM Integration. Perform the followings steps to generate this token.
- Login to the Netskope Admin Console or tenant instance using admin privileges. You can log in to your tenant instance in Netskope using the URL provided in the initial onboarding email sent from Netskope. For example, https://<tenant_name>.goskope.com
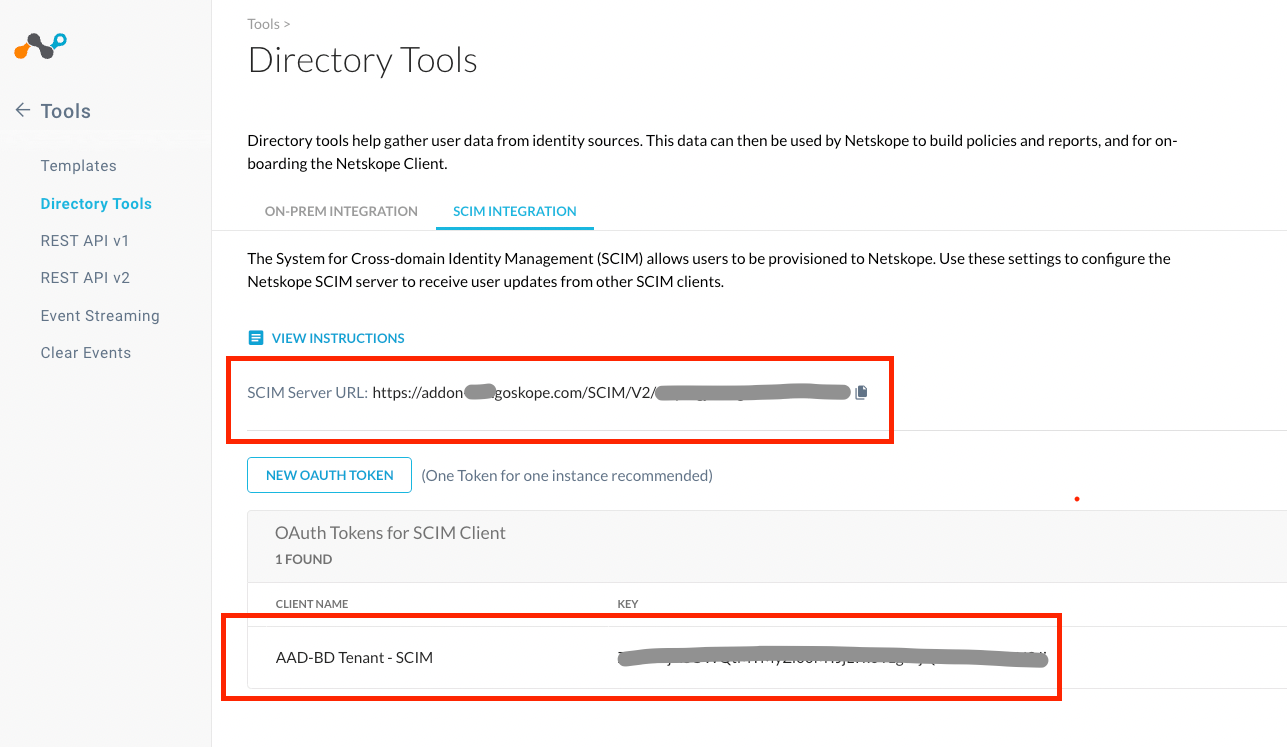
- Go to Settings > Tools > Directory Tools > SCIM Integration (tab) and click New OAUTH TOKEN
- Enter CLIENT NAME and click Generate Token. The OAuth Token for SCIM Client will be created.
- Copy the following values to use in the later steps.
- SCIM Server URL
- The newly generated OAuth Token (Key) value.
Step 2: Add Netskope Azure AAD Application (Netskope User Authentication) from Azure AD Gallery
The Netskope User Authentication AAD application will be used to configure SCIM Integration with Netskope to onboard AAD Users to Netskope. Perform the followings steps to add the app:
- Sign into the Azure portal using either a work or school account, or a personal Microsoft account using admin privileges.
- On the left navigation pane, select the Azure Active Directory service.
- Navigate to Enterprise Applications and then select All Applications.
- To add new application, select New application.
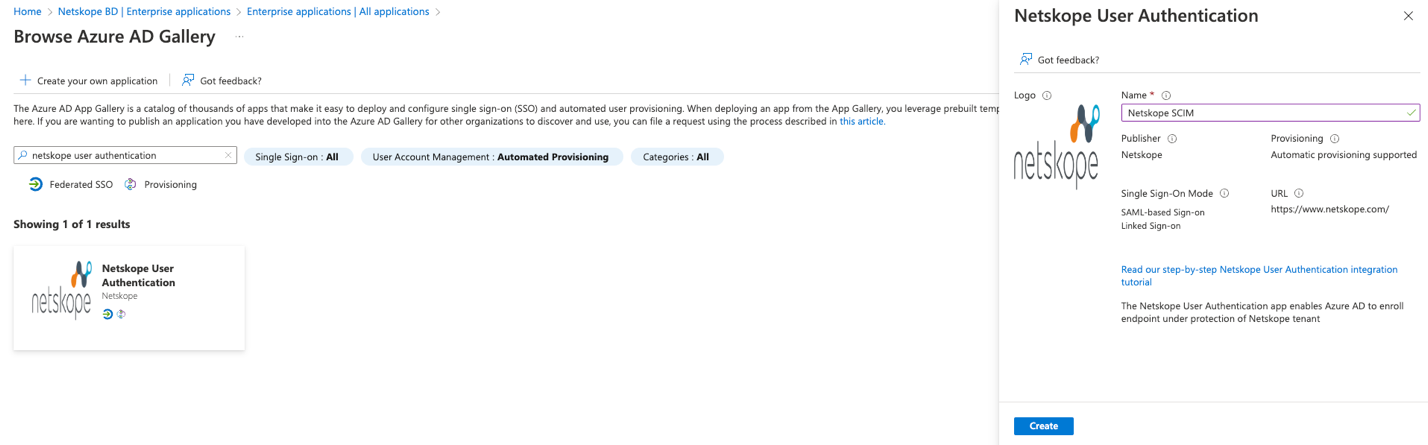
- In the Add from the gallery section, type Netskope User Authentication in the search box.
- Select Netskope User Authentication from results panel, name the application e.g., Netskope SCIM and then click Create to add the app. Wait a few seconds while the app is added to your tenant.
Step 3: Configure Netskope Azure AAD Application (Netskope User Authentication) For User Account Provisioning
The newly created Netskope User Authentication AAD application will be configured to provision AAD Users to Netskope. Perform the followings steps:
- Navigate to Enterprise Applications and then select the application you just added.
- Click on Overview on the left navigation pane and then click Provision User Accounts
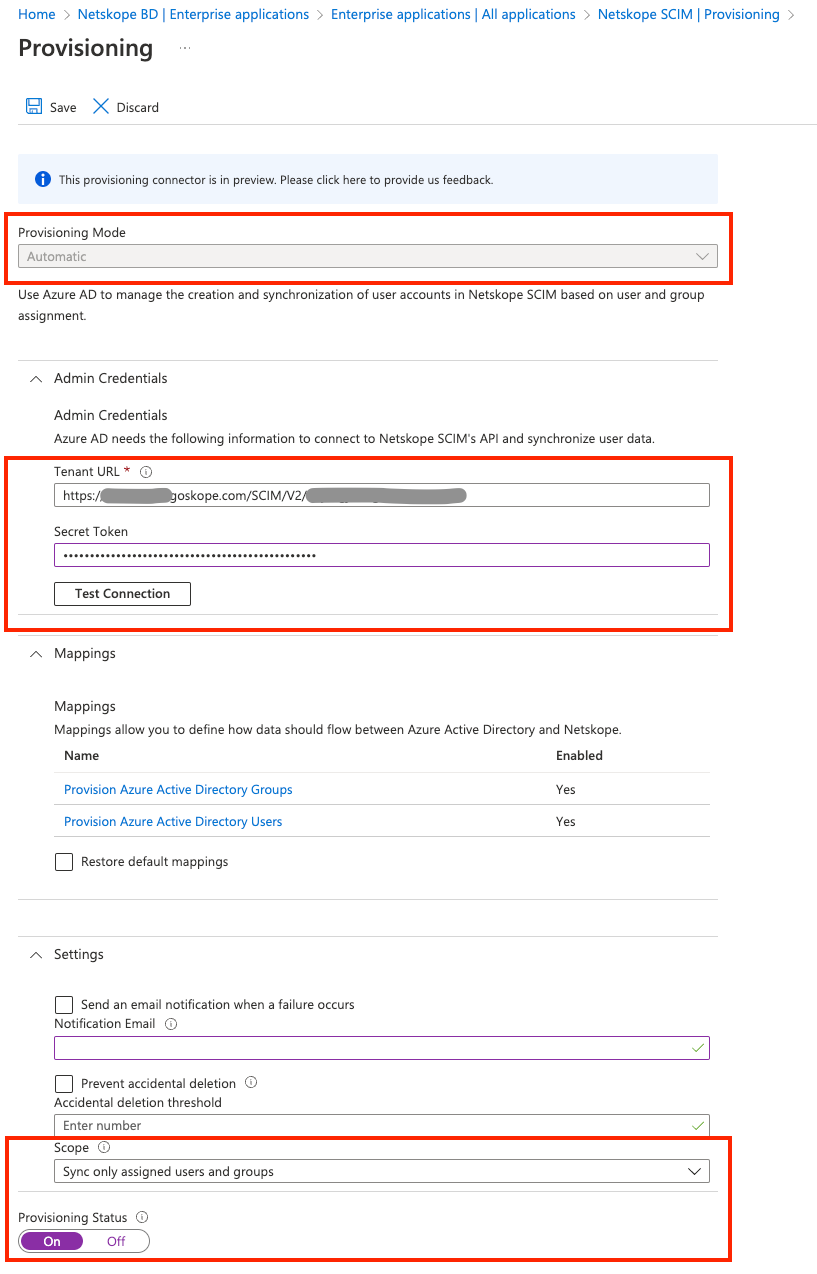
- Click Get Started and then set the Provisioning Mode to Automatic.
- Enter Tenant URL and Secret Token for the admin credentials. These values you copied in Step1 i.e., enter SCIM Server URL in the Tenant URL field and OAuth Token in the Secret Token field.
- Click Test Connection. After successfully validating the connection, click Save.
- Set Provisioning Status to On.
- Configure Scope to Sync only assigned users and groups.
Note; If you can’t see the Provisioning Status Field, go back one level and then select Edit Provisioning button on the top navigation pane.
The Default SCIM Mappings and Provisioning Scopes are listed under Mappings; refresh the page to view it. The mappings attributes are fixed and should not be changed. You can click on the mappings to view details.
Step 4: Assign AAD Users to Netskope Azure AAD Application (Netskope User Authentication)
Assign the newly created Netskope User Authentication AAD application to your AAD Users and Groups to enable synchronization to Netskope. Perform the followings steps:
- Navigate to Enterprise Applications and then select the application you just added.
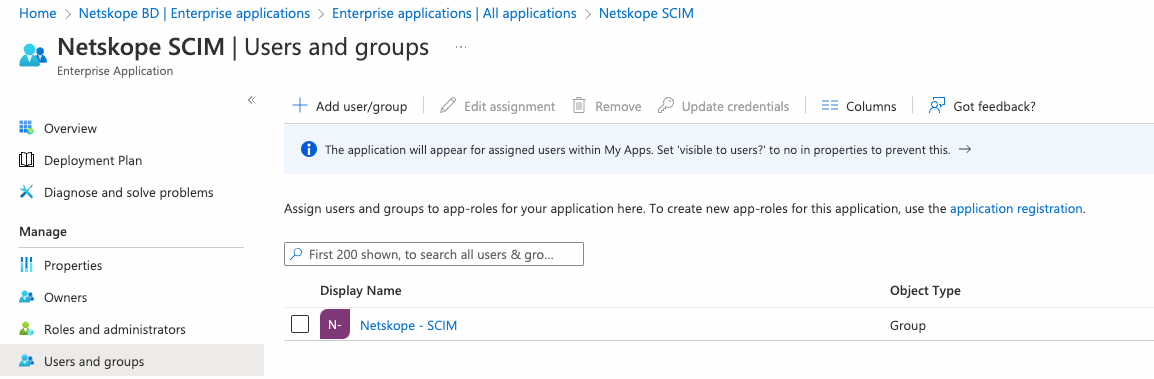
- Click on Users and Groups on the left navigation pane and then click Add user/group
- In the Add Assignment page, select none selected under Users and groups to open the pane to search your AAD users and groups.
- In the Users and groups dialog, search and find the required user or group from the list, then click the Select button at the bottom of the screen.
- Click Assign and the selected user or group will be shown.
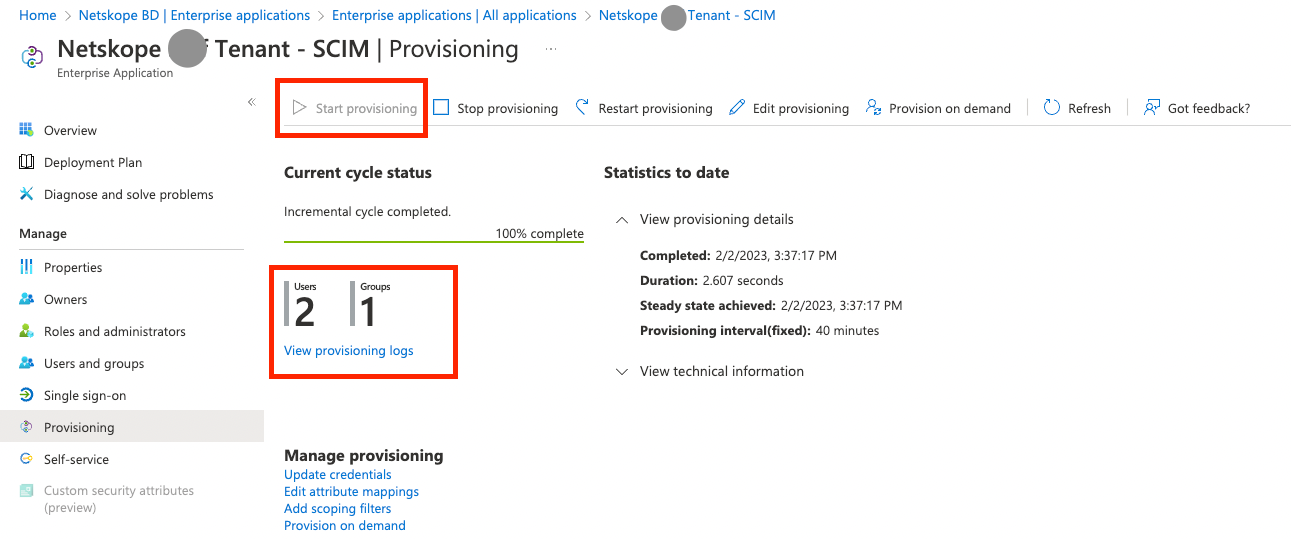
Step 5: Confirm Synchronization of the Users or Groups Provisioning
After the assignment of Users and Groups, you can start the provisioning process. To start the provisioning and monitor progress, perform the following steps.
- Navigate to Enterprise Applications and then select the application you just added.
- Click on Provisioning on the left navigation pane and then click Start Provisioning button. This operation starts the initial sync of the users or groups you are provisioning. The initial sync takes longer to perform than later ones. Syncs occur approximately every 40 minutes.
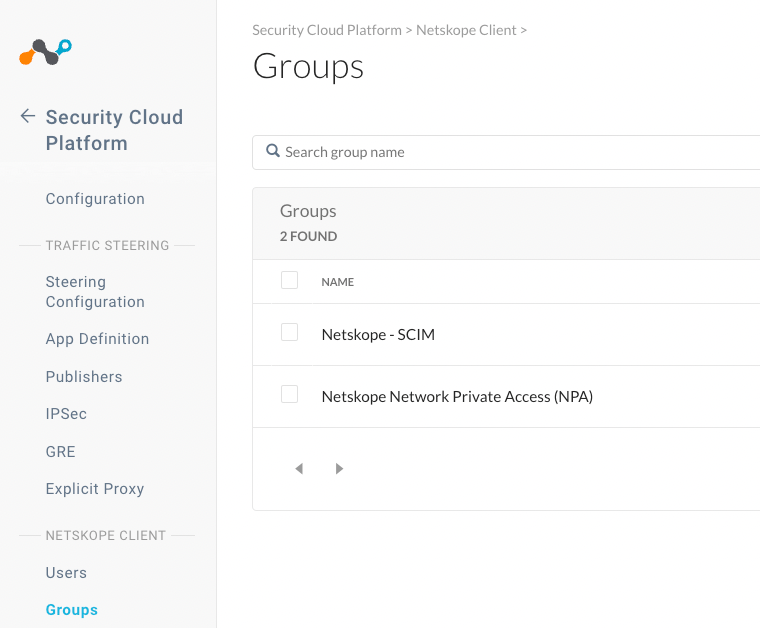
- You can confirm the AAD user and group provisioning from the Netskope Admin console as well. Login to the Netskope Admin Console or tenant instance using admin privileges. You can log in to your tenant instance in Netskope using the URL provided in the initial onboarding email sent from Netskope. For example, https://<tenant_name>.goskope.com
- Go to Settings > Security Cloud Platform > Users or Groups and confirm the AAD users are successful synchronized and now the AAD Users & Groups will be available for selection in Real-time Protection Policies.
Note: If an error prevents adding, updating, or deleting an individual user to Netskope, Azure retries the operation in the next sync cycle. To resolve the failure, administrators must check the provisioning logs to determine the root cause and take the appropriate action.
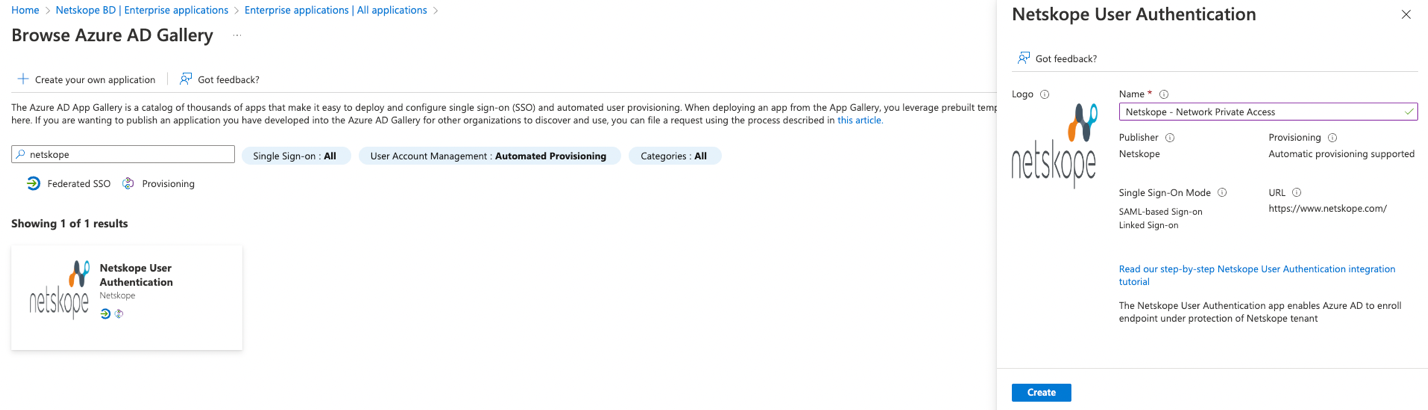
Step 6: Add Netskope Azure AAD Application (Netskope User Authentication) from Azure AD Gallery for SAML Authentication
The Netskope User Authentication AAD application has Federated SSO as well as Provisioning capabilities. You will use this app to configure SAML Authentication with Netskope to enable Netskope Private Access (NPA) for your AAD users or groups. Perform the followings steps to add the app:
- Sign into the Azure portal using either a work or school account, or a personal Microsoft account using admin privileges.
- On the left navigation pane, select the Azure Active Directory service.
- Navigate to Enterprise Applications and then select All Applications.
- To add new application, select New application.
- In the Add from the gallery section, type Netskope User Authentication in the search box.
- Select Netskope User Authentication from results panel, name the application e.g., Netskope - NPA and then click Create to add the app. Wait a few seconds while the app is added to your tenant.
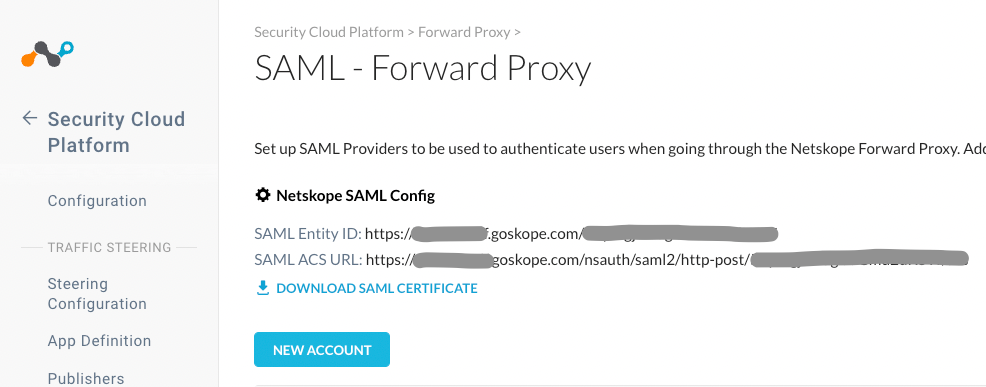
Step 7: Retrieve Netskope SAML Config
The Netskope SAML config will be used to configure Netskope Azure AAD Application (Netskope User Authentication) for SAML Authentication.
- Login to the Netskope Admin Console or tenant instance using admin privileges. You can log in to your tenant instance in Netskope using the URL provided in the initial onboarding email sent from Netskope. For example, https://<tenant_name>.goskope.com
- Go to Settings > Security Cloud Platform > Forward Proxy > SMAL
- Copy the following values to use in the later steps.
- SCIM Entity ID
- SAML ACS URL
Step 8: Configure Netskope Azure AAD Application (Netskope User Authentication) For SAML Authentication
The newly created Netskope User Authentication AAD application will be configured for SMAL Authentication with Netskope. Perform the followings steps:
- Navigate to Enterprise Applications and then select the application you just added for SAML authentication.
- Click on Overview on the left navigation pane and then click Single Sign On and then SMAL
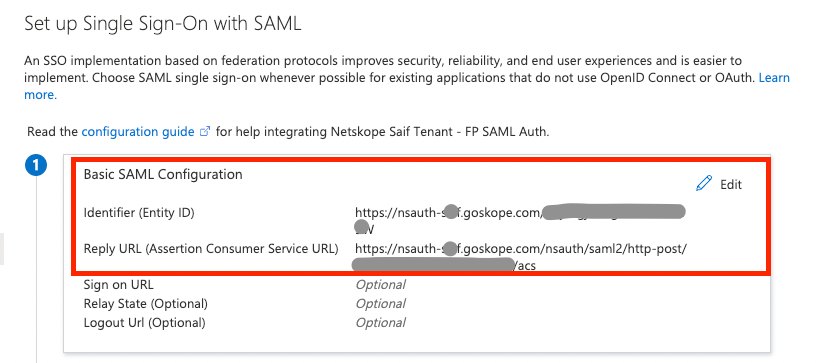
- On the Set up single sign-on with SAML page, click the pencil icon for Basic SAML Configuration to edit the settings.
- Enter Identifier (Entity ID) and Reply URL (Assertion Consumer Service URL) by referring to the values you retrieve from Netskope Admin Console. These values were copied in Step 8 i.e., enter SCIM Entity ID in the Identifier (Entity ID) field and SAML ACS URL in the Reply URL (Assertion Consumer Service URL) field.
- Click Save.
- Click No, I’ll Test later when prompted to test single sign-on.
- Select Edit under Attributes & Claims section and Delete all the Additional claims and only keep the Required Claim i.e., Unique User Identifier (Name ID).
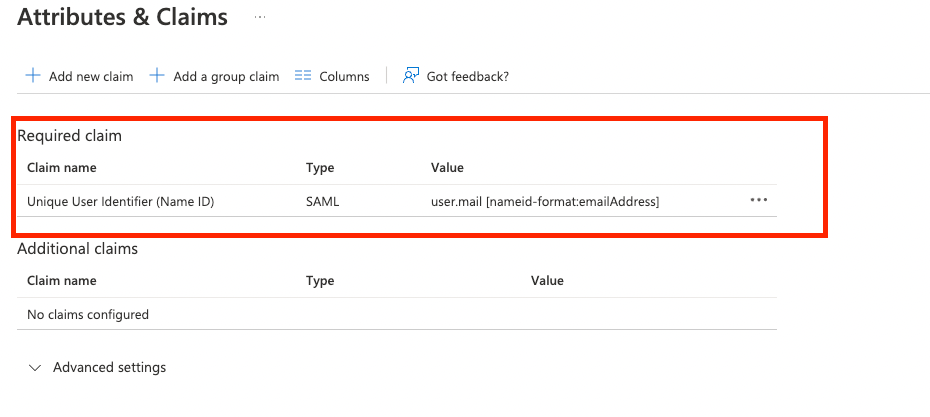
- Click on the required claim name i.e. Unique User Identifier (Name ID) field to edit and manage this claim then set the Source attribute as user.mail and then click Save.

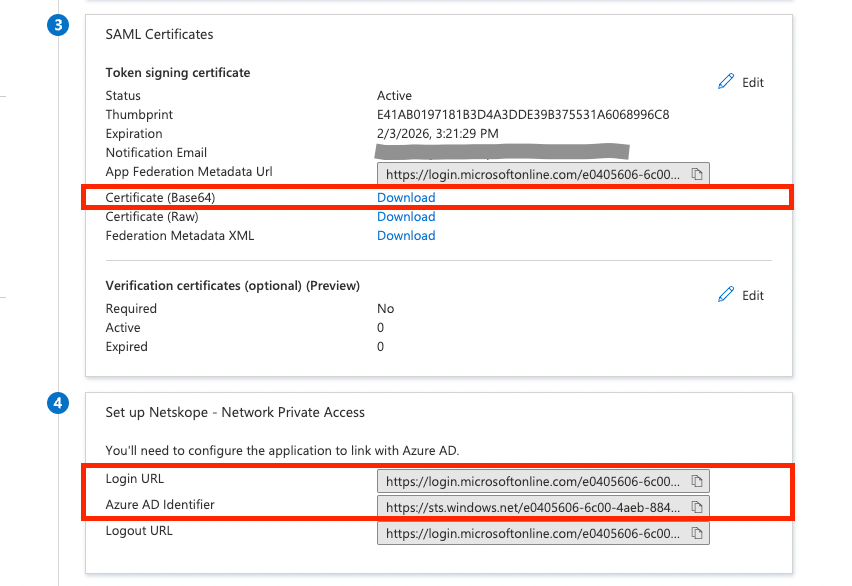
- Copy the following listed field values. These will be used to configure Netskope Forward Proxy - SAML settings page in the later steps.
- Login URL
- Azure AD Identifier
- Certificate (Base 64)
Step 9: Assign AAD Users to Netskope Azure AAD Application (Netskope User Authentication) for Network Private Access
Assign the newly created Netskope User Authentication AAD application to your AAD Users and Groups to enable access to Netskope Private Access. Perform the followings steps:
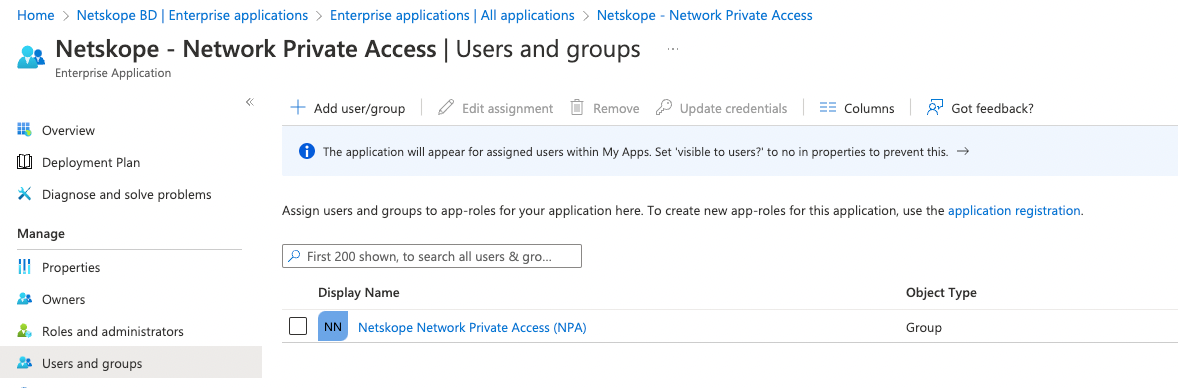
- Navigate to Enterprise Applications and then select the application you just added.
- Click on Users and Groups on the left navigation pane and then click Add user/group
- In the Add Assignment page, select none selected under Users and groups to open the pane to search your AAD users and groups.
- In the Users and groups dialog, search and find the required user or group from the list, then click the Select button at the bottom of the screen.
- Click Assign and the selected user or group will be shown.
Step 10: Setup AAD as SAML Provider in Netskope
Add Azure Active Directory (AAD) details to configure Netskope for AAD as a SAML Provider. Perform the followings steps:
- Login to the Netskope Admin Console or tenant instance using admin privileges. You can log in to your tenant instance in Netskope using the URL provided in the initial onboarding email sent from Netskope. For example, https://<tenant_name>.goskope.com
- Go to Settings > Security Cloud Platform > Forward Proxy > SMAL
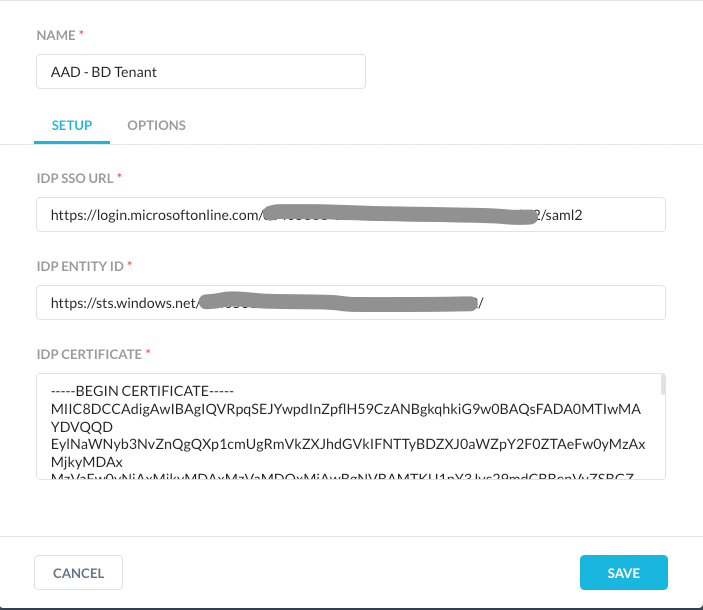
- Click New Account and enter the values for the following parameters.
- Name
- IDP SSO URL
- IDP Entity ID
- IDP Certificate
These values you copied in Step8 i.e., enter Login URL in the IDP SSO URL field, Azure AD Identifier in the IDP Entity ID and Certificate contents in the IDP Certificate field. You can open your Certificate (Base 64) downloaded file in notepad and then copy the content of it into your clipboard.
Step11: Configure Netskope for Forward Proxy SAML Authentication
Configure Netskope for Forward Proxy SAML Authentication with Azure Active Directory (AAD). Perform the followings steps:
- Login to the Netskope Admin Console or tenant instance using admin privileges. You can log in to your tenant instance in Netskope using the URL provided in the initial onboarding email sent from Netskope. For example, https://<tenant_name>.goskope.com
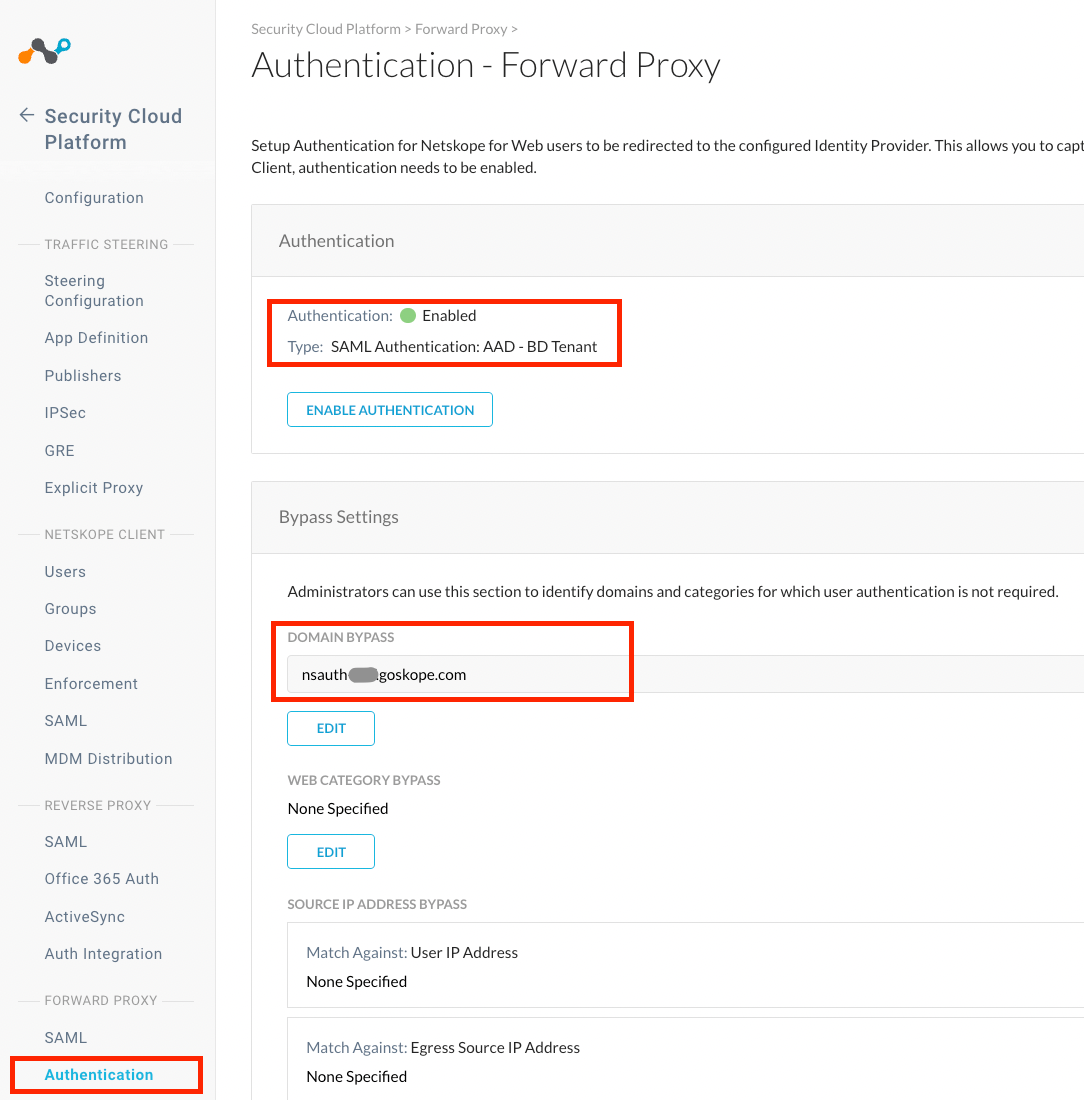
- Go to Settings > Security Cloud Platform > Forward Proxy > Authentication
- Click Enable Authentication and then turn on Enabled setting, select SAML Account from the dop down list, set Authentication Refresh Interval value and then click Save.
- Click Edit under Bypass settings and enter nsauth-<tenant name>.goskope.com to be bypassed for authentication. This is required to allow the domain bypass function to work otherwise the service that perform the “Domain Bypass” will also be blocked.
Step 12: Enable Periodic Re-Authentication with Network Private Access
The Netskope Client will prompt user to re-authenticate at a predefine interval with Azure Active Directory (AAD) to get access to private apps. Perform the followings steps:
- Login to the Netskope Admin Console or tenant instance using admin privileges. You can log in to your tenant instance in Netskope using the URL provided in the initial onboarding email sent from Netskope. For example, https://<tenant_name>.goskope.com
- Go to Settings > Security Cloud Platform > Netskope Client > Devices and click Client Configuration.
- Either use the Default tenant config that will apply to All users user group or optionally, add a New Client Configuration and apply to the specific AAD user group that has been assigned access to the Network Private Access.
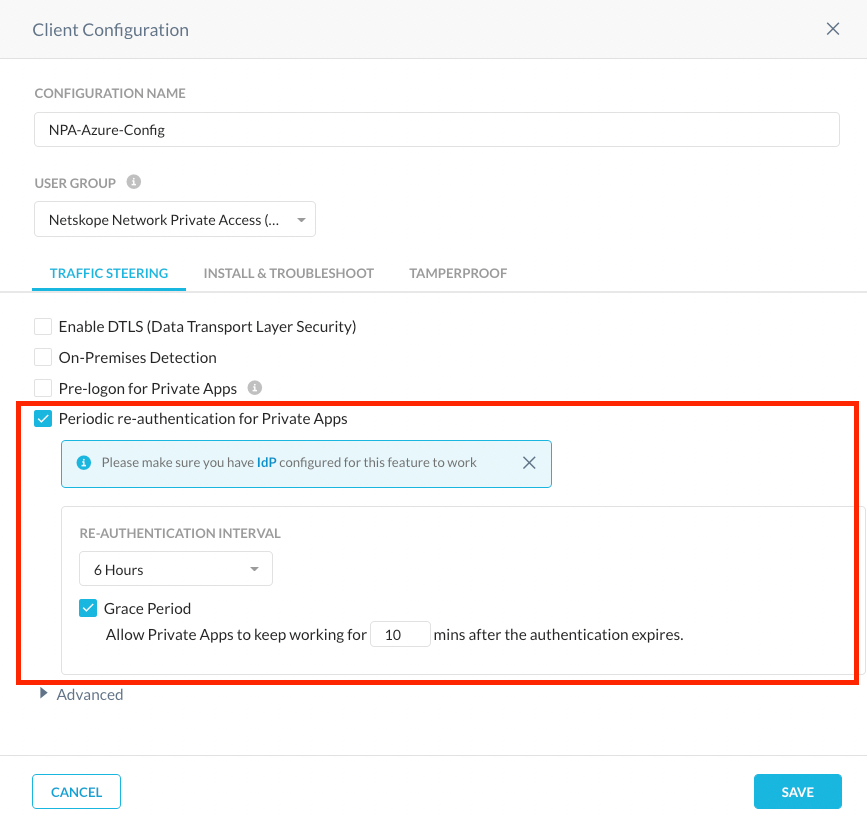
- Enter the values for the following parameters for the client configuration.
- Enable the Periodic re-authentication for Private Apps checkbox.
- Enter time value for the Re-Authentication Interval i.e., how often you want the user to be prompted for authentication.
- Enter time value for the Grace Period i.e., how much time is allowed to pass to re-authenticate after the specified re-authentication interval time has expired. The grace period must be less than the interval set for the Re-Authentication.
Step 13: Install Netskope Client in IDP Mode
The Netskope Client can be installed in multiple ways in IDP mode. For this tutorial, we will install Netskope client on a Window system using direct download from Netskope POP. Perform the followings steps:
- Login to the Window system with a user account that has admin privileges.
- Download the Netskope Client for Windows from your home POP using tenant URL. For example,
- https://download-<tenant name>.goskope.com/dlr/win/get
- https://download-<tenant name>.eu.goskope.com/dlr/win/get
- https://download-<tenant name>.de.goskope.com/dlr/win/get
- Install Netskope client using command prompt with this command.
msiexec /I NSClient.msi installmode=IDP tenant=<tenant name> domain=<goskope.com / eu.goskope.com / de.goskope.com> mode=peruserconfig
- Once installation is finished. The installer will prompt you for the Authentication with Azure Active Directory.
- Upon successful Authentication and validation of user in your Netskope tenant, the Netskope client will download the configuration files from the tenant.
- Right-click on the Netskope Client on the taskbar and then select Configuration to view enrollment details.
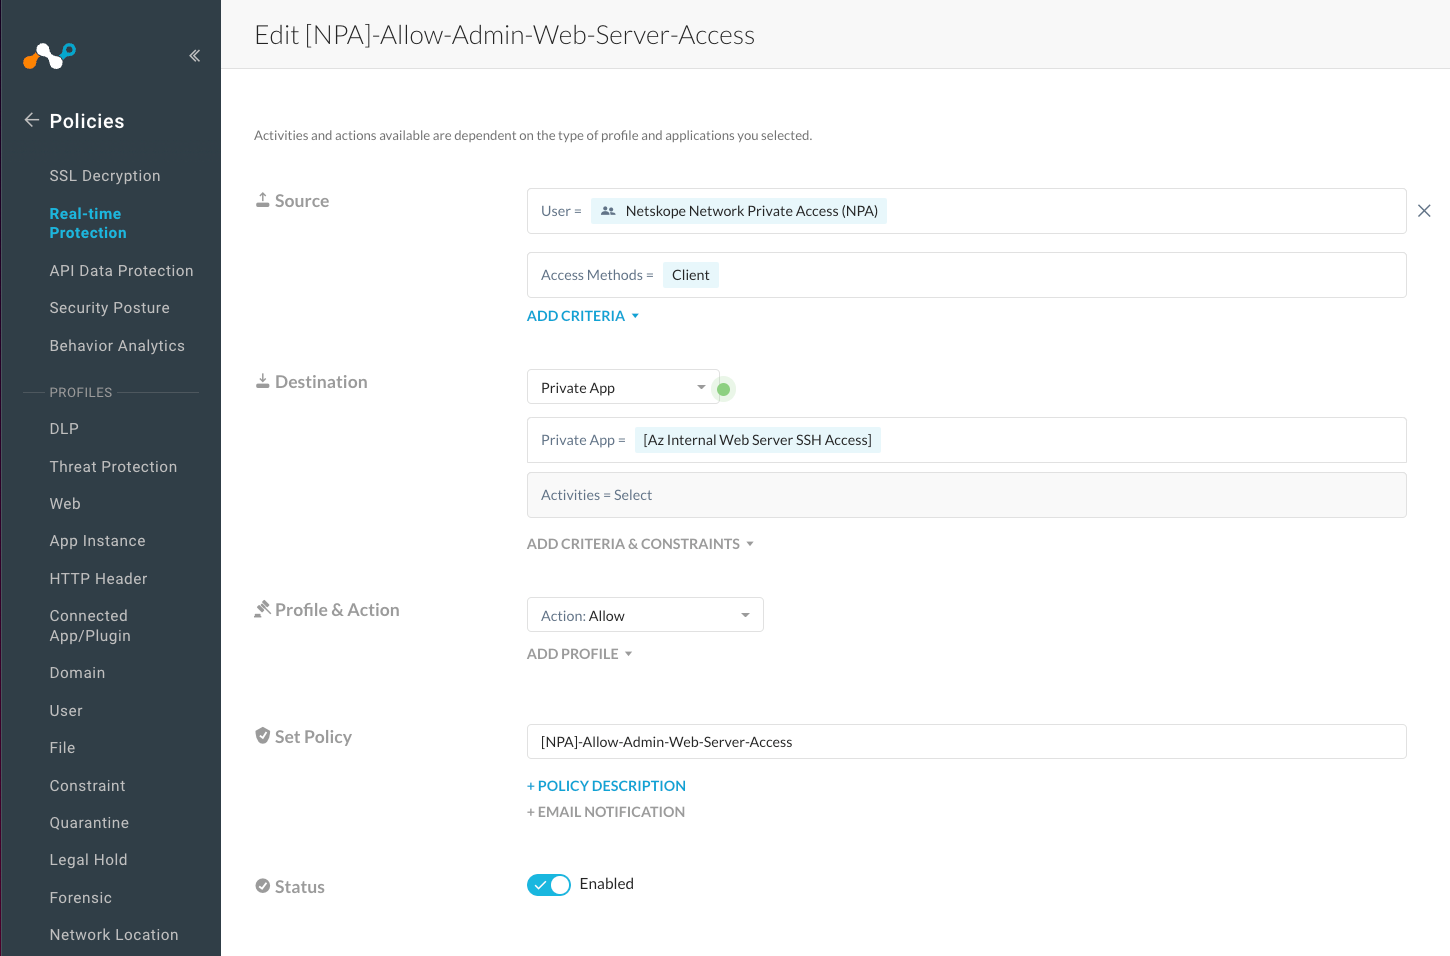
Step 14: Create Policy to enable Netskope Network Private Access
Create Netskope Real-time policy to enable access to private apps and verify authentication against Azure Active Directory before access to the private Apps is allowed. Perform the followings steps:
- Login to the Netskope Admin Console or tenant instance using admin privileges. You can log in to your tenant instance in Netskope using the URL provided in the initial onboarding email sent from Netskope. For example, https://<tenant_name>.goskope.com
- Go to Policies > Real Time Protection > New Policy and select Private App Access.
- Enter the values for the following parameters for the policy configuration.
- Source Select Azure AD Group that is configured for Network Private Access or an individual AAD user that needs access.
- Set Access Method as Client
- Set Destination as Private App
- Pick Private App from the list of Private Apps.
- Set Profile & Action to Allow
- Enter Policy Name.
- Set Status to Enable.
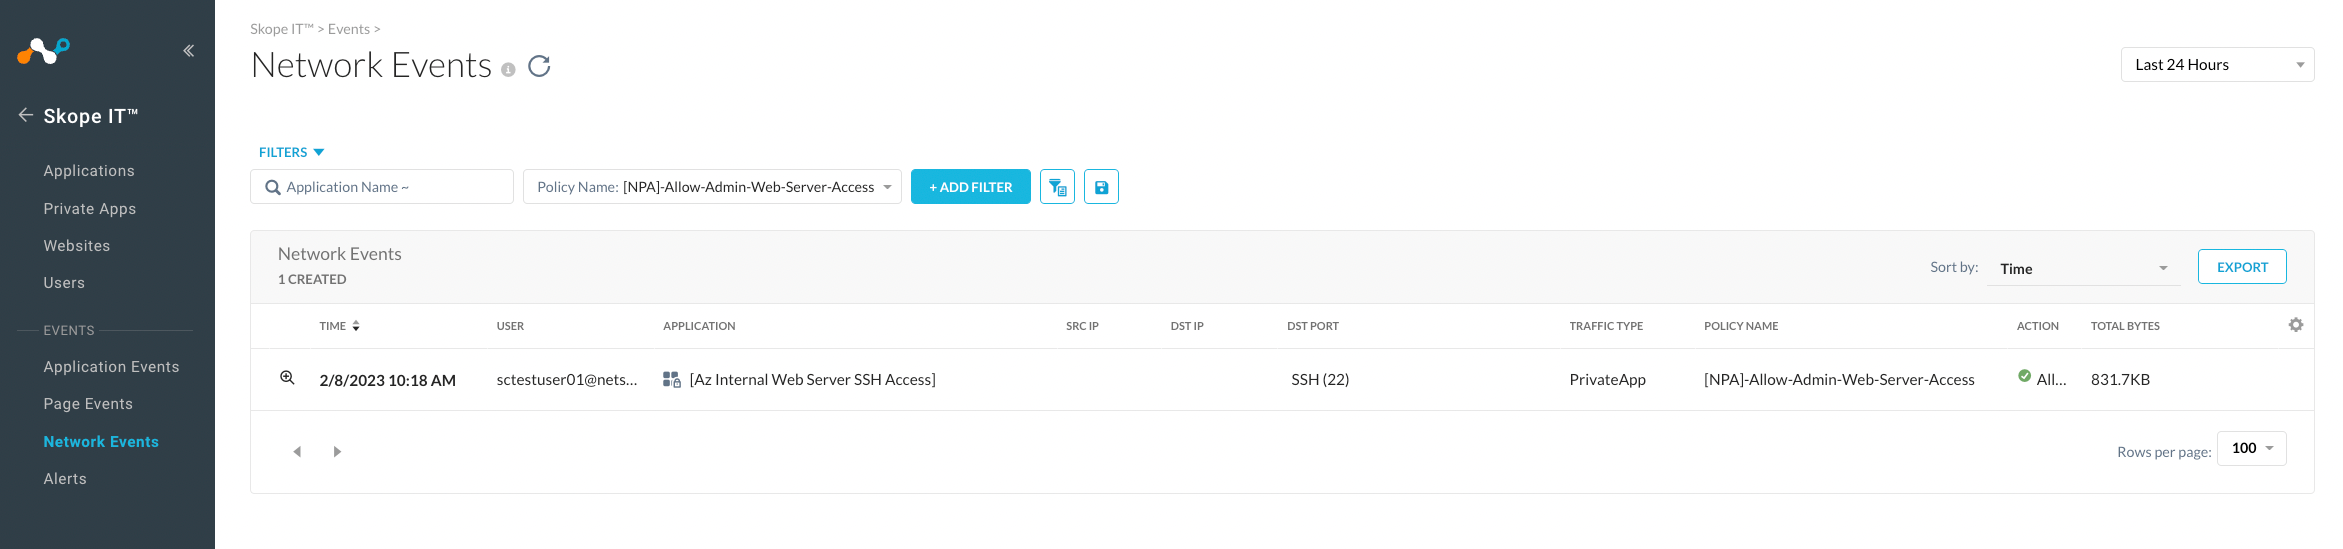
Step 15: Verify Private App Access Through Netskope Network Private Access
Verify Netskope Private Access and Azure AD Authentication by testing the access to the assigned Private App. Perform the followings steps:
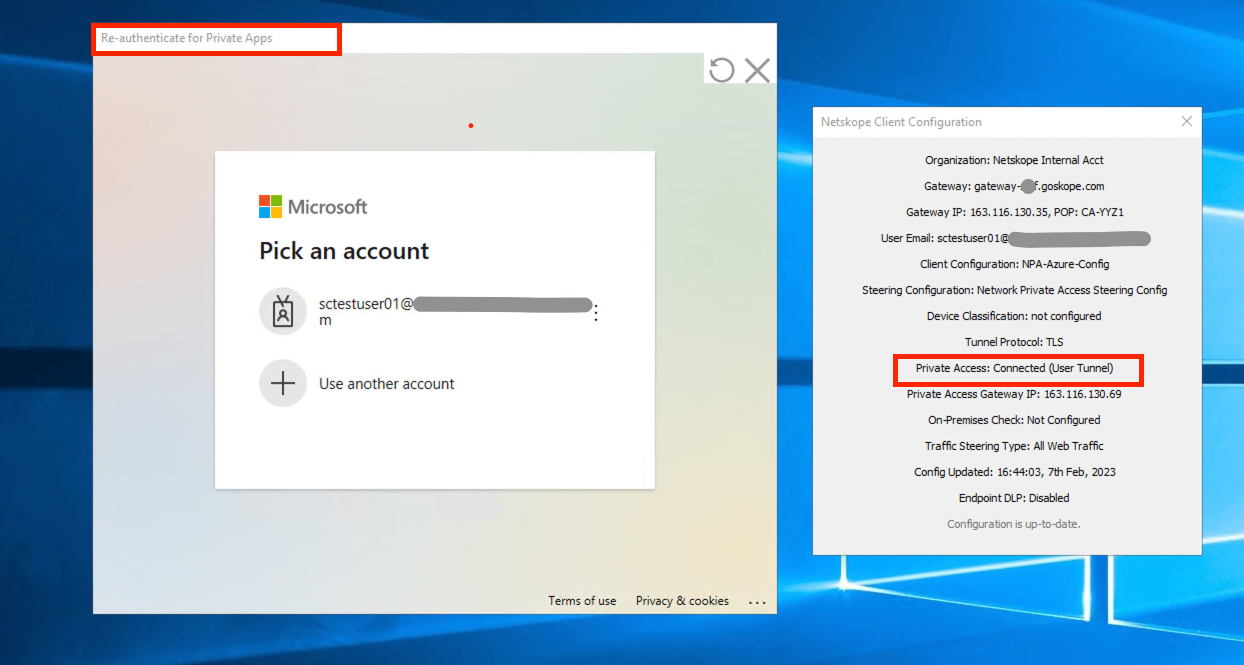
- Login to the assigned user desktop where Netskope Client is installed and enrolled.
- Access the assigned Private app and confirm access is working. For example, SSH into the remote system.
- Go to SkopeIT > Network Events Verify logs in Netskope Admin Console.
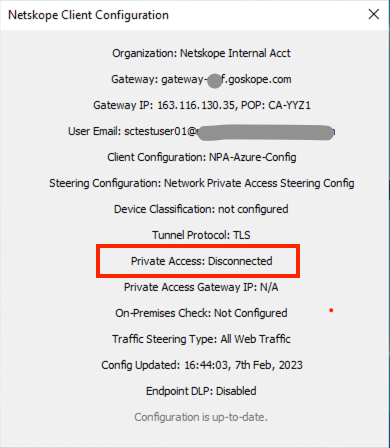
- Optionally, from Netskope Client menu click re-authentication to initiate re-authentication flow with Azure Active Directory (AAD).
Note; When the user is not authenticated or authentication time interval has expired, Netskope will disconnect the user from the Private access and user will be prompted to authenticate. The Client configuration will show Private Access status “Disconnected”.
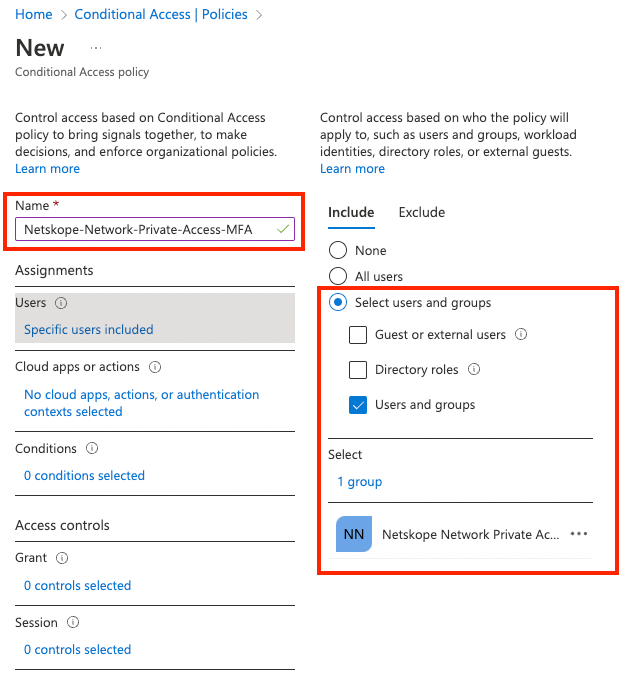
Step 16: Create Conditional Access Policy using Azure Active Directory (Optional)
Conditional Access policies can be applied to Netskope Network Private Access to enforce right levels of access to the users who needs it e.g., we can create Conditional Access policy to prompt for MFA when a user signs and request access to the Netskope Private Access. Perform the followings steps:
- Sign into the Azure portal. Search for and select Azure Active Directory. Then select Security from the menu on the left-hand side.
- Select Conditional Access, select + New policy, and then select Create new policy.
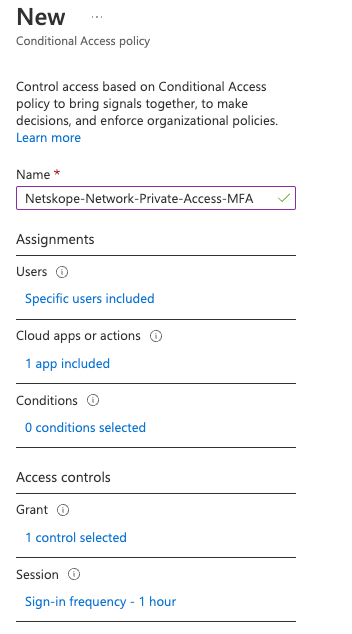
- Enter a Name for the policy, such as Netskope-Network-Private-Access-MFA.
- Under Assignments, click Users and groups selected.
- Under Include, click on Users and groups and then select Users and groups and then browse for and select your Azure AD group created for Netskope Private Access, then choose Select.
- Select the current value under Cloud apps or actions, and then under Select what this policy applies to, verify that Cloud apps is selected. Under Include, choose Select apps.
- Browse the list of available cloud apps and then select the Cloud Apps i.e., Netskope Azure AAD Application (Netskope User Authentication) for Network Private Access.
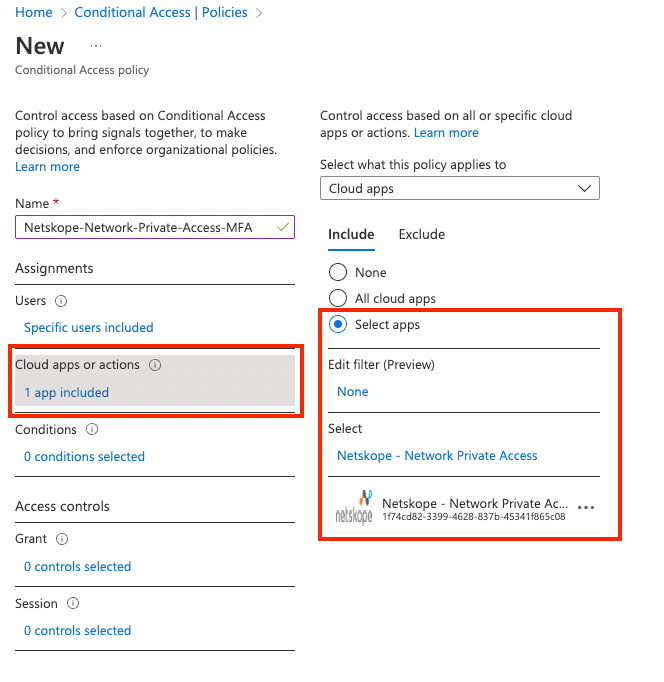
- Browse the list of available cloud apps and then select the Cloud Apps i.e., Netskope Azure AAD Application (Netskope User Authentication) for Network Private Access.
- Under Access controls, select the current value under Grant, and then select Grant access and enable Require multi-factor authentication.
- Under Session, select the current value and then select Sign-in Frequency and set time value for the Periodic reauthentication.
- Under Enable policy, select On and then select Create.
- Use verifications steps listed in Step 15 and confirm the Conditional Access Policy is working as intended. Since you have configured the Conditional Access policy to require additional authentication for the Azure portal. Because of that configuration, now Netskope Private Access will prompt the user for Azure AD Multi-Factor Authentication before enabling access to Private Apps.
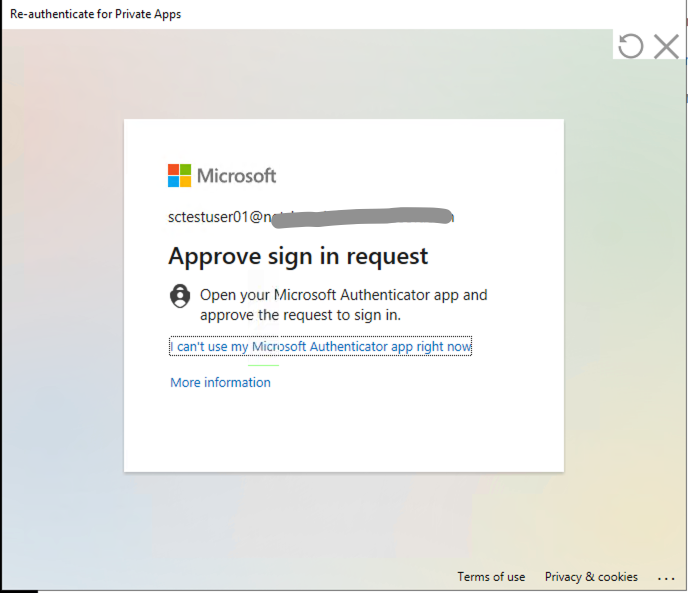
Note; If the user is not registered with Mutli-Factor Authentication, he will be prompted to configure one the first time he authenticates.
that's it folks, it was a long post.


