I was on my way to airport when a colleague of mine message me asking for help with the traffic routing in Azure as he was having issue and didn’t know where the problem was. It was a minor issue and few messages back and forth during my Uber ride and he was off to the races. The fact that he has a sharp mind makes explaining very easy. However, his query triggered the idea for creation of this post i.e., traffic steering option understanding from Azure to Netskope.
The first thing I like you to understand is that we can classify traffic into two groups:
- Machine Traffic: Think “Infrastructure-as-a-Service (IaaS)” where applications and systems running on Azure Virtual Machines are generating traffic.
- User Traffic: Think “Desktop-as-a-Service (DaaS)” where users are using Azure Virtual Machines in Azure as their desktop whether it’s an Azure Virtual Desktop or Windows 365 Desktop offering.
You can integrate Azure and Netskope in multiple ways for both type of traffic groups. In this post I will cover the first type of traffic group.
There are two options you have when it comes to this traffic group. However, before I get into these options, let’s do a refresher on some “concepts” – I am a firm believer of “Read before you do hands-on” so continue reading my post and hit the like, share and the subscribe button…! That was my shameless self-promotion attempt – if it makes any difference, it has no monetizing value for me. Okay, you got me, it’s not directly but perhaps in-directly.
In Azure, when you create a virtual network and create subnets, azure reserve 5 IP’s from the subnet address space the first 3 and the last 2. The first IP address of each subnet’s address space becomes subnet’s default gateway. In addition, Azure automatically creates system routes and assigns the routes to each subnet in a virtual network. You can't create system routes, nor can you remove system routes, but you can override some system routes by using a concept called “User Defined Route (UDR)”. If you deploy a virtual machine in Azure and it doesn't have explicit outbound connectivity, it's assigned a default outbound access IP so unless you stop outbound access by other “explicit” means – your VM has access to the internet because when a subnet is created, Azure creates a default route to the 0.0.0.0/0 address prefix, with the “Internet” next hop type. If you don't override this route, Azure routes all traffic destined to IP addresses not included in the address prefix of any other route (e.g., route for virtual network itself, peer virtual networks) to the Internet.
When it comes to topology and network design, Microsoft Cloud Adoption Framework and Azure landing zone guide you towards a “hub-and-spoke” model i.e., you will enable various connection points from the central hub, whether it’s a connection to internet or to your data centers through private connectivity or for a spoke-to-spoke connectivity. Inside the hub you will have your network virtual appliances (NVA’s) or other networking services from Azure e.g., VPN gateway or Express Route Gateway. Your workload will be running in the spoke’s virtual networks and each spokes virtual network will be “peered” with hub virtual network. Think, peering as seamlessly way to connect two or more Virtual Networks in Azure. The virtual networks appear as one for connectivity purposes.
We got the important basic building blocks out of the way for this topic so now let’s discuss the two options when it comes to machine traffic steering from Azure to Netskope.
To make things simple for this post, let’s agree on two things, you are doing the recommended network architecture and topology i.e., hub-and-spoke and decided to use Azure native VPN solution i.e., Azure VPN gateway – It will save me creating various permutation of the diagram and it’s an easy button vs a full blown third party NVA 😊
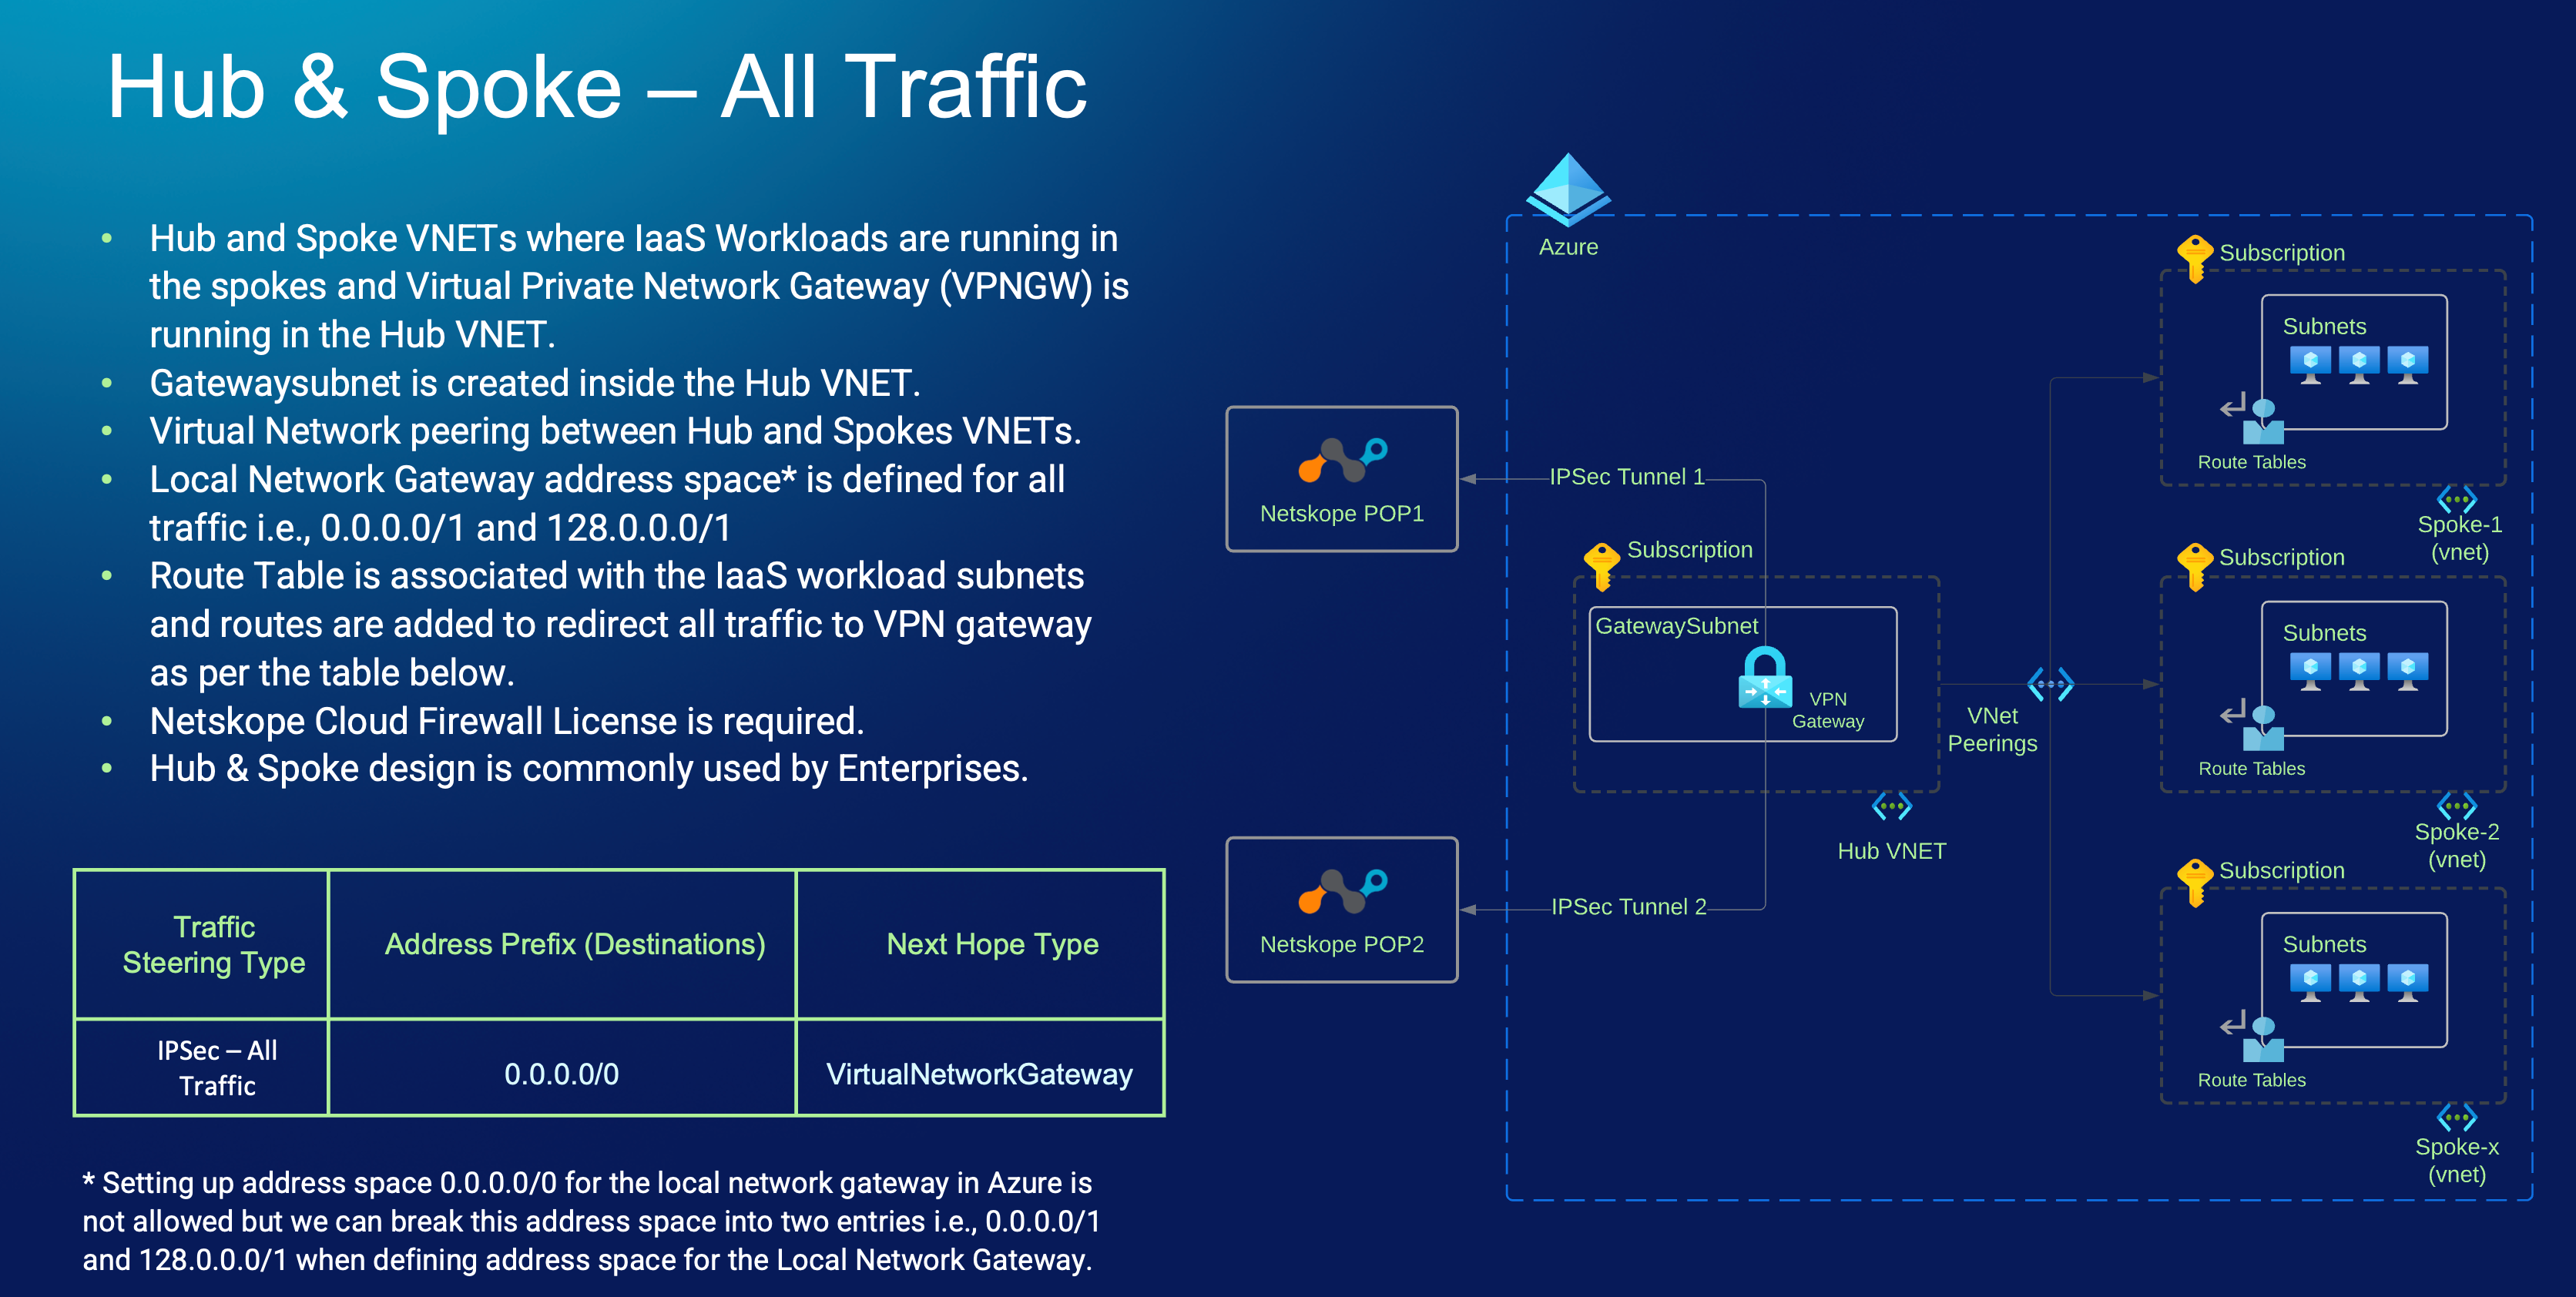
IPSec Tunnels to Netskope to Send All Traffic
To send both HTTP(s) and non-HTTP(s) traffic (i.e., All traffic) to Netskope, first you will need to have Netskope Cloud Firewall License. You will than configure IPSec tunnels from your VPN device e.g., Azure VPN Gateway or any IPSec compatible third-party Network Virtual Appliance (NVA) to Netskope POPs that is close to your selected Azure region. For example, if your workloads (IaaS) virtual machines are running in Canada Central region then logically you can pick Toronto as your Netskope Primary PoP. To represent each PoP inside Azure, you’ll be defining them as “local network gateway” object and also define an address space. It’s important to understand that for all traffic use case, Azure does not support 0.0.0.0/0 unless it’s advertised over BGP. To overcome this, we can break this into two address space e.g. 0.0.0.0/1 and 128.0.0.0/1. The rest of the configurations is standard, like shared secret, crypto policy etc.
This traffic steering is kind of transparent to your workloads (IaaS) virtual machines since you won’t have to touch them or make any changes to your workload. From the Virtual machine and application running on them perspective it will just a standard default gateway as an “exit point” and then by leveraging the “UDR” concept we discussed earlier you will be overriding the next hop type from “Internet” to either an “Network Virtual Appliance” or “VirtualNetworkGateway” depending on what you decide to use to establish these IPSec tunnels.
It's also important to understand that depending on your VPN device that you are using for IPSec tunnels establishment with Netskope you can also create exceptions on what type of traffic is sent through the IPSec tunnel to Netskope e.g., you can send all traffic to Netskope but decide not to send VoIP traffic.
This is how it will look from a high-level design perspective by keeping in mind our agreed upon two points!

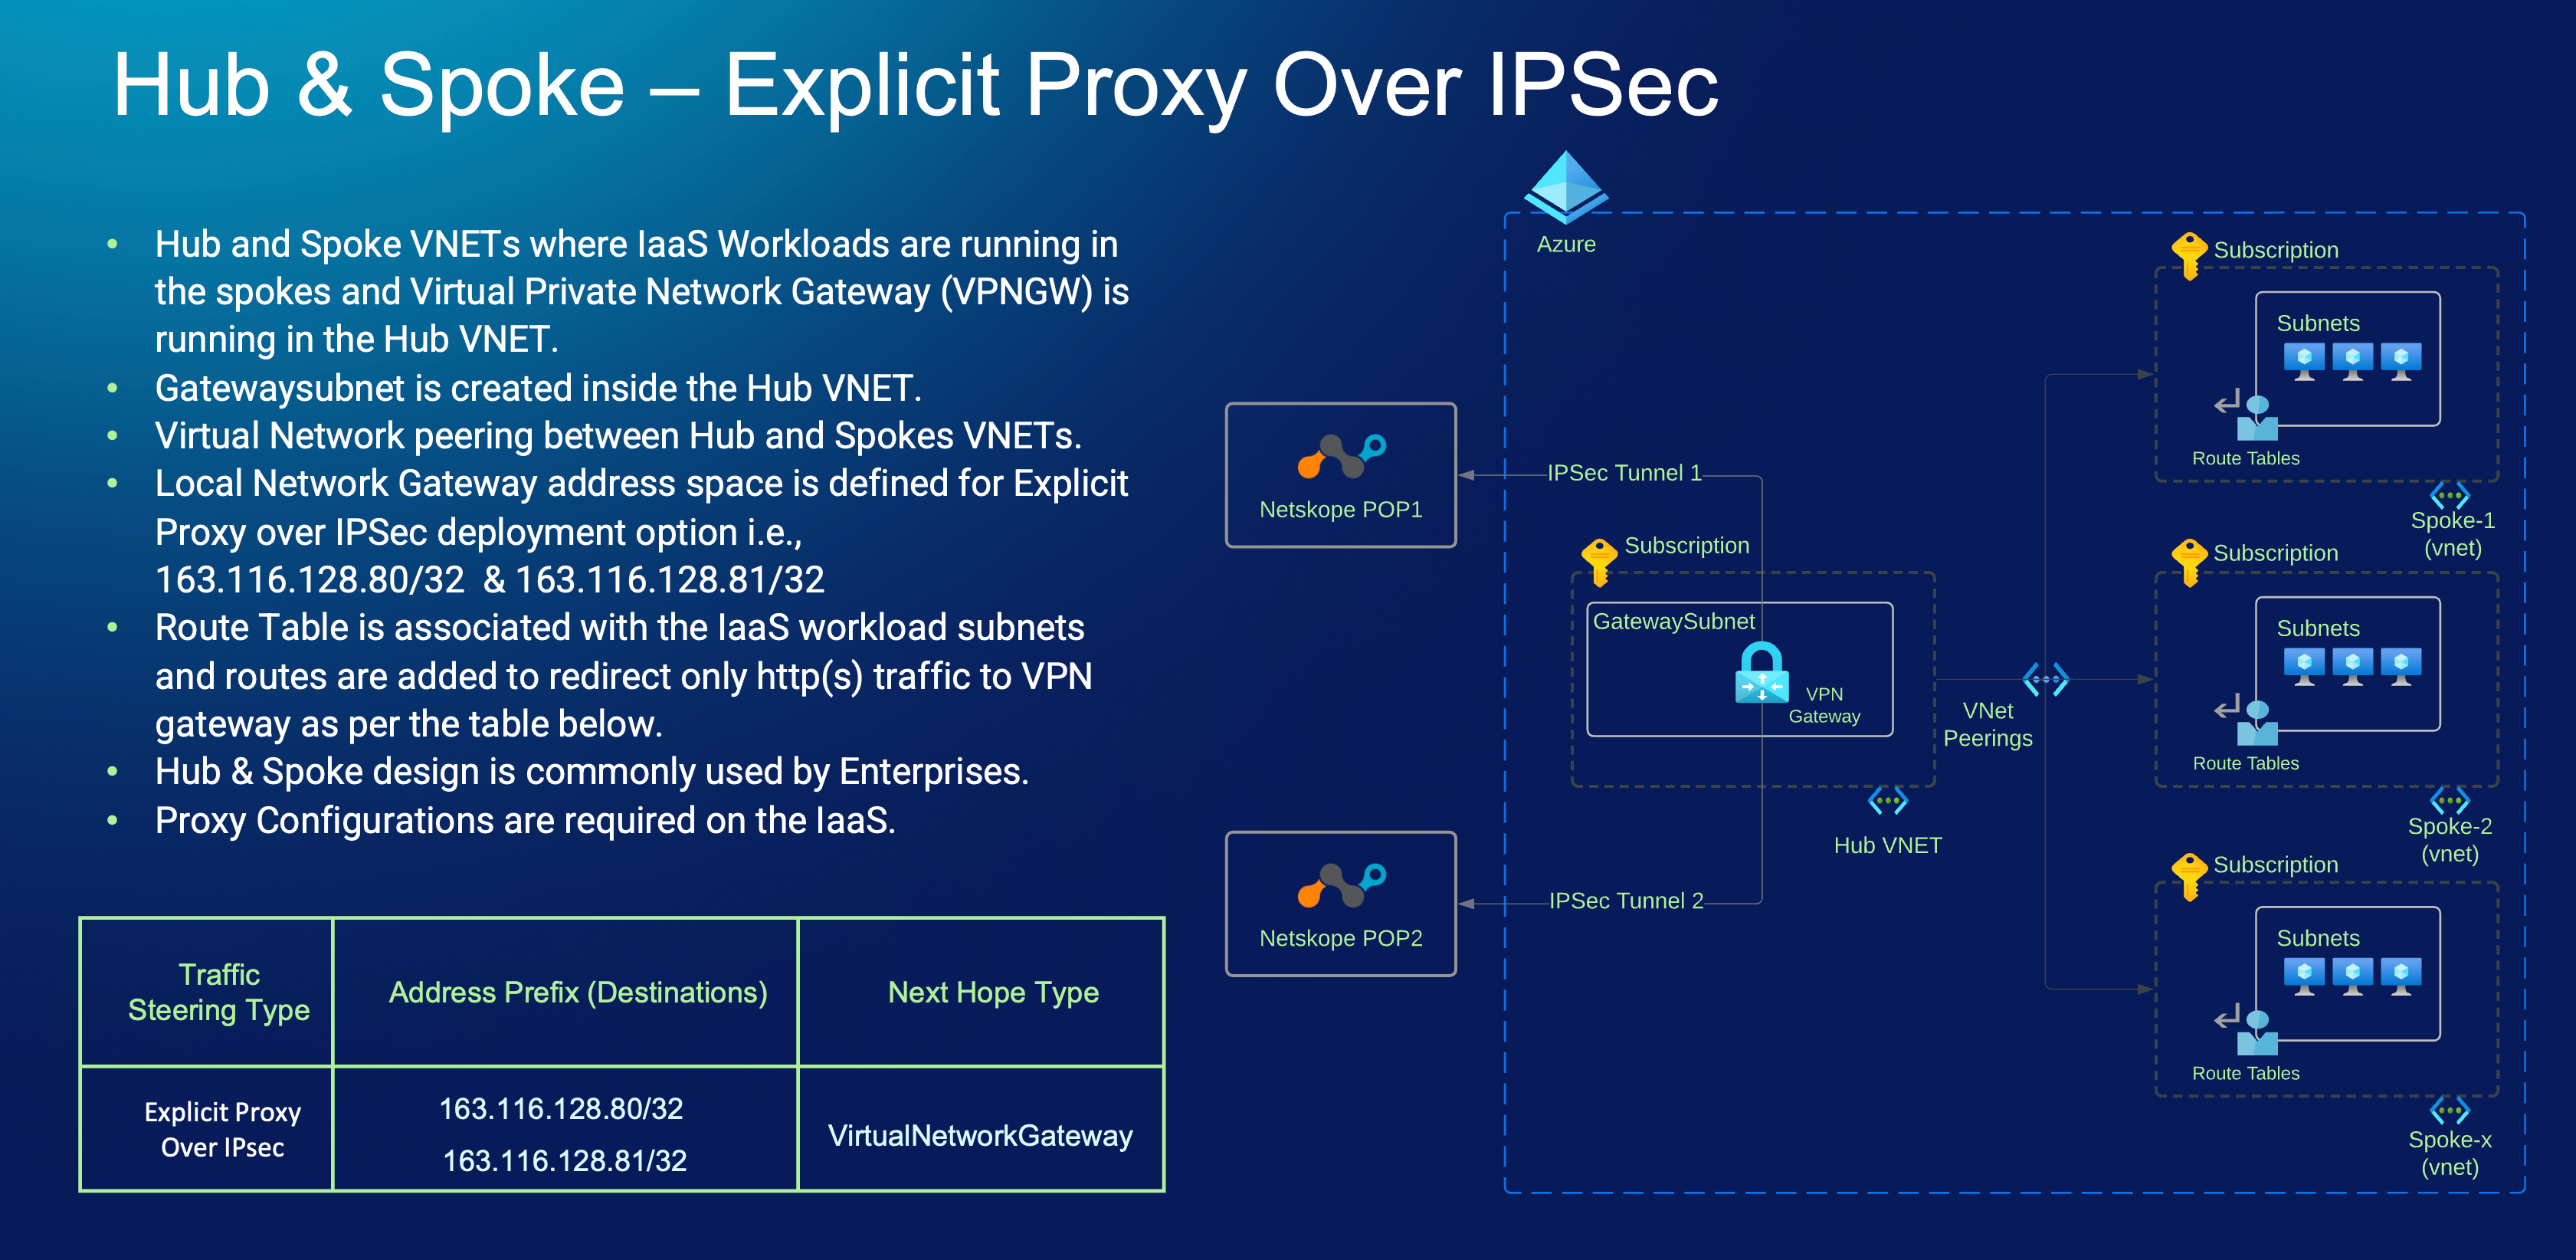
Explicit Proxy Over IPsec Tunnels to Send only HTTP(s) Traffic.
Explicit Proxy over IPSec is browser-centric traffic steering mechanism, and you will have to use an existing or new PAC file, or manual proxy settings for your workloads (IaaS) virtual machines. You will than configure IPSec tunnels from your VPN device e.g., Azure VPN Gateway or any other third part Network Virtual Appliance to Netskope POPs that is close to your Azure region e.g., If your workloads (IaaS) virtual machines are running in Canada Central region then you can pick Toronto as your Netskope Primary PoP. To represent each PoP inside Azure, you’ll be defining them as “local network gateway” object and also define an address space. For this traffic use case, you will use the two addresses 163.116.128.80/32 and 163.116.128.81/32. The rest of the configurations is standard, like shared secret, crypto policy etc.
The difference between the first option and this one is that this traffic steering is not transparent to your workloads (IaaS) virtual machines since you rely on the proxy configurations to be in place however for this option, you don’t need Netskope Cloud Firewall License. You will be adding two new routes to the route table using “UDR” concept we discussed earlier, please note you will not be overriding the next hop type from “Internet” to either an “Network Virtual Appliance” or “VirtualNetworkGateway” instead you will be adding two “new” routes based on the values set in the proxy configuration i.e., all http(s) traffic use 163.116.128.80/32 and 163.116.128.81/32.
This is how it will look from a high-level design perspective by keeping in mind our agreed upon two points!

I think that covers it…. at the high level this is what you will do to do traffic steering from Azure to Netskope:
- Deploy Azure VPN Gateway
- Create IPSec Tunnels for the use case (all traffic vs http(s) only)
- Add Proxy configurations (only for http(s) traffic steering use case)
- Add User Defined Routes based on the use case (all traffic vs http(s) only)
To help you with the #1 and #2 steps. I have good news, anything that you provision in the cloud can be automated using “Infrastructure as Code” and I have a terraform code for you to leverage that is available at.
Traffic Steering to Netskope Using Azure VPN Gateway with Terraform Code
It comes with readme file and with step-by-step instructions and the big plus you don’t have to master bunch of things since it will all be taken care for you.
Here is a video walkthrough of this deployment using IaC.
At least give it try, after all if you not even trying is not fair to the “skinny jeans and laptop stickers club”. To set the record straight, I’ve nothing against skinny jeans or the laptop stickers 😊 but I must admit I don’t like putting stickers on my laptop because for that I got my little one who never miss an opportunity to put stickers everywhere – In her mind, my primary purpose to attend IT conference is to collect stickers!


