Overview
Forward Proxy Authentication (FPA) ensures secure access to cloud applications by requiring SAML-based authentication via an intermediary server that allows organizations to enforce granular authentication policies. Netskope’s FPA allows integration of multiple Identity Providers (IdPs) based on criteria like access methods (IPsec, GRE, Cloud Explicit Proxy, NS Client Enrollment) and network location, enabling flexible and secure user authentication management. Organizations can maintain existing SAML setups while utilizing Netskope’s enhanced authentication features, supporting multiple concurrent IdPs to match specific conditions for robust security and control.
Configuration in PingOne
-
Login to the PingOne Admin Console.
-
Navigate to Applications > Application Catalog.
-
Search the Application Catalog for Netskope Client Enrollment and click + Add Instance.
-
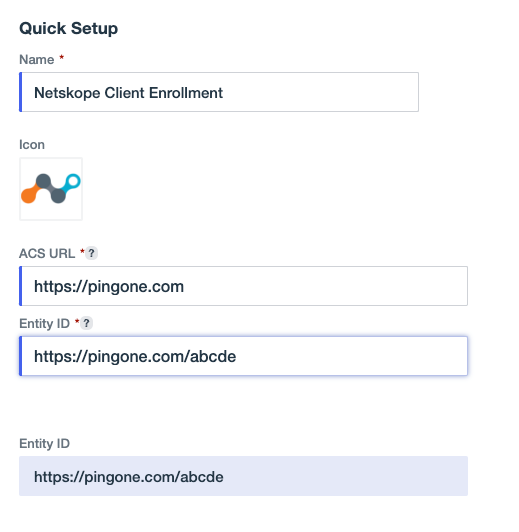
Enter temporary values into the ACS URL and Entity ID fields, like
https://pingone.comandhttps://pingone.com/abcde. -
Select Next.
-
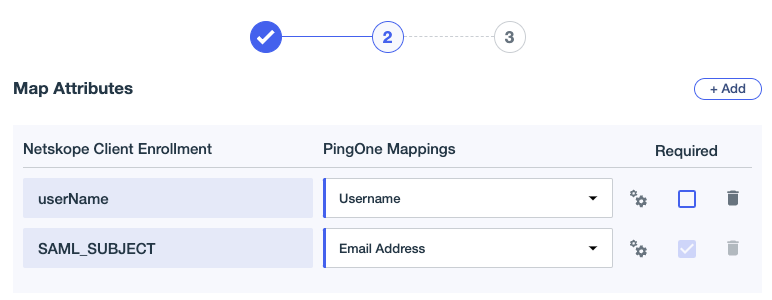
Leave the attribute mapping as the default.
-
Select the appropriate group(s) for access.
-
Click Save.
-
n the PingOne console, go to Applications > Netskope Client Enrollment > Configuration
-
On the Configuration tab, copy the Single Signon Service URL and store in a text editor.
-
From the Configuration tab, copy the Issuer ID URL and store in a text editor.
-
Download the signing certificate X509 PEM (.crt).
Configuration in Netskope
-
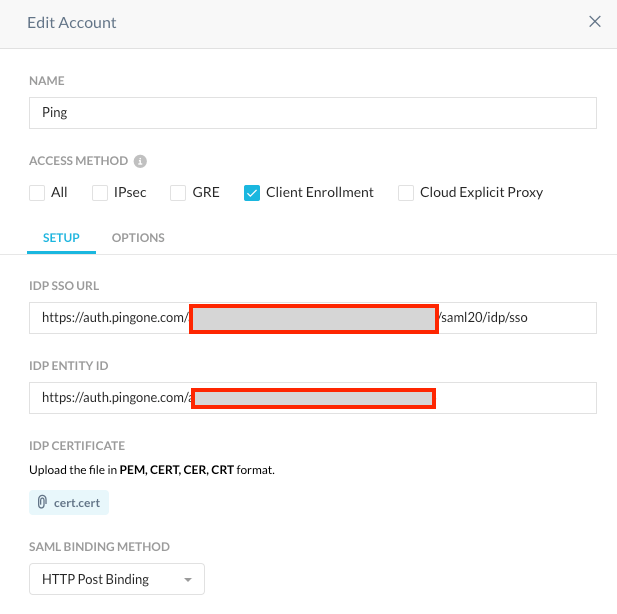
In the Netskope Administrator console under Settings > Security Cloud Platform > Forward Proxy > SAML and click New Account.
-
Enter a name.
-
Select the Access Method, like Client Enrollment or All..
-
Paste the Single SignOn Service URL copied from PingOne into IDP SSO URL
- Paste the Issuer ID URL copied from PingOne into IDP Entity ID
- Upload the signing certificate to IDP Certificate.
-
Under Status, Enable this account.
-
Click Save.
-
Click on the Netskope Settings button next to the account you just created, and then copy the SAML Proxy ACS URL and SAML Entity ID fields.
-
In the PingOne console, navigate to Applications > Netskope Client Enrollment > Configuration.
-
Click the edit button.
-
Replace the ACS URL with the SAML Proxy ACS URL copied from Netskope.
-
Replace the Entity ID with the SAML Entity ID copied from Netskope.
-
Ensure the Netskope Client Enrollment App is enabled in PingOne

Validate SAML Connection
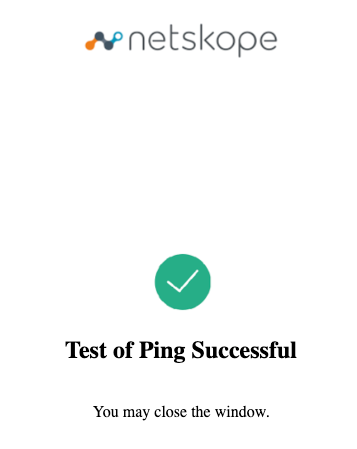
- Navigate to Settings > Security Cloud Platform > Forward Proxy > SAML
- Click the Configuration button next to the Certificate Expire Date.
- Select Test.
- Login with an account that is assigned to your Netskope Client Enrollment App
- Test should be successful