

A Security Practitioner's Perspective
This article will walk you through the setting up of Reverse Proxy(RProxy) for Salesforce (SFDC) using Okta as the Identity Provider (IDP). There are RProxy limitations which should be noted as it will greatly affect its use within the organization and subsequent effective use within Real-Time Policies (RTP). For example, RProxy might appear to function correctly but activities with desktop applications might be restricted or bypass RProxy altogether.
Since RProxy is meant to provide another real time steering method for machines or devices which do not have the Netskope client enabled, it is imperative to understand its limitations and plan accordingly.
Additionally, RProxy should be implemented as the last method of deploying other real time access methods since it sits between the IDP and the application. The exception to this is implementing RProxy as a Service (RPaaS). RPaaS is an application that sits in an SaaS service that also has a built in IDP.
Applications Supported in RProxy
Please see the following for a list of applications that are supported. https://support.netskope.com/s/article/Applications-supported-with-Reverse-Proxy
Implementation Steps
- Disable Re-Sign SAML Assertions.
- Create a Salesforce RProxy SAML application in the Netskope tenant.
- Use Postman to alter the SAML ACS URL inside Okta to point to Netskope via API request to modify the Okta App configuration to override the endpoint URL.
- Test access to the SFDC application in Okta with and without the Netskope Client Enabled.
Prerequisites
- Administrative access to Okta.
- A working connection between SFDC and Okta needs to be confirmed that it is working. THIS is necessary due to the intricacies of trying to configure RProxy when it is not working. While not impossible it is painful!
- Application similar to or capable of the functions that Postman performs with respect to API functions.
- Delegated Admin and Tenant Admin level of access to the Netskope Tenant.
- Web browser on a machine which has the Netskope Client disabled or not installed. The machine may have the Netskope Client running; however, tamper proof options should not be turned on for testing purposes.
Reverse Proxy Configuration
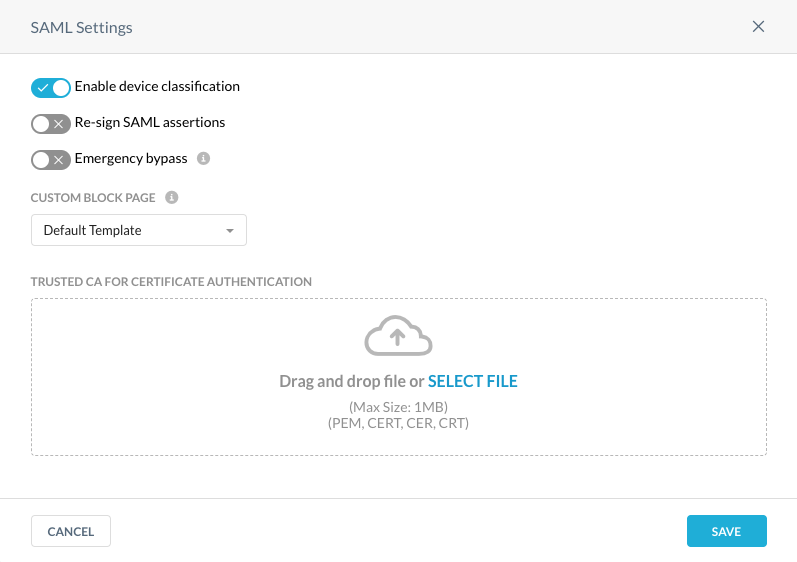
Disable Re-Sign SAML Assertions
- Login to the Netskope tenant and go to Settings.
- Go to Security Cloud Platform, Reverse Proxy, and SAML.
- Click on the Settings button located on the right-hand side of the page. The SAML Settings window will appear.
- Use the toggle to disable Re-Sign SAML Assertions.
- Click Save.
Create a SAML RProxy Application
This step will create the SAML RProxy application in the Netskope tenant. Configuration information from Salesforce is necessary to complete this step.
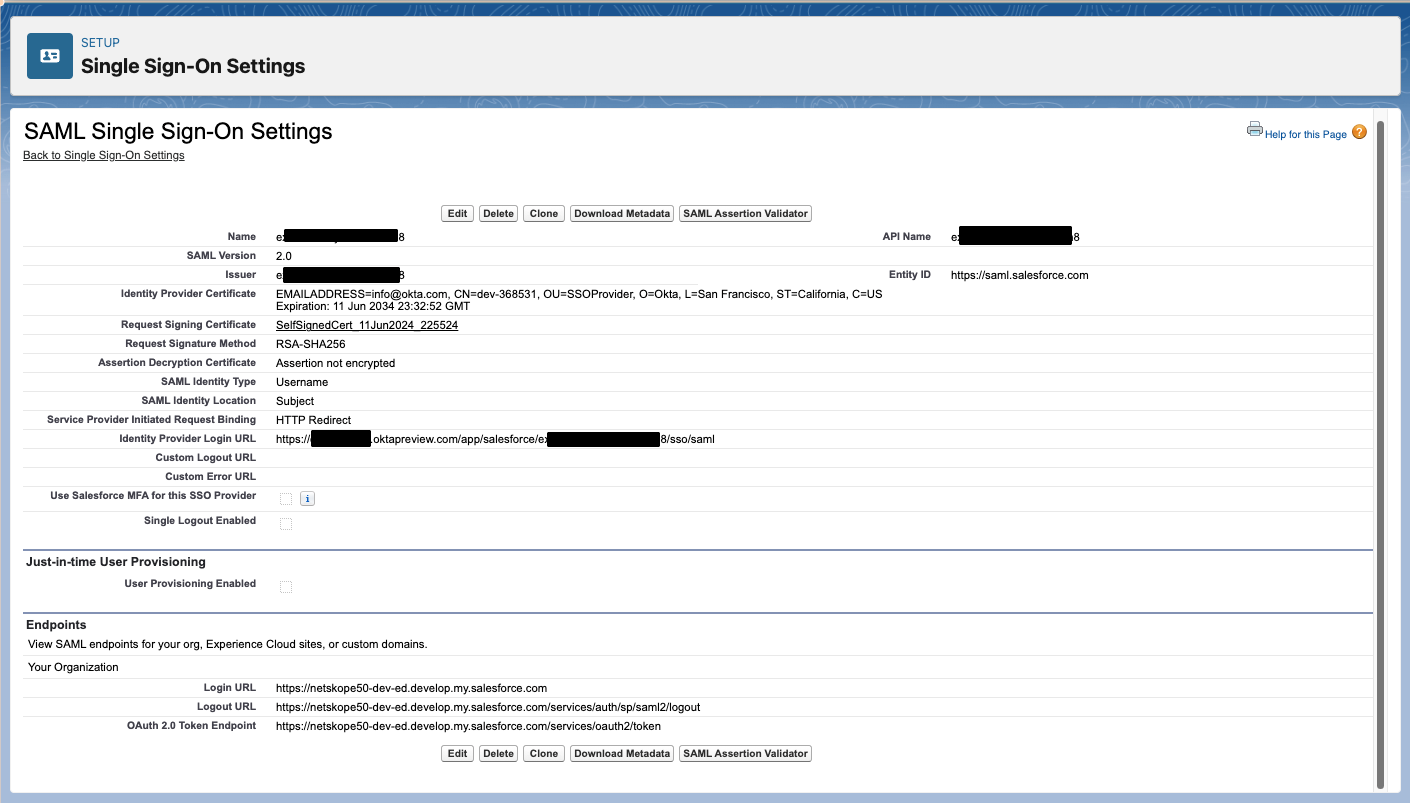
- Login to Salesforce and navigate to Settings, Identity, Single Sign-On Settings.
- Copy the Identity Provider Login URL and the Endpoint Login URL.
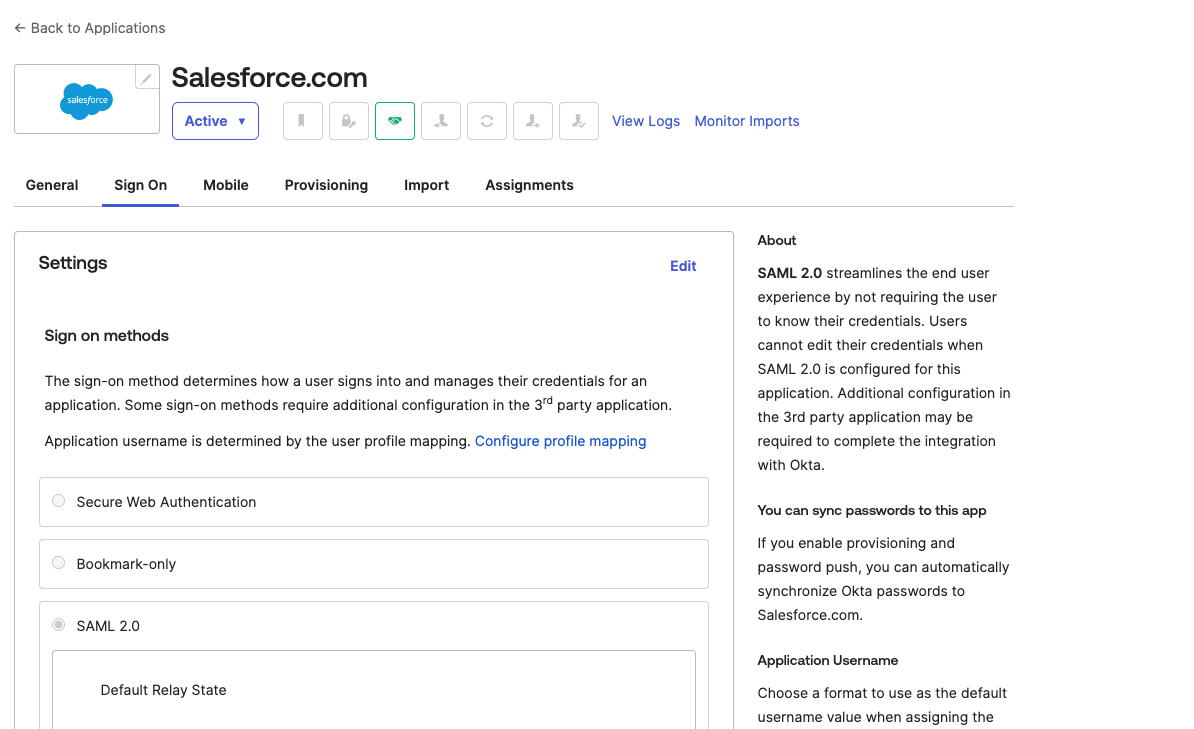
- Login to Okta and navigate to the Salesforce application. Open the Okta application. The application configuration page will be displayed.
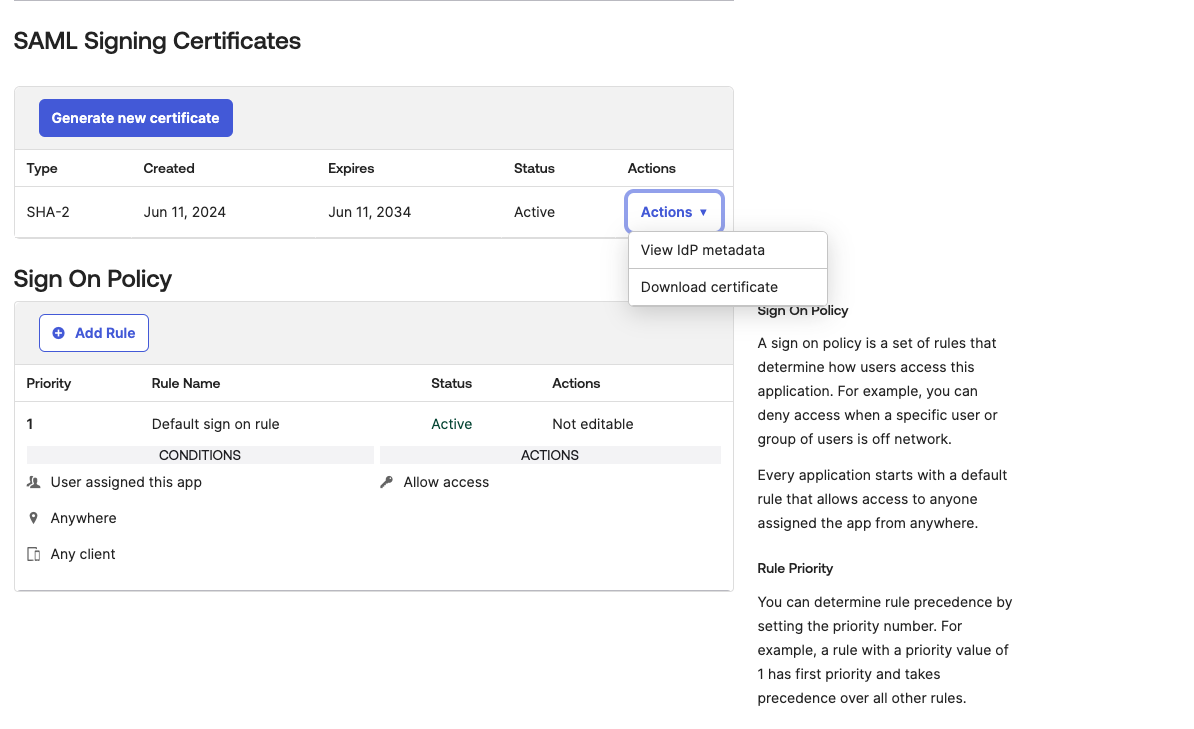
- Click on the Sign-On tab.
- Scroll down to the SAML Signing Certificates section and click the Actions drop-down menu. Choose the Download certificate and store the certificate in an easily accessible location.
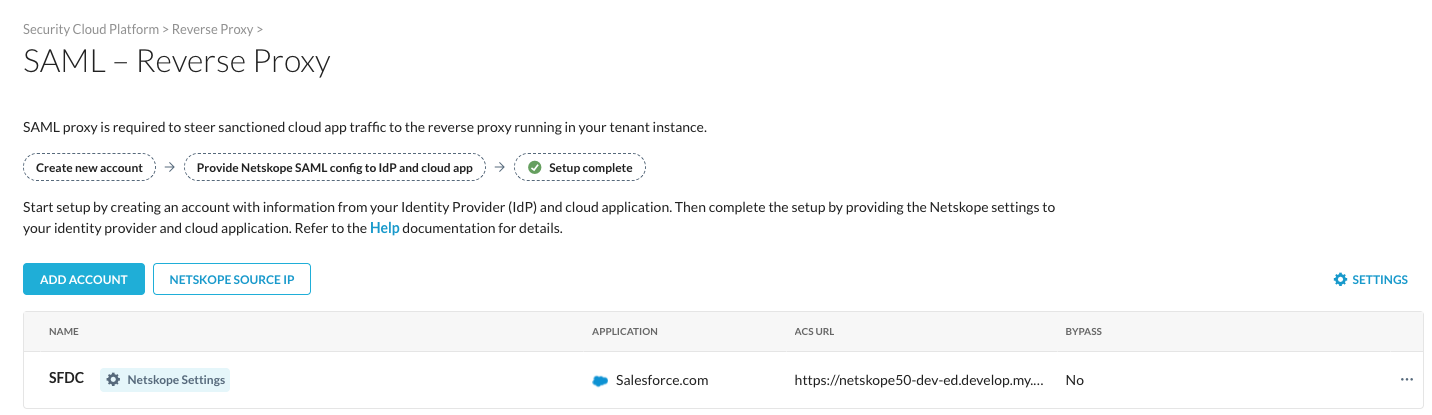
- While on the SAML Reverse Proxy page settings, click Add Account. The New Account window will appear.
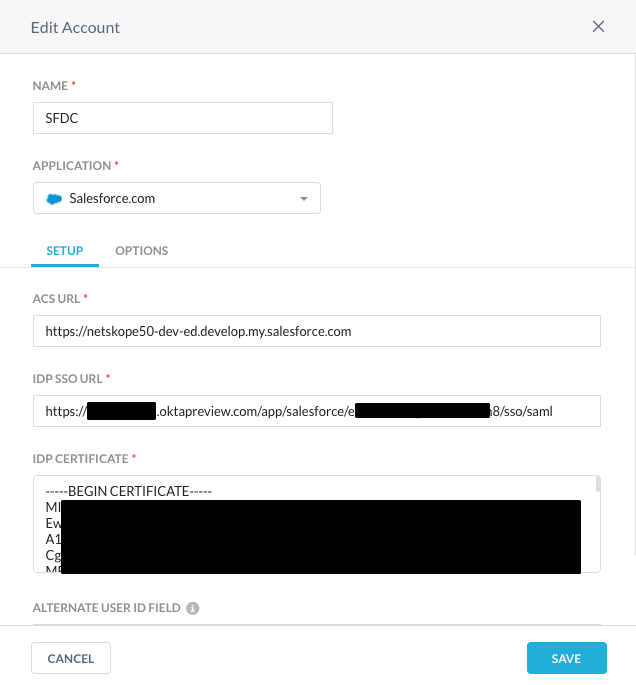
- Complete the following steps to add the new application.
- Enter a name for the SAML RPRoxy application.
- In the ACS URL field, use the Endpoint Login URL copied earlier.
- In the IDP SSO URL field, use the Identity Provider Login URL copied earlier.
- Open the Okta SAML Signing Certificate in a text editor, copy all of its contents, and paste it into the IDP CERTIFICATE field.
- Click Save.
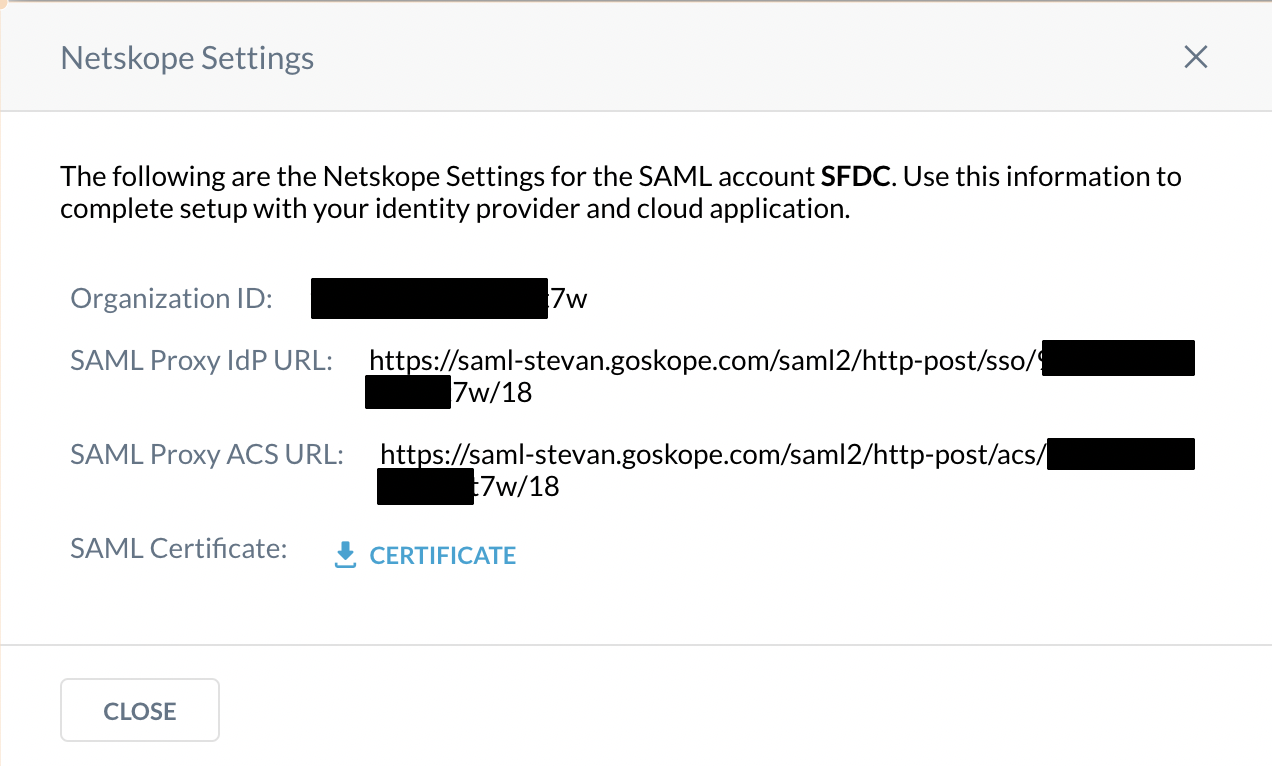
- Click on the Netskope Settings button next to the new Salesforce SAML Proxy application. The Netskope Settings window will appear.
- Copy the SAML Proxy ACS URL.
Postman ACS URL Override
This step will use the SAML Proxy ACS URL copied earlier to redirect to Netskope.
- Login to Okta as an administrator and navigate to Security, API, and Tokens page.
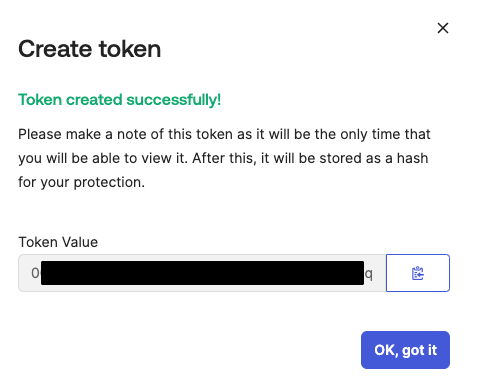
- Click on the Create token button. The Create token window will appear.
- Enter a name for the token and click Create Token. The Create token window will be refreshed to display a token.
- Copy the token and store it in a safe location. Once you navigate from this window, the token cannot be displayed again.
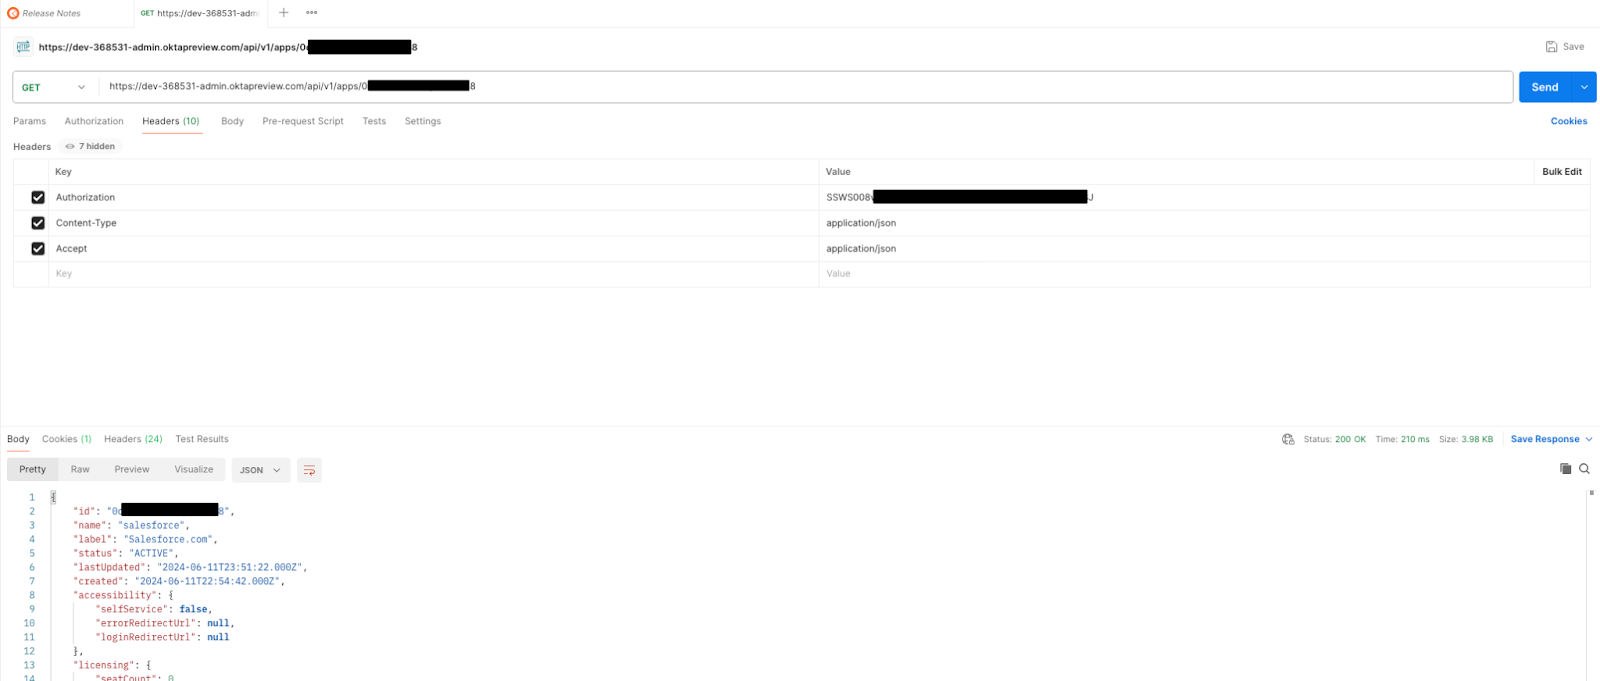
- Open Postman and create a new GET request using the subdomain appending .okta.com/api/v1/apps followed by the app id seen when in Okta application settings.
In my case, I am using an Oktapreview domain but the domain used for API connections is okta.com
- Click Send. The Postman window will be refreshed to display body contents.
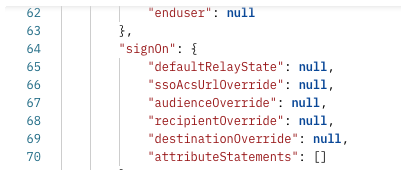
- In the body, navigate to the sign-on section and locate the ssoAcsUrlOverride setting, set to null. This is the setting to be overrode using a POST.
- Duplicate the tab with the GET request and change it to a PUT.
- Copy the body from the GET request and paste it into the body of the PUT request in raw format, using the radio button to select raw.
- Locate the ssoAcsUrlOverride setting and replace null with the SAML Proxy ACS URL encapsulated in double quotes.
- The ssoAcsUrlOverride setting should be overwritten and should be confirmed by using a GET request tab.
SFDC Application Access Testing
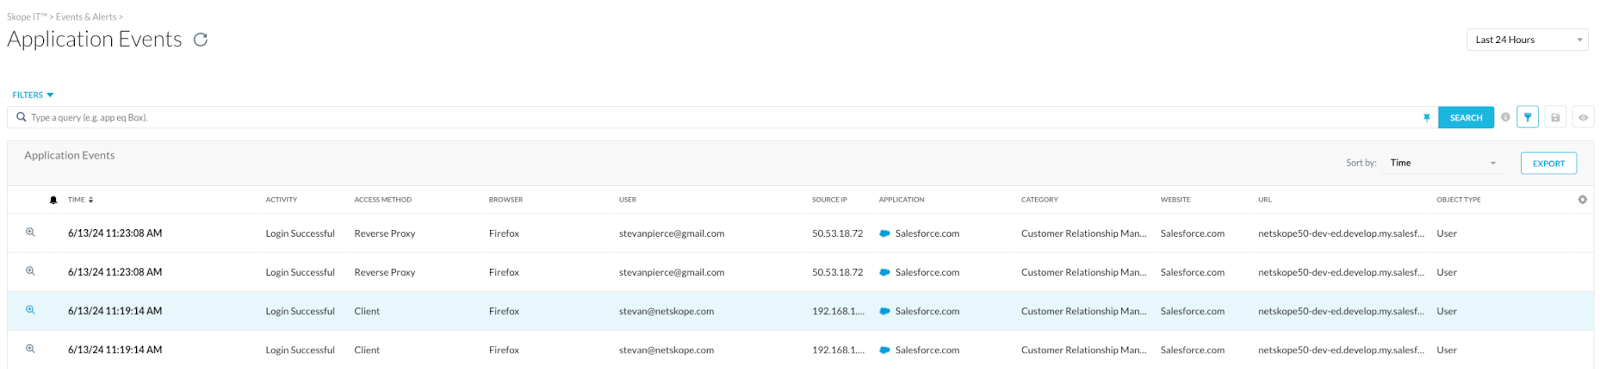
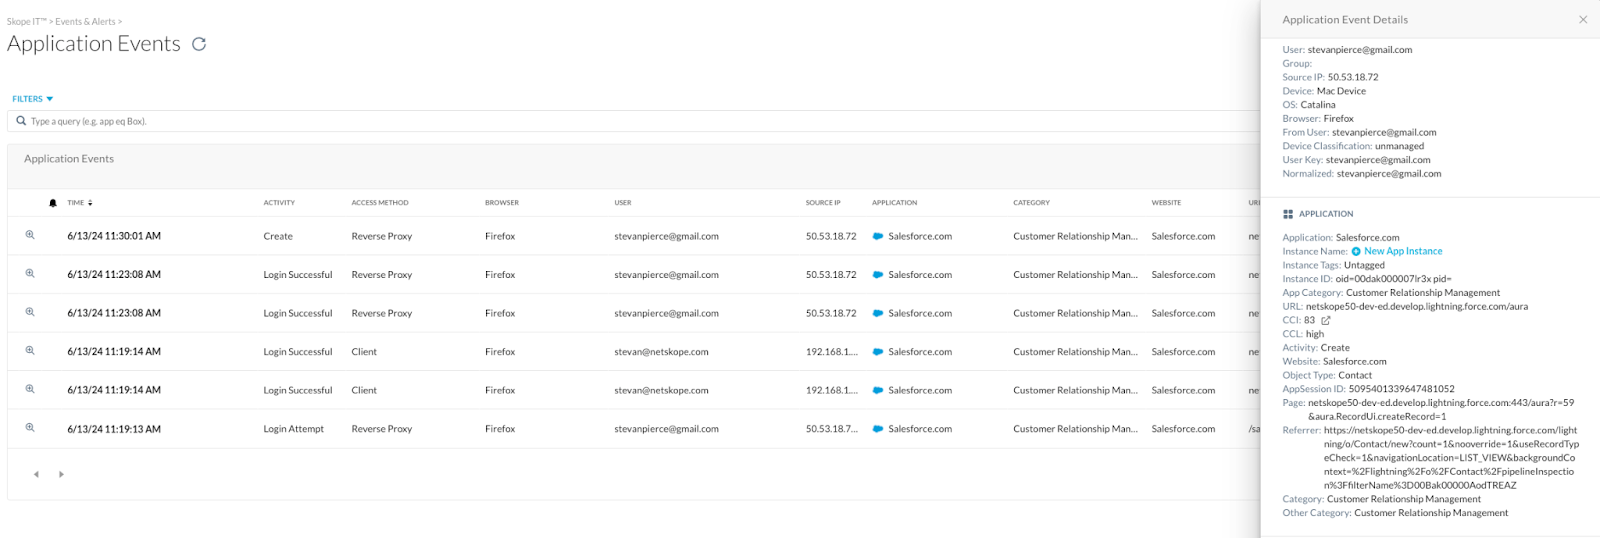
- When you access SFDC through Okta with the Netskope Client enabled, check SkopeIT Application Events. There will be logs displaying access with a Real-Time steering method of “Client”.
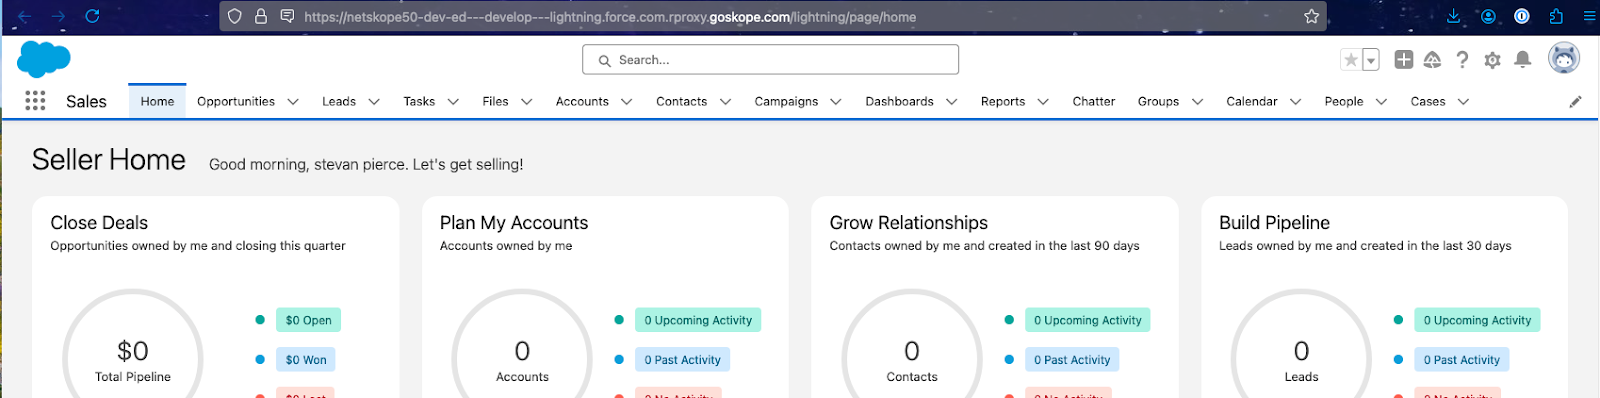
- When you access SFDC through Okta with the Netskope Client disabled, the URL will be rewritten similar to the following. https://netskope50-dev-ed---develop---lightning.force.com.rproxy.goskope.com/lightning/page/home
In addition, there will be logs displaying access with a Real-Time steering method of “Reverse Proxy”.

Use Case
RProxy shines when controlling access to SFDC on unmanaged devices, devices that do not have a Netskope Client enabled. A device that is unmanaged might be a personal machine that persons use to access SFDC while at home or a new machine deployed to an end user that does not have the client yet installed.
In this example, a remote user has been found to be accessing SFDC over RProxy and created a contact.
We want to stop any type of activity that might allow for alteration of contacts, send data, share, and so forth. We are going to give the end user the ability to passively use SFDC. In order to do so, we need to create a RTP that blocks those activities and notifies that end user that the activity has been blocked by choice.
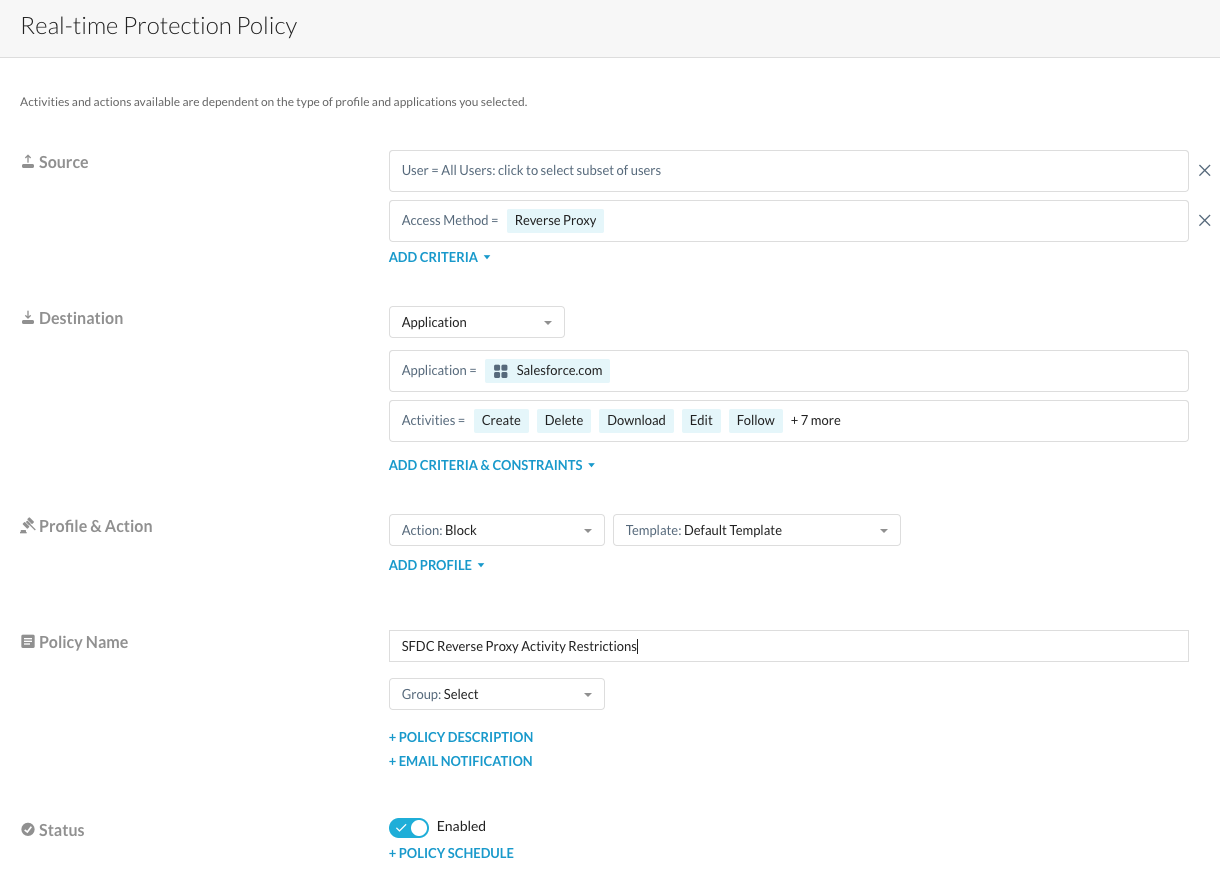
- Navigate to Policies, Real-time Protection. Click on the New Policy drop-down menu and select Cloud App Access. The Real-time Protection Policy page will be displayed.
- Click on the drop-down menu for Add Criteria underneath Source, select Access Method. Then select Reverse Proxy from the drop-down menu in the Source field.
- In the application field, navigate to Salesforce.com and check the box next to it.
- In the Activities field, select all of the activities except Login Attempt, Login Failed, Login Successful, Logout, and View.
- In the Action drop-down menu, select Block. In the template drop-down menu, select a template to notify users.
- In the Policy Name field, give the policy a name which is relevant to the actions performed.
- Save the policy and apply the changes on the next page.
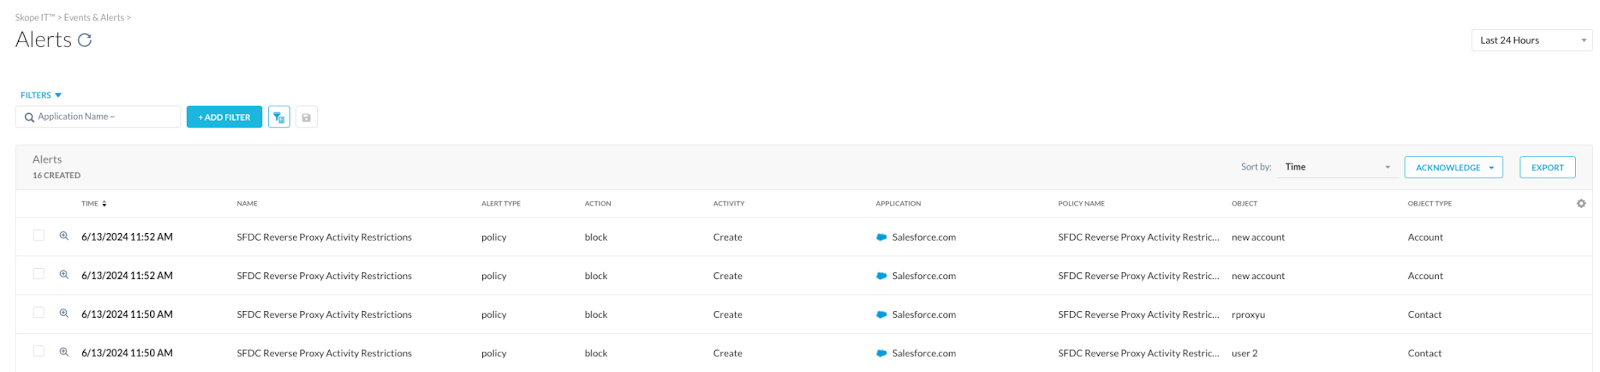
- Test creating a few objects such as users or contacts. Review SkopeIT Application Events and Alerts for the blocks.

Summary
Netskope’s RProxy should be deployed as the last access method for real time steering to the Netskope tenant for protections. The exception is when RProxy is deployed as a service in Google Workspace or Microsoft Azure. The ability to allow for unmanaged devices access to SaaS applications is unmatched when it comes to security. This is one of many reasons as to why Netskope is “A Leader in the Gartner® Magic Quadrant™ for Security Service Edge (SSE)”!
Be sure to download the Gartner® Magic Quadrant™ for Security Service Edge (SSE) here!


