

Introduction
In my previous post I introduced the Netskope Provider for Terraform and showed you how it can be used to deploy publishers and applications inside of a Netskope tenant. While I think this capability on it's own is extremely exciting, I know we can do better. When looking at creating automation for Netskope, our goal was always to ensure a new publisher including the underlying infrastructure could be managed in the same configuration. In fact this concept is one of the primary reasons that we choose to use Terraform as our initial entry into Infrastructure as Code(IaC). In this post I will expand upon what we introduced previously by walking you through how to use the Terraform Module for automating Netskope Publishers running in Amazon EC2. This should be fun!
What is a module?
For those that are new to Terraform let me start by explaining what a module is. The definition of a module is something along the lines of 1 or more .tf configuration files in the same directory. Based on this you already created a module in the previous post. Of course, this was a very simple module that only deployed resources from the Netskope provider using hard coded values. In reality modules are typically used to abstract complex task using multiple resources and possibly multiple providers. These modules also typically are designed to be passed variables so that can be used as part of other configurations. Modules can be created locally and called using a directory path, they can also stored and called using a git repository address or even published in the Terraform registry. This flexibility, both in sharing and design, makes them extremely useful for building infrastructure in a repeatable manner.
Netskope Publisher AWS Module
The "Netskope Publisher AWS Module" simplifies the process of deploying a publisher in EC2. It does so by creating the publisher in Netskope, choosing the latest Publisher AMI in AWS, deploying the EC2 instance, and finally registering it to Netskope. It also has the flexibility to choose a standard AMI instead of the latest, choose the best method to register the publisher(User Data or Amazon SSM), add a public IP or not and more. In its simplest form you can deploy a publisher and have it connected to Netskope by passing 4 variables to the module. I think after you see this in action, you will agree that this takes the Netskope Provider to a whole new level.
Prerequisites
In order to use the "Netskope Publisher AWS Module" you will need to have Terraform installed and have access to a Netskope Tennant and an AWS Tenant. If you haven't done so yet, I recommend reviewing my previous post to get to ensure you have a working Terraform deployment and to ensure it can access the Netskope tenant. When you are done come back over to this post and follow along.
Netskope Authentication
At this point you need to make sure you have exported credentials the same way as before. If you need a refresher on how to get credentials you can check out the "README" in the provider repository.
Mac or Linux
export NS_BaseURL=<Base URL>
export NS_ApiToken=<API Token>
Windows
set NS_BaseURL=<Base URL>
set NS_ApiToken=<API Token>
AWS Requirements
The AWS Provider is required in the Netskope module so it doesn't need to be added to the project. However, you do need to make sure you have the AWS credentials and can easily use them. As before you can include them in a provider block, however I recommend using the aws credentials file in this instance. If you have the AWS CLI installed and you can access AWS resources then you shouldn't need to do anything. I highly recommend setting up the AWS CLI if you don't have it installed as it can be useful while building the Terraform.
Check out the aws documentation for more details on credentials and the AWS CLI.
Starting a new Terraform Configuration
If you still have the project we created in the previous post, we can simply modify the main.tf file, but you are also welcome to start a new project. If you choose a new project follow the commands below to open the new project directory in VSCode. You can also see the finished project, here.
mkdir netskope-tf-intro
cd netskope-tf-intro
code .
I recommend creating a new main.tf file for this project as it will look very different from the original. You can rename the original if you would like to keep it.
AWS Provider Block
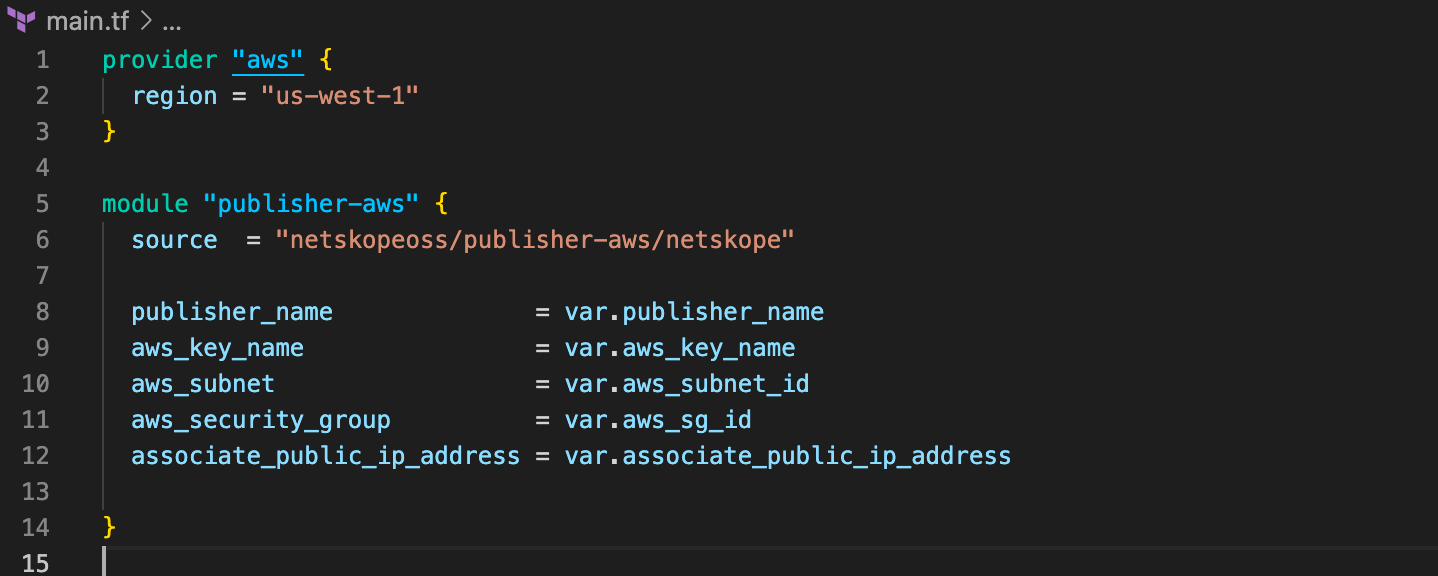
This time we are starting our main.tf with a provider block instead of the required providers since it is already in the module. We introduced a provider block in the previous post where we said it could be used to pass credentials to Netskope. In this post we will be using one for AWS to pass configuration settings. Specifically we will be passing the AWS region here.
Go ahead and add the provider block below to the main.tf file with the region you will use in your environment.
provider "aws" {
  region = "<aws region>"
}
Main.tf should now look like this.

Module Block
Now you will be adding the "Netskope Publisher AWS Module" to the project. Like before you will simply be adding a block of code to main.tf but this time it will call a module instead of a resource.
module "aws_publisher" {
  source = "netskopeoss/publisher-aws/netskope"

  publisher_name              = var.publisher_name
  aws_key_name                = var.aws_key_name
  aws_subnet                  = var.aws_subnet_id
  aws_security_group          = var.aws_sg_id
  associate_public_ip_address = var.associate_public_ip_address

}
Your main.tf should now look like the image below, in the next step we will create the variables so that we can apply the configuration.
Variables
In this section we will take a look at input variables, feel free to follow the link for more details. Terraform provides many ways to provide input variables to a configuration. Once the variables are defined in our configuration we will use a .tfvars file to pass specific variables in.
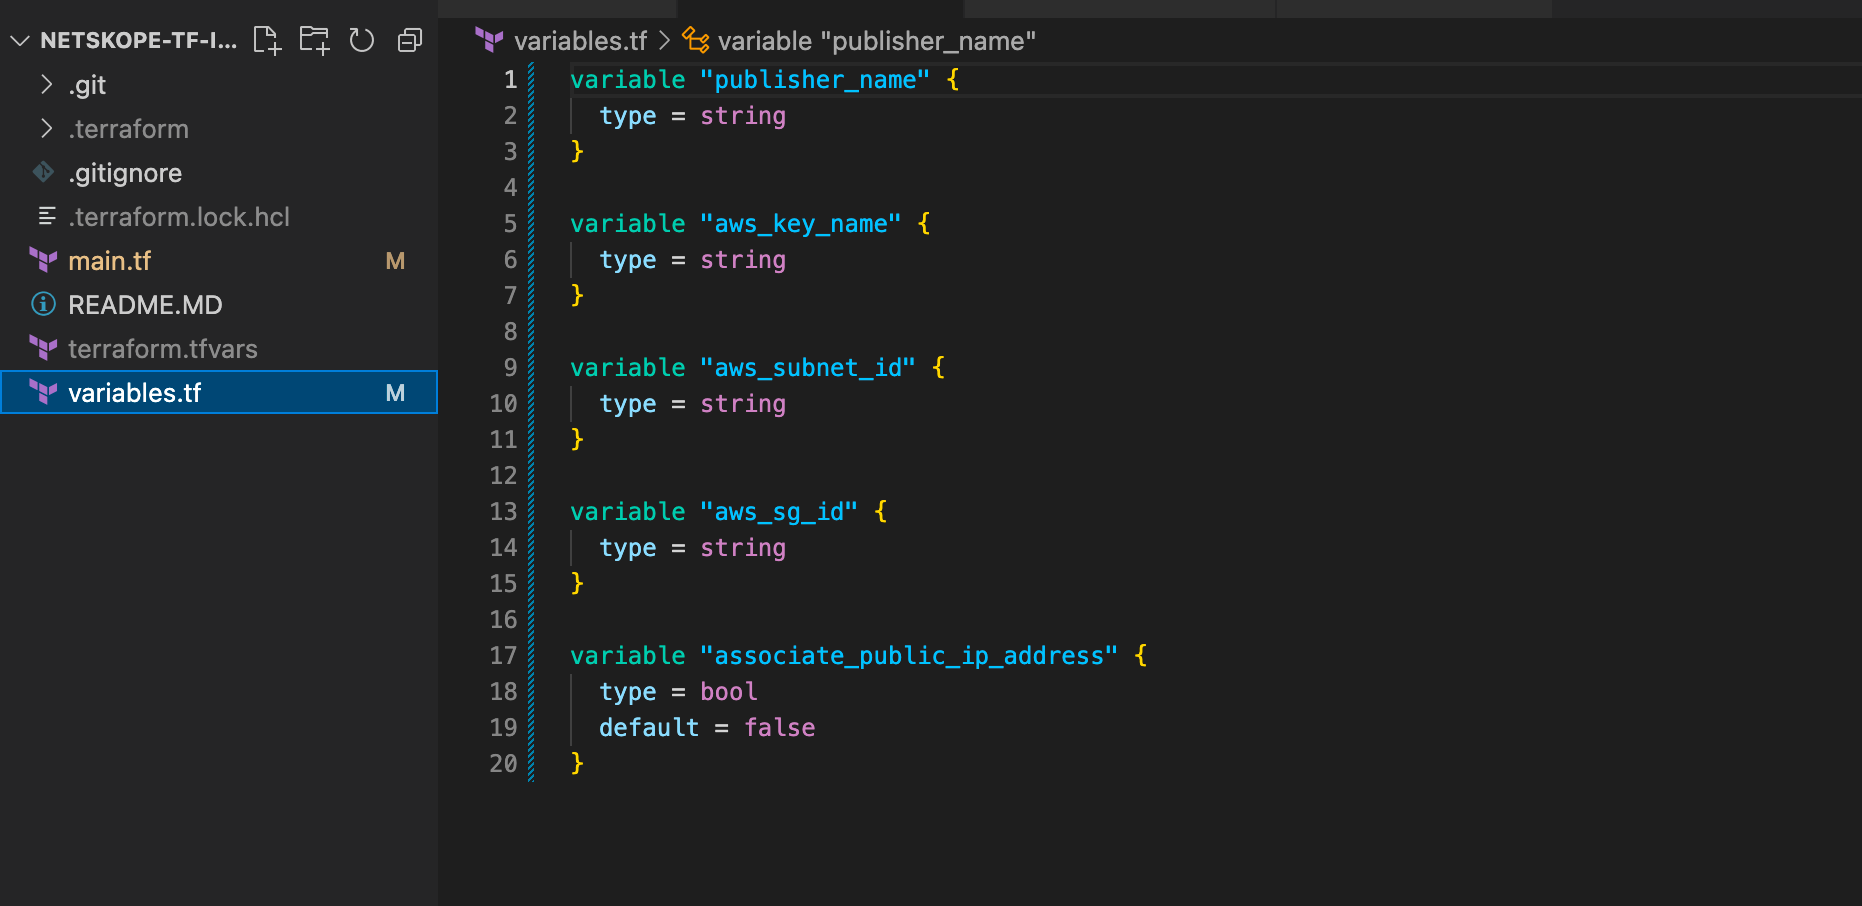
With that go ahead and create a file named variables.tf and add the code below to it. These are the minimum required variables for the module to run.
variable "publisher_name" {
  type = string
}

variable "aws_key_name" {
  type = string
}

variable "aws_subnet_id" {
  type = string
}

variable "aws_sg_id" {
  type = string
}

variable "associate_public_ip_address" {
  type = bool
  default = false
}
The project should be similar to the image below at this point.
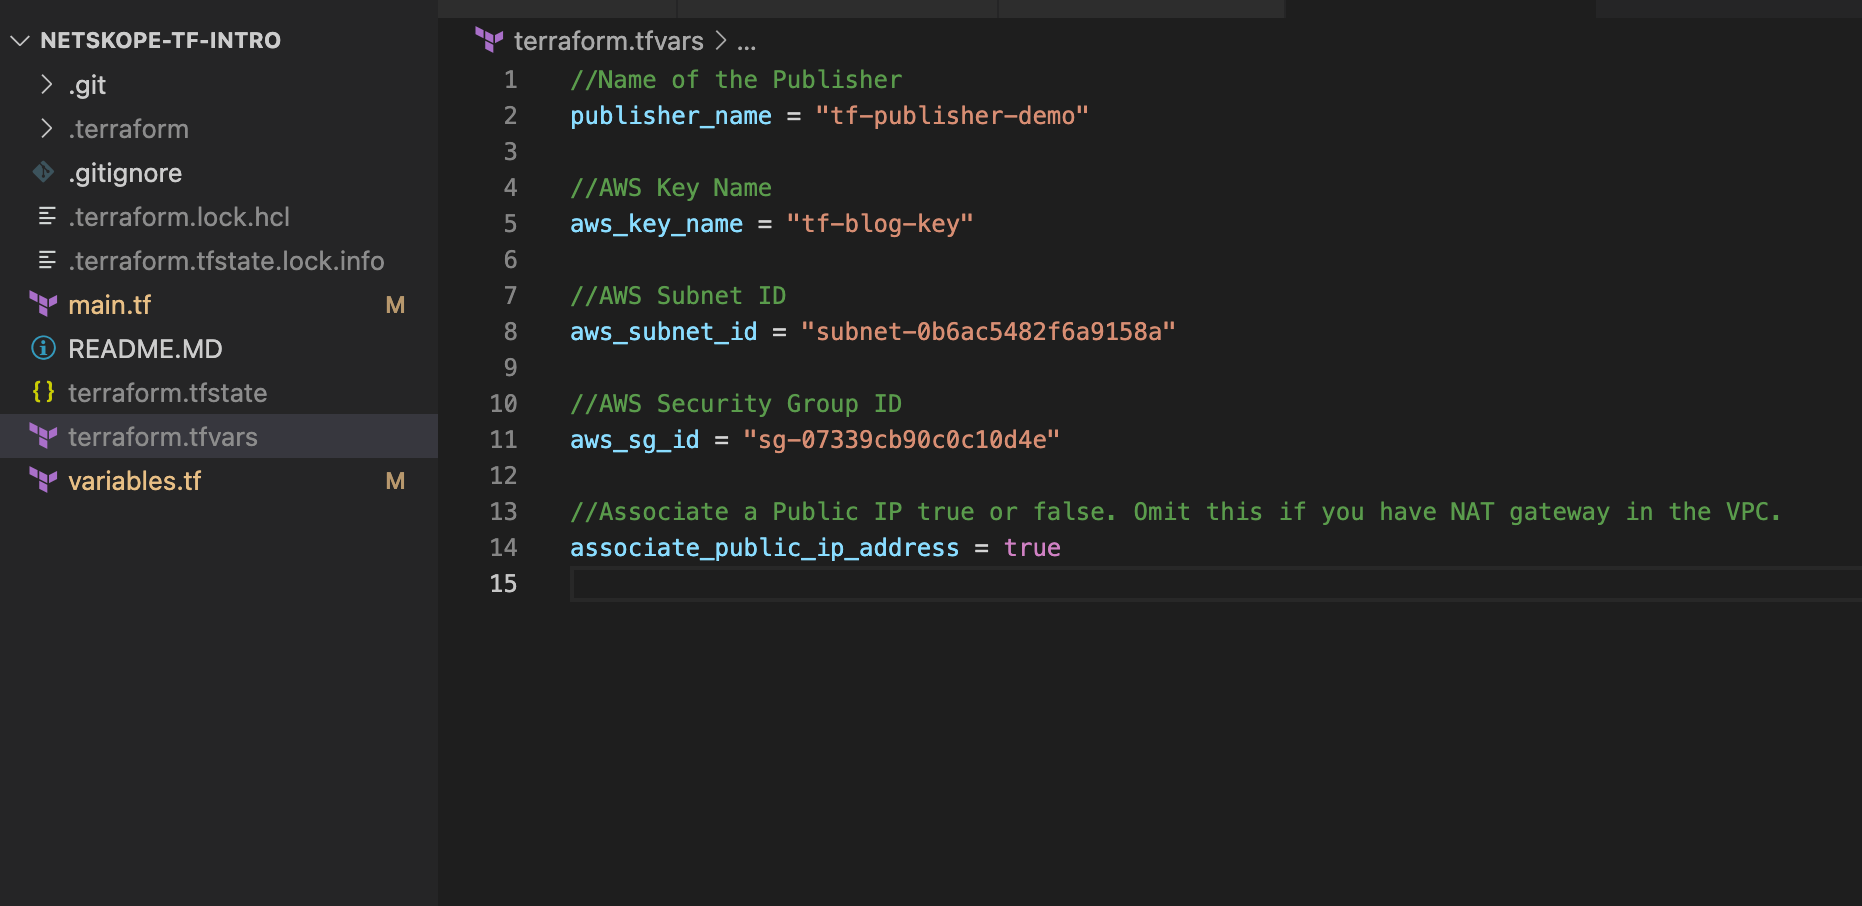
Once the variables file is complete, you can work on creating the variable mappings. In this example we will use a .tfvars file but this is not your only option. You will be creating a file named terraform.tfvars. This name is used, because Terraform will automatically read the variables from a file with this name. If you choose to use another name you can simply include the "-var-file=" switch when running the apply. Go ahead create the terraform.tfvars file and we will add vars one at a time below. Keep in mind that this post assumes you have an existing VPC with subnets, security groups, etc already built. Feel free to comment below or DM me if another post that builds all of the infrastructure would be helpful.
- Create a variable for "publisher_name". This is a required variable and will be used to name the publisher in Netskope and AWS.
publisher_name = "<publisher name>
- Next, the "aws_key_name" is used to specify an existing SSH key pair in the region.
aws_key_name = "<aws key name>"
- The "aws_subnet_id" variable is the next required variable. This is the id of the existing subnet where the EC2 instance should reside.
aws_subnet_id = "<aws subnet id>"
- One last variable is required. The "aws_sg_id" variable points to the Security Group that will be used for the deployment. Keep in mind that we will be automatically registering the publisher, so the only "required" rule in the security group is to allow the outbound requests to Netskope. This is open by default on all SGs.
aws_sg_id = "<security group id>"
- Optionally you can add the "associate_public_ip_address" variable. By default this is set to false and doesn't even need to be added to module command, but because it is hard to know what environment you will be testing this in I had us include it here for functional purposes. It is highly recommended that VPCs use NAT gateway, however if you don't have one in your test VPC go ahead and add this.
associate_public_ip_address = true
Here is what my .tfvars file looks like. Notice that the file name is grey in VSCode. This is because I have it in my .gitignore file so it won't be committed to the repository. This may be a good idea if you have any sensitive information in the file. I ignore this by default when creating a new Terraform project.
Applying the config
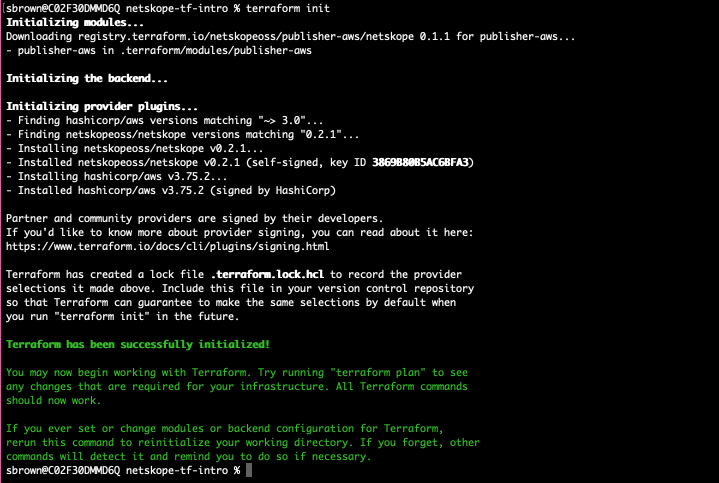
We will now be running terraform init and terraform apply to deploy the publisher. Terraform Init will make sure the providers and module are installed.
terraform init
Confirm that the init was successful. Notice that if you ran this from a new project that the Netskope Provider, AWS Provider and the Netskope Publisher AWS module are all installed when running the init command.
Now apply the configuration.
terraform apply
Type yes to deploy 2 resources and confirm it completed successfully.
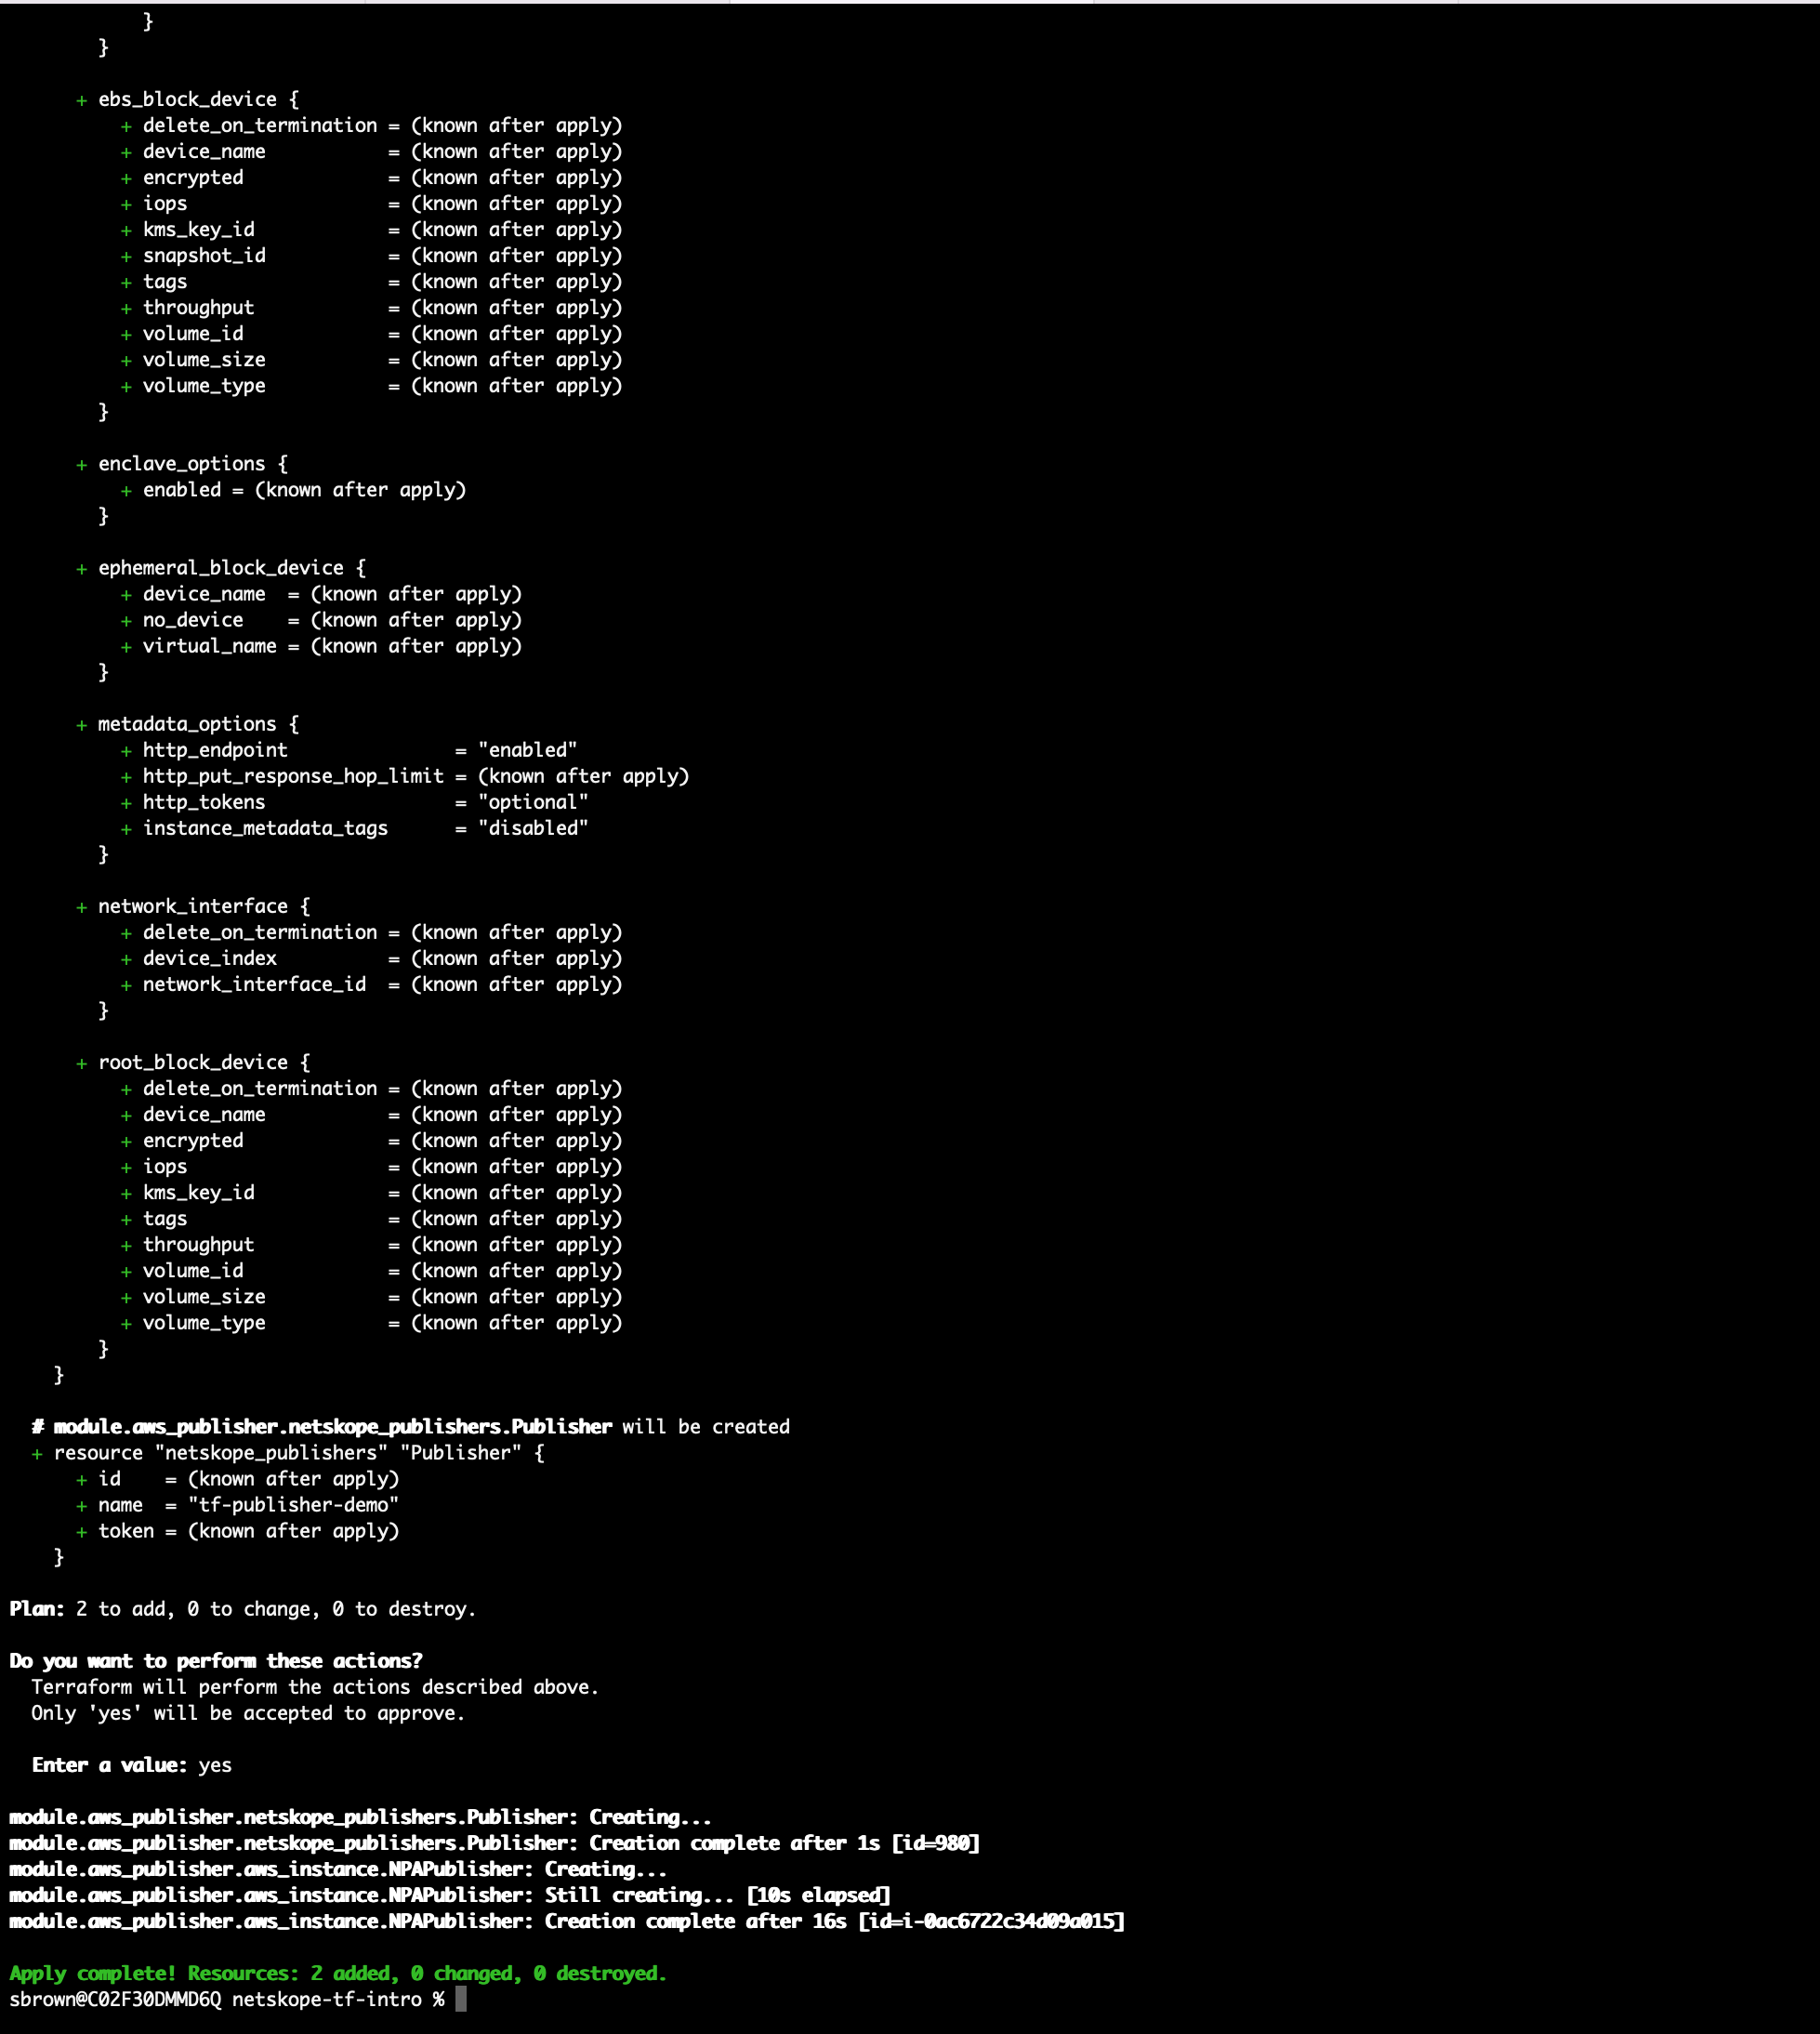
After a short while the publisher should show as connected in the tenant. Assuming your tenant shows something like the image below it is time to celebrate!

Cleaning all of this up
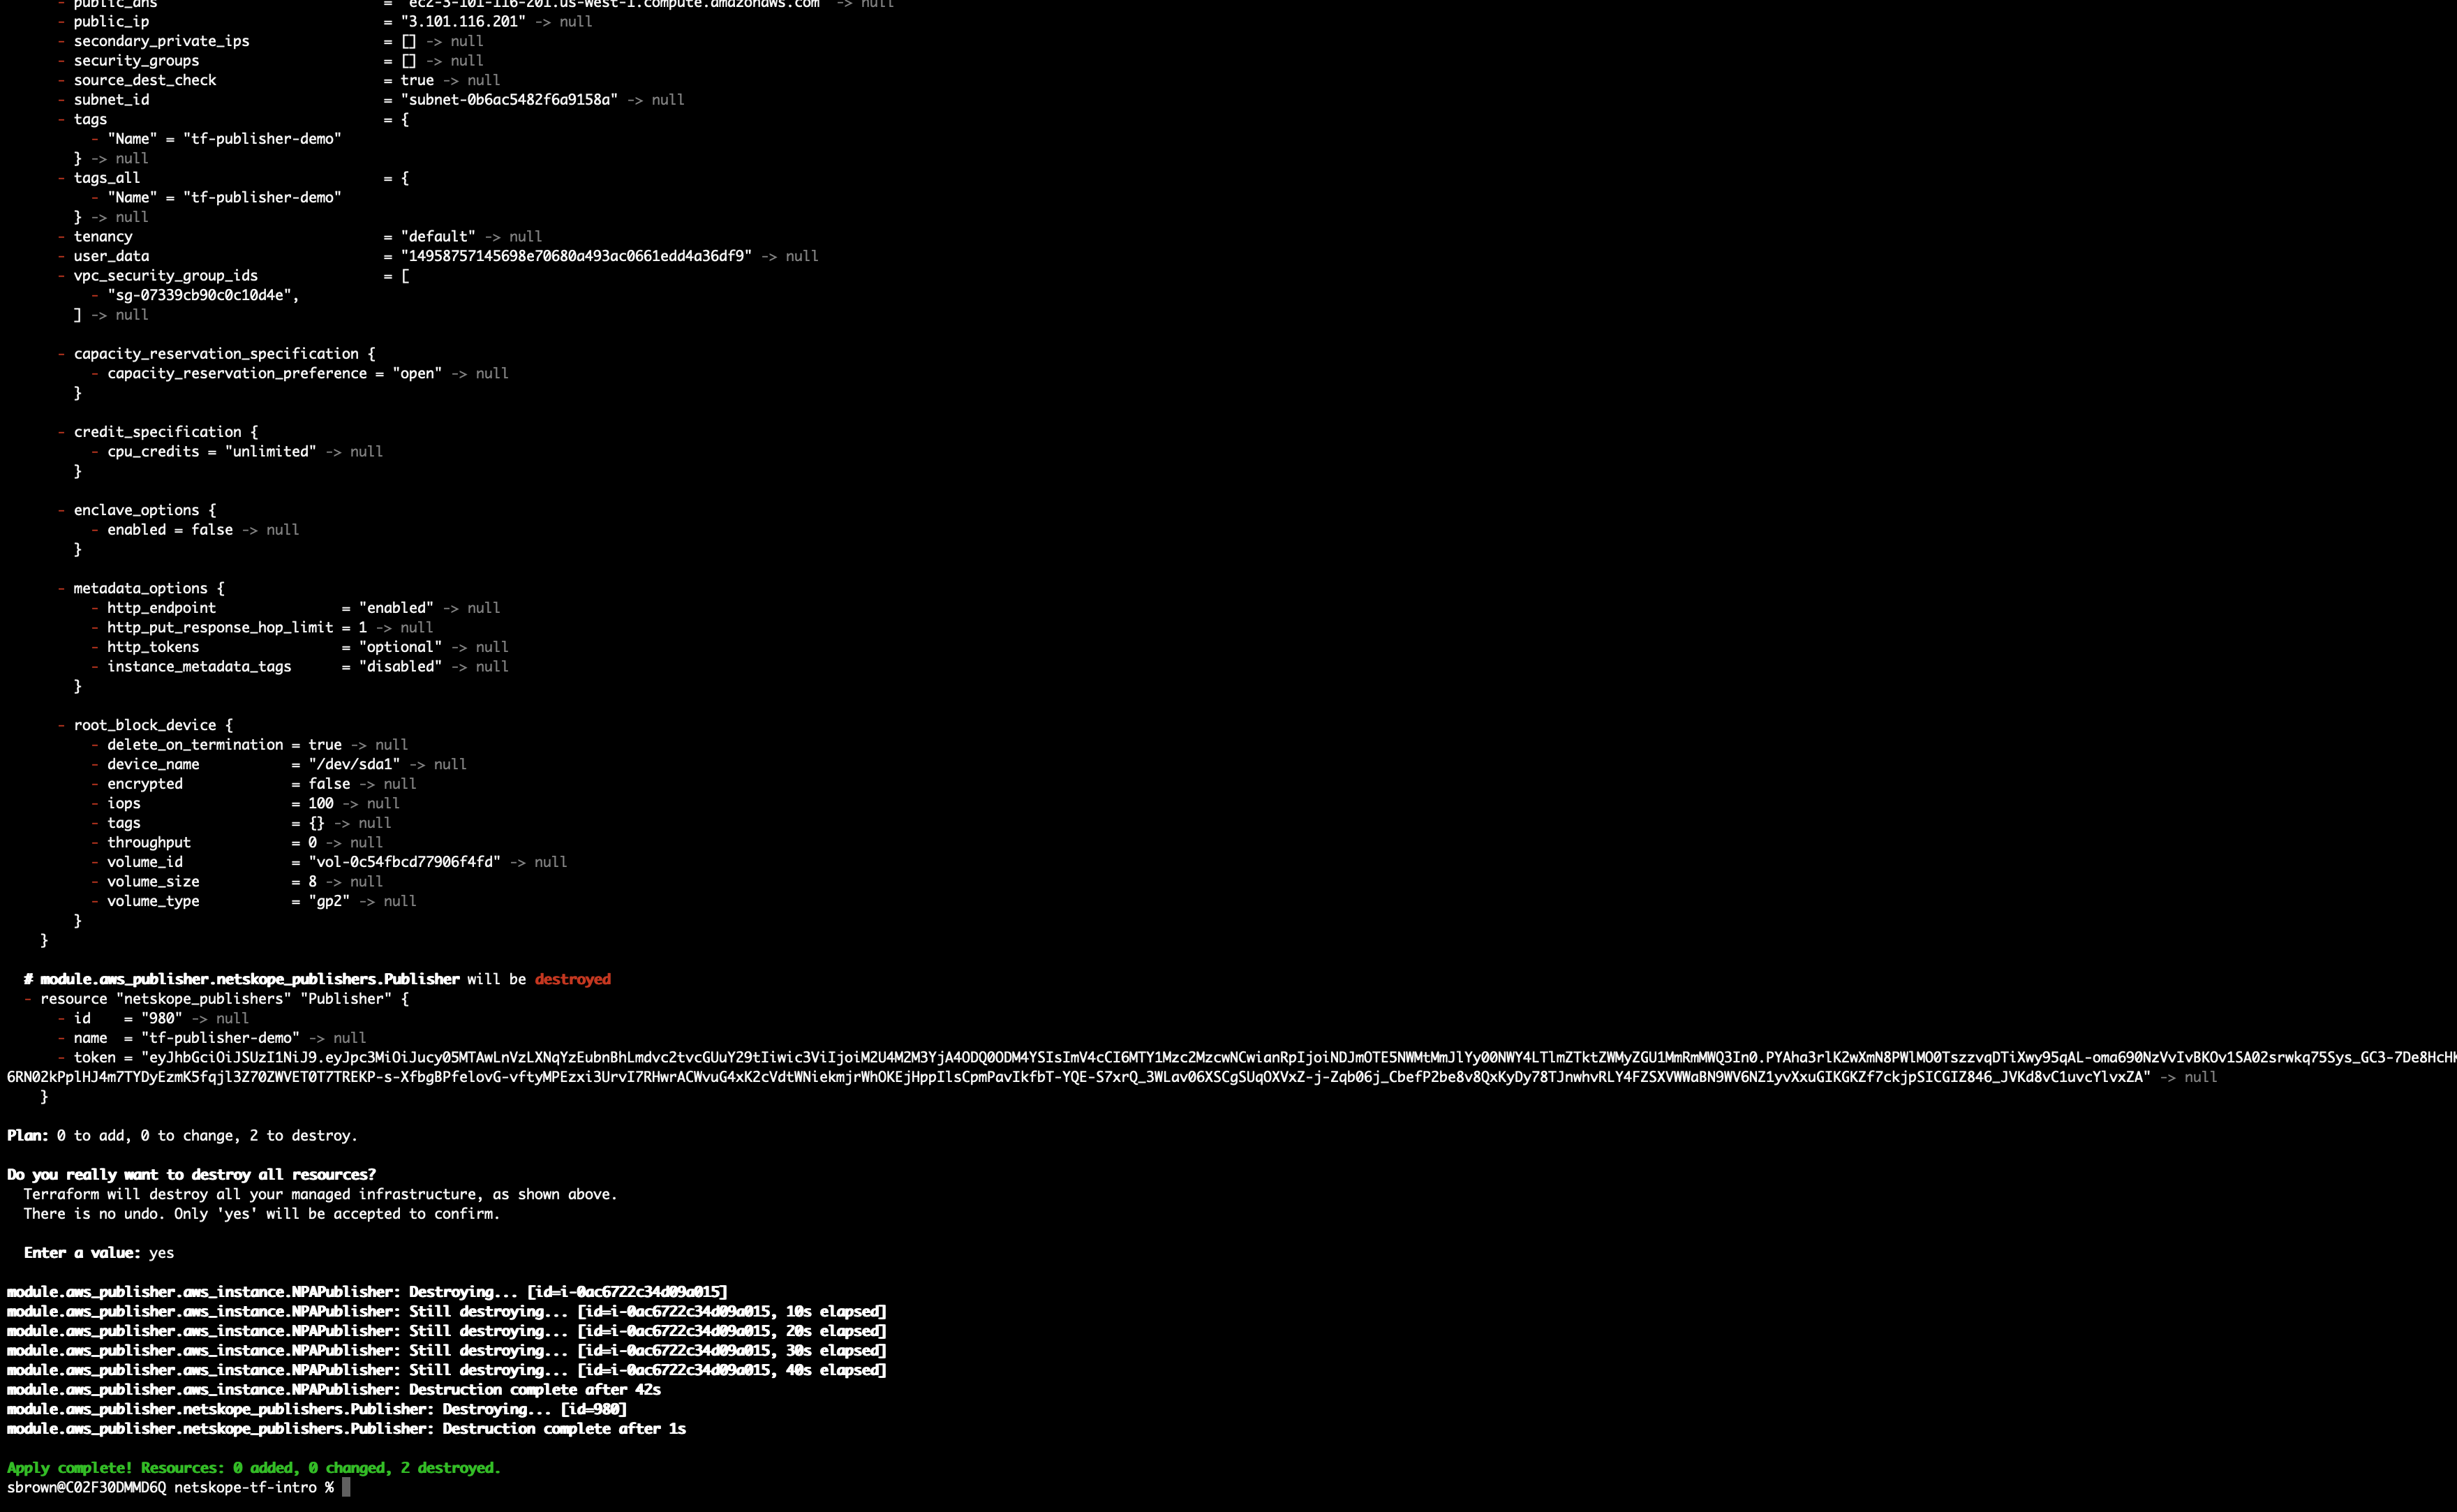
To remove what we just created simply type terraform apply -destroy and all of the resource will be removed from Netskope and AWS. (Make sure to wait and type yes.)
Conclusion
Congratulations, if you have made it this far you have created a publisher in AWS, automatically added it to Netskope and destroyed it. This was a fairly simple example of how to use the "Netskope Publisher AWS Module". For more examples on how to use it to create multiple publisher, or to use SSM instead of user data for registration take a look at the repository.


