


Note: SCCM distributions are highly customizable, and the below information is based on sample environments. You should always consult with your SCCM administrator to create optimal Application Definitions and Policies based on your environment.
Introduction
Microsoft’s System Center Configuration Manager (SCCM) is an endpoint management solution that has been combined with Intune, Autopilot, and other tools into Microsoft Endpoint Configuration Manager. SCCM is traditionally deployed with management and distribution points on-premises or in public clouds that are used to deploy updates, configurations, and software to managed endpoints.
When on-premises, communications between the managed endpoint and SCCM distribution points are handled via enterprise networking and security tools such as site-to-site tunnels. Traditionally, remote access VPNs were used to connect remote endpoints to SCCM distribution points. In distributed environments, this presented a challenge to ensure that both on-prem and remote clients utilized optimal SCCM resources such as distribution points. SCCM utilizes boundary groups to logically organize SCCM resource selection based on IP ranges or subnets, Active Directory Sites, IP ranges, and more. This worked well for traditional remote access VPNs because they typically provided the remote client a routable IP address on a virtual interface. Administrators could simply define VPN specific boundary groups to provide optimal resource selection such as preferring a cloud distribution point if the user is remote.
Zero-trust Network Access (ZTNA) technologies such as Netskope Private Access typically don’t provide an individual routable IP address to the remote endpoint. Instead, Netskope Private Access routes traffic through Publisher virtual machines deployed in your enterprise data center or public cloud. The good news is that the Publisher itself does have an IP address on your network that you can use in Active Directory Sites and boundary groups to have NPA-based clients prefer cloud distribution points or specific resources.
Configuring Netskope Private Access and SCCM
Assuming you’ve already deployed Publishers in ideal locations for accessing SCCM resources, your first step is to ensure that you’ve followed best practices for deploying Active Directory services via Netskope Private Access. This ensures services like Kerberos, SRV resolution, and other services are available for proper SCCM authentication and selection. If Active Directory is properly configured then you can configure SCCM over NPA by following the process below:
- Define Boundary Groups based on Active Directory Sites using the Publisher IPs or RFC 1918 subnets
- Define Application Definitions for SCCM resources
- Create Real-time Protection Policies to enable access to SCCM resources
Define Boundary Groups
Prior to configuring SCCM to traverse Netskope Private Access, you should ensure that boundary groups have been configured to properly select resources based on the Publisher IP(s) or Active Directory Sites.
Note: Using Active Directory sites and services is recommended. When using IP ranges or subnets for boundary groups, the SCCM client will include the local RFC 1918 address to perform its evaluation. This means that your SCCM server will see the end user’s internal address. You must account for this by using all RFC 1918 addresses in a boundary group if you can't use Active Directory Sites.
Active Directory Site Boundary Group
Microsoft Active Directory Sites and Services are primarily used in distributed environments to provide optimized resource selection and replication preferences. This becomes relevant to Netskope Private Access for Active Directory and SCCM as Publishers are deployed in numerous locations where specific AD servers or SCCM distribution points may be highly preferred for regional users or performance. For example, in the environment depicted above, we may want all users in the region primarily served by DC1 to use DC1 AD servers and SCCM distribution points while users in DC2’s region should prefer DC2 AD servers and SCCM distribution points.
This is where the concept of client affinity in Active Directory Sites comes into play. Using the Publisher IPs, we can have Active Directory and by extension, SCCM, provide optimal resource selection. You may already have Active Directory Sites configured but if not, you will need to create Sites and assign the Publisher IPs to the respective sites. If sites are not already configured, consider how this change will impact your existing Active Directory deployment as Site configurations may impact AD resource selection and replications.
In general though, whether sites exist or not, you will need to do the following with the below environment referenced as an example. Note that in this case, the Publishers are deployed to separate subnets than the other resources. If the Publishers are deployed to subnets already configured in Active Directory Sites and Services then you may not need to configure additional subnet objects.
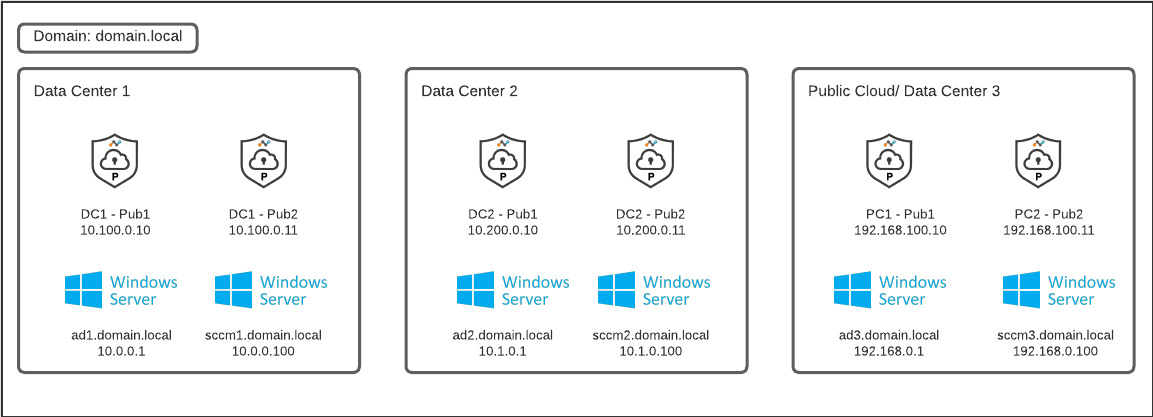
- In Active Directory Sites and Services, create Subnet objects in for each set of Publishers. Subnet objects use the subnet prefixes notation so you may have to create /32 objects for each individual Publisher IP if the Publishers aren’t on their own subnet:
- Data Center 1 Publisher Subnet objects
- 10.100.0.10/32
- 10.100.0.11/32
- Data Center 2 Publisher Subnet objects
- 10.200.0.10/32
- 10.200.0.11/32
- Public Cloud 1 Publisher Subnet objects
- 192.168.100.10/32
- 192.168.100.11/32
- Data Center 1 Publisher Subnet objects
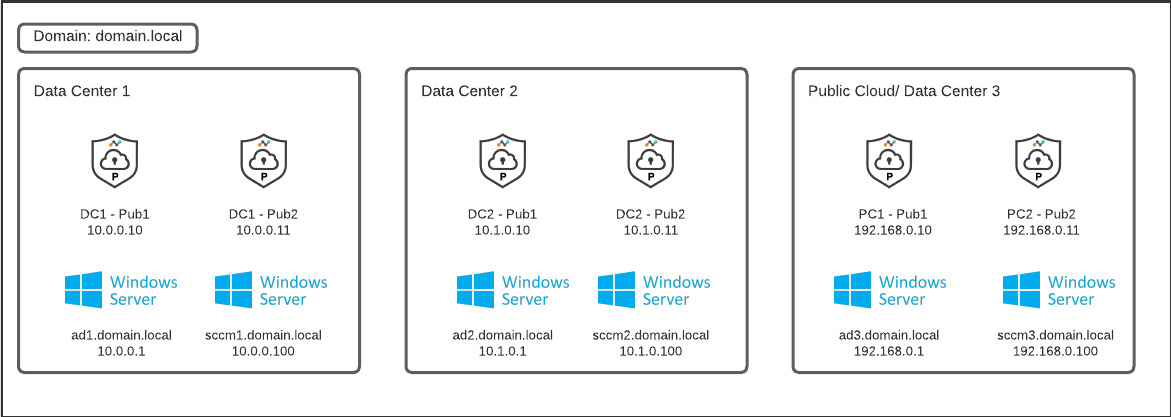
- If you don’t already have Sites created, create Sites for the respective group of Active Directory servers and resources based on your network topology. This is heavily dependent on your network and Active Directory topology. Consult with your Active Directory administrator on how sites are currently configured or if additional sites are required.
- Data Center 1 Site
- 10.0.0.0/24 subnet
- DC1 Publisher Subnet objects
- Data Center 2 Site
- 10.1.0.0/24 subnet
- DC2 Publisher Subnet objects
- Public Cloud 1 Site
- 192.168.0.0/24
- Public Cloud 1 Publisher Subnet object
- Assign the appropriate Domain Controllers to the respective sites
- Data Center 1 Site
- AD1
- Data Center 2 Site
- AD2
- Public Cloud 1 Site
- AD3
Now that sites and services are configured correctly, you can use them in boundaries and boundary groups to select the correct SCCM distribution points and resources per site. Follow the steps below based on the environment referenced above:
- Create new boundaries using the Active Directory site type or update an existing boundary if already configured for remote clients based on
- Data Center 1 Site
- Data Center 2 Site
- Public Cloud 1 Site
- Create new boundary groups or update existing boundary groups
- Data Center 1 Boundary Group
- Assign the Data Center 1 Site boundary to the boundary group
- Assign SCCM1 as the site system
- Optionally configure “Prefer cloud based sources over on-premises sources” if you are using Cloud Management Gateways
- Data Center 2 Boundary Group
- Assign the Data Center 2 Site boundary to the boundary group
- Assign SCCM2 as the site system
- Optionally configure “Prefer cloud based sources over on-premises sources” if you are using Cloud Management Gateways
- Public Cloud 1 Boundary Group
- Assign the Public Cloud 1 Site boundary to the boundary group
- Assign SCCM3 as the site system
- Optionally configure “Prefer cloud based sources over on-premises sources” if you are using Cloud Management Gateways
- Data Center 1 Boundary Group
IP Subnet Boundary Group
If Active Directory Sites are not viable in your environment, then you can use IP Address Subnets in Boundary Groups. You must include all RFC 1918 spaces to account for various home network setups.
- Create a new boundary using the IP subnet type or update an existing boundary if already configured for remote clients based on
- NPA Boundary
- 10.0.0.0/8
- 192.168.0.0/16
- 172.16.0.0/12
- NPA Boundary
- Create new boundary groups or update existing boundary groups
- Assign the NPA Boundary
- Optionally configure “Prefer cloud based sources over on-premises sources” if you are using Cloud Management Gateways
You can optionally configure fallback boundary groups in case the preferred boundary group isn’t available.
Define Application Definitions for SCCM resources
Once you have configured your boundary groups, you will create application definitions for the respective SCCM distribution points based on location. In distributed environments, you will want to consider how failover works and whether you need to publish a subset of SCCM resources or all SCCM resources to all users. This is dependent on your environment and you should consult with your SCCM administrator. Consider the environment we referenced earlier in the boundary groups example:
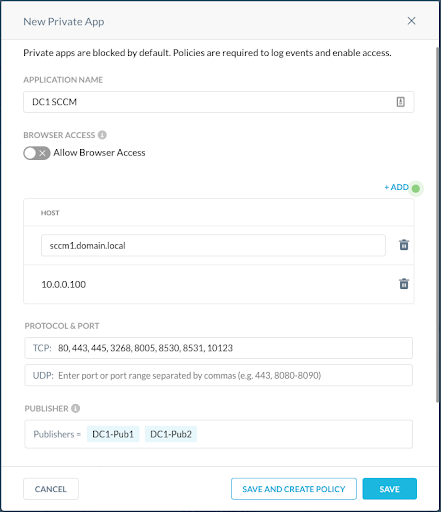
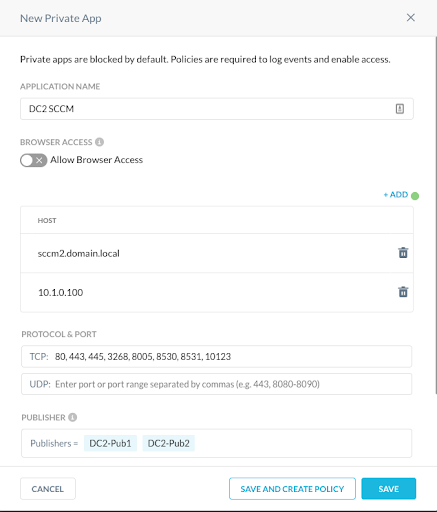
Assuming Active Directory is already configured and working, you would want to create three application definitions for SCCM resources to ensure optimal Publisher Selection. This assumes you are using default ports for SCCM communications and some of the ports may differ depending on your version of SCCM or if your administrator has altered the default ports.
- Data Center 1 SCCM Server(s)
- Data Center 2 SCCM Server(s)
- Public Cloud 1 SCCM Server(s)
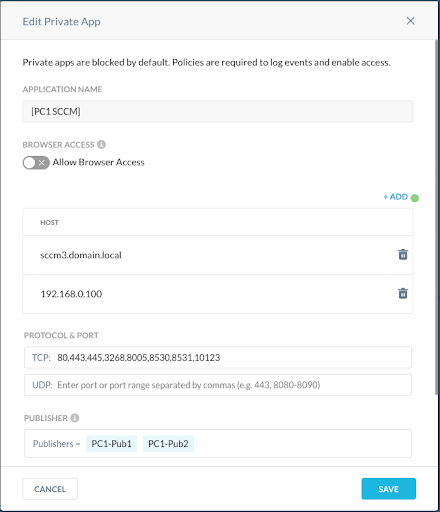
For your convenience, the TCP ports for the application definition are below. These can be copied directly into the app definition in the UI or via REST AP. However, SCCM ports can be customized by administrators so it's possible your administrator is not using the default ports.
- TCP: 80,443,445,3268, 8005, 8530, 8531, 10123
Create Real-time Protection Policies to enable access to SCCM resources
Real-time Protection Policies are what ultimately determine which App Definitions Netskope clients receive based on user assignments. By extension, this also means Real-time Protection Policies can be used to selectively steer regional users to specific locations or Publishers for things like Active Directory DNS and SRV lookups. For our example environment, users in the USA should prefer DC1 resources and users in the EU should prefer DC2 resources. To accommodate this, you can create two policies:

In this example environment, if our Active Directory App Definitions were also assigned geographically via Real-time Protection Policies, we could combine these into a single rule that allows access to all SCCM resources for all users.
The combination of geographic DNS resolution and Active Directory Sites ensures optimal resource selection. Additionally, if you’re using a Cloud Management Gateway, then using a single policy to grant access to all resources also makes sense as you will configure boundary groups that include the Publishers to prefer cloud based sources as the clients are remote.
Conclusion
Netskope Private Access provides seamless, transparent access to Active Directory and SCCM. While SCCM deployments vary, the core process to providing access to SCCM via Netskope Private Access remains the same.
- Define Boundary Groups
- These boundary groups utilize the Publisher IP addresses assigned to Active Directory Sites or IP subnet boundaries that include all RFC 1918 subnets
- If using a Cloud Management Gateway or another internet facing SCCM server, consider configuring the respective boundary groups to prefer cloud based sources. Any traffic from the Publishers will be from remote endpoints or users.
- Define App Definitions for SCCM Resources
- App Definitions should include all necessary ports for SCCM client-to-server traffic
- Create Real-time Protection Policies to enable access to SCCM resources
- Evaluate whether to use specific policies for business units or regions
- A single policy may be preferable


