Solution Overview
Windows Autopilot Overview
Traditionally IT administrators spend a lot of time on building and customizing OS images, compatibility testing with various device makes and models etc. Every device typically goes through a re-imaging process with additional pre and post validation to make sure it is ready for use in the field. This process implies major cost and time effort.
Windows Autopilot is a collection of Microsoft technologies working in concert that help to simplify and streamline the bulk deployment, setup, and configuration of Windows 10/11 devices in organization to ensure they are provisioned and locked down according to corporate standards. Autopilot also can be used for device reset, repurpose and recovery.
The following diagram shows a process overview of a typical device procurement and onboarding lifecycle:
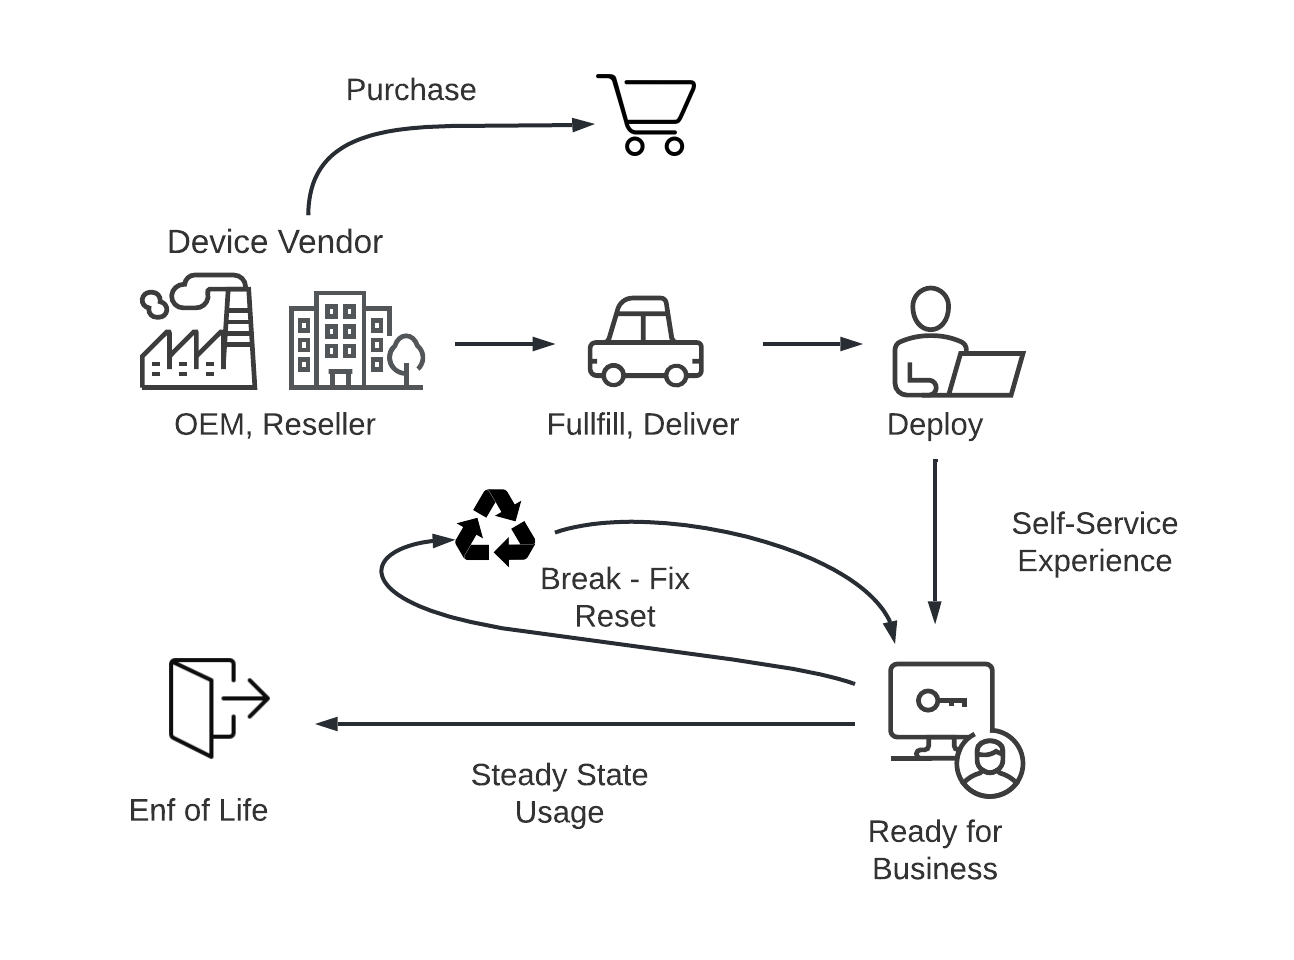
Windows Autopilot enables customers to:
- Recognize company owned devices and associate them with appropriate enrollment workflows and configuration profiles
- Automatically join devices to Azure Active Directory (Azure AD) or Active Directory
- Auto-enroll devices into MDM services such as Intune
- Customize Out of Box Experience (OOBE) content specific to the organization
More information about Microsoft Autopilot can be found here https://docs.microsoft.com/en-us/mem/autopilot/windows-autopilot
Windows Autopilot with Hybrid Azure AD Join
Many organizations heavily rely on on-premises Active Directory capabilities such as Group policy, authentication (Kerberos and NTLM) and file sharing services (SMB, DFS). While there is a desire to adopt modern device management framework such as Autopilot, it is important to retain an existing set of technologies and ensure its compatibility with on-premises AD infrastructure.
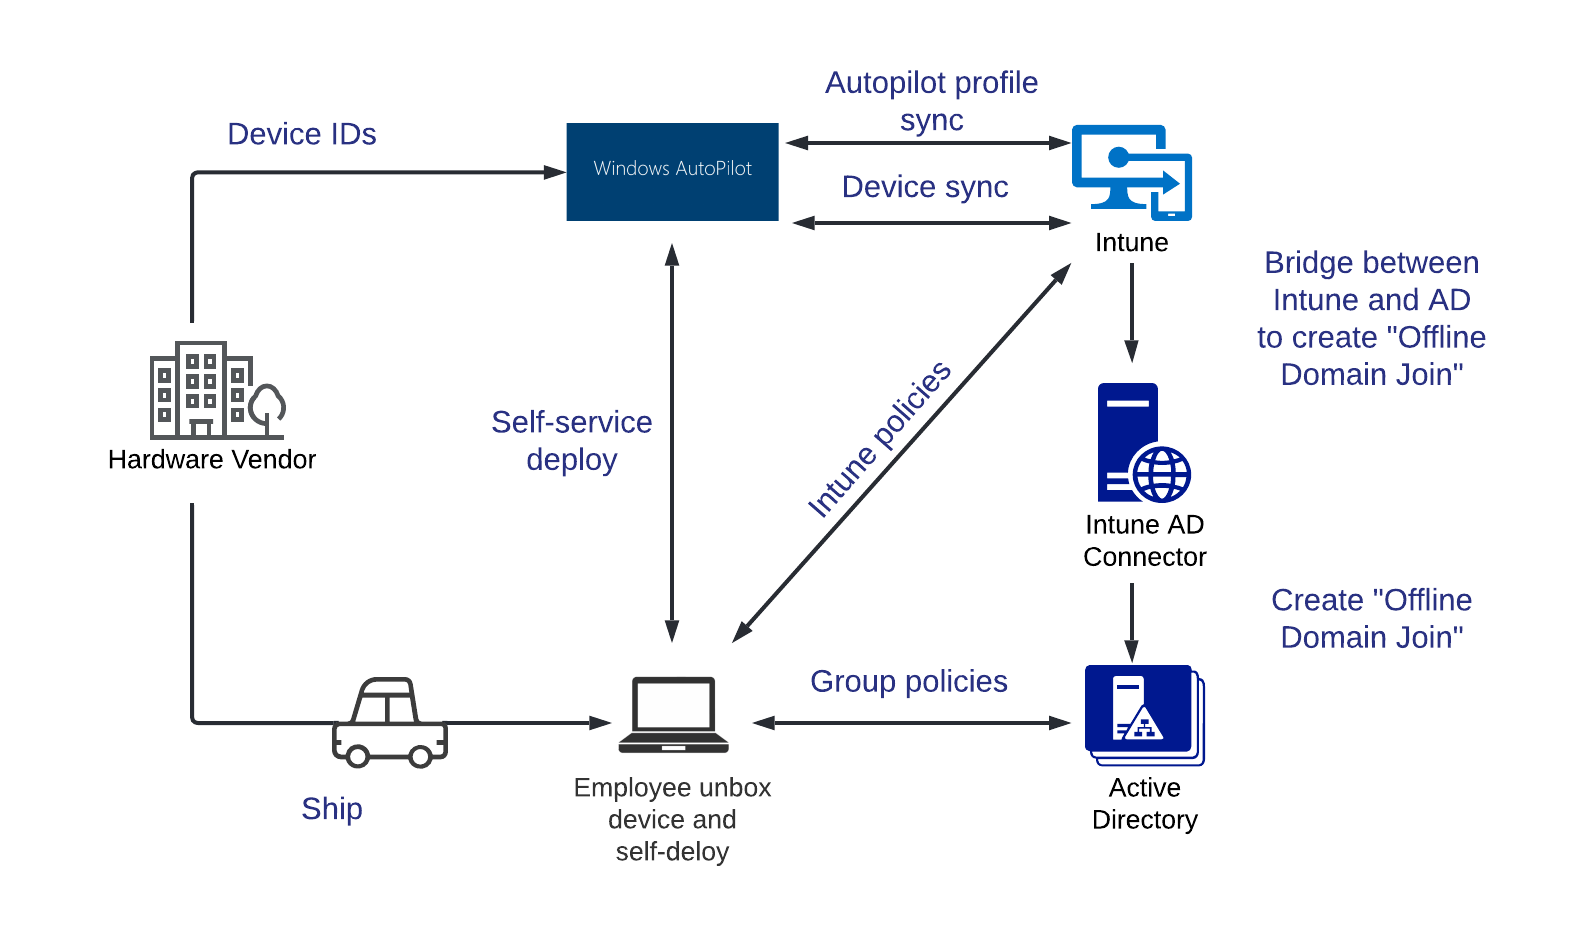
There are a few different types of Windows Autopilot profiles aiming to address different deployment scenarios. This article is covering the Autopilot type “Hybrid Azure AD Join”, as most customers need to take advantage of this particular scenario in their deployments. In this scenario Autopilot adds the device to on-premises Active Directory and performs device enrollment into Intune. The below high level architecture diagram illustrates critical components required to enable Autopilot Hybrid Azure AD Join type. More information about prerequisites and deployment steps can be found in Microsoft article here https://docs.microsoft.com/en-us/mem/autopilot/windows-autopilot-hybrid
Secure connectivity to on-premises Active Directory via Netskope
One of the biggest benefits of Autopilot-based enrollment is an accelerated timeline for the user to onboard with their IT-issued endpoint(s) in their possession. Devices can be shipped to users right from the manufacturer, bypassing centralized IT organization. A user just needs to unbox the device, connect to power and the local Wi-Fi network, enter corporate credentials, and the Autopilot process will take it from there. Here is a video recording which gives a better visual of an actual user experience.
The result of the Autopilot enrollment process would be a fully provisioned hardened device ready for business use. It will not have any local accounts configured - a user must use domain credentials as the only way to access a device. There are no cached credentials on the device after the enrollment is complete, therefore there must be connectivity to Active Directory at the time of initial login. For field-based devices, this represents an architectural challenge which Netskope Private Access (NPA) is uniquely positioned to solve.
Devices with a pre-installed Netskope client would be enabled to access Active Directory services in a secure least-privilege manner via Netskope Private Access (NPA). A Netskope client with necessary configuration parameters can be installed by Intune as a part of the Autopilot enrollment process.
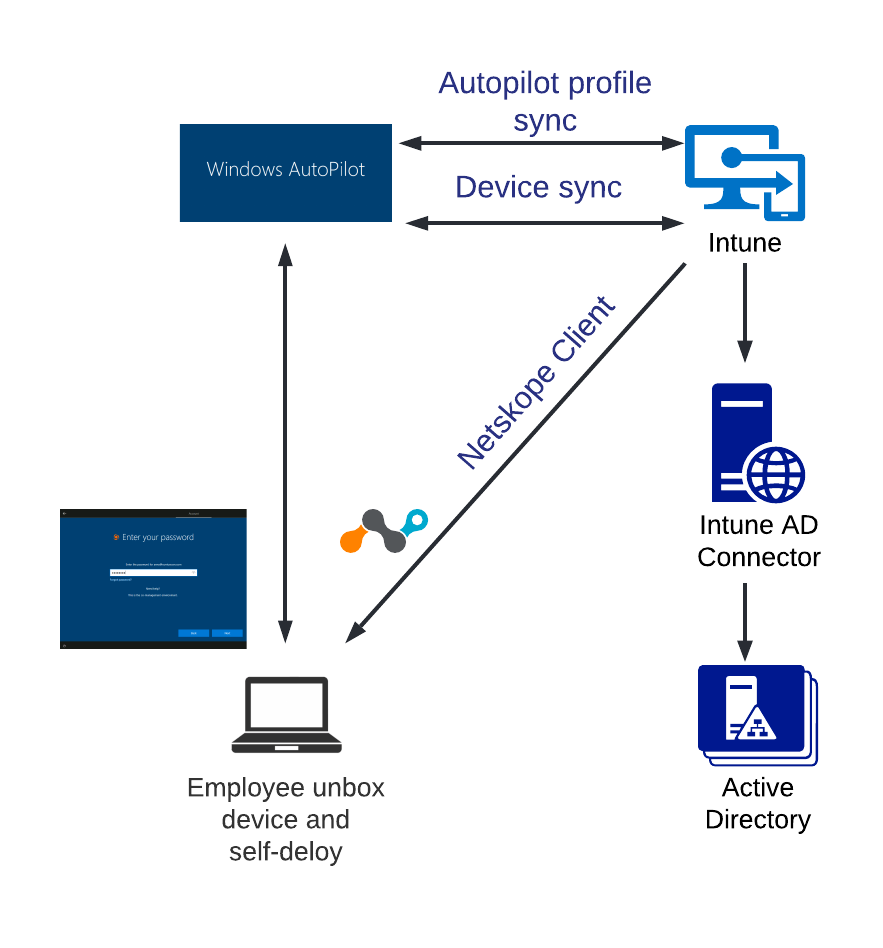
After successful Autopilot enrollment, a user will be presented with the standard Windows logon screen. At this point user context and permissions are not yet known. Netskope Private Access client will establish a “pre-logon” tunnel specifically designed for accessing critical infrastructure services out of machine level context.

After successful authentication, Netskope client will collect the user's identity and will switch into user tunnel mode which will open broader access to enterprise applications and services.

Security considerations for pre-logon connectivity
Netskope recommends to combine Autopilot enrollment process with an additional phase that triggers machine certificate generation by Active Directory CA and distribution to the enrolled devices via Intune. It requires additional component, Intune Certificate Connector, to be deployed to help bridge Intune and Active Directory Certificate Authority. More details on how machine certificates lifecycle can be established will be shared in the next posts. Eventually the device which just completed the Autopilot enrollment process will have a unique machine certificate which will be mandatory for origination of pre-logon tunnel.
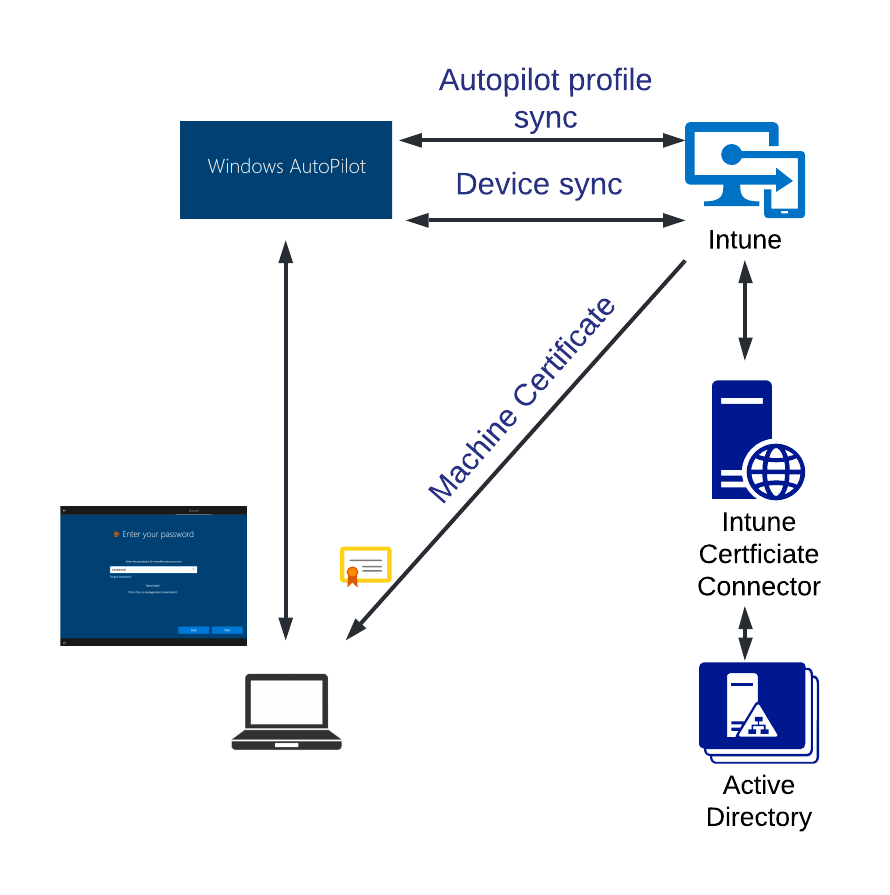
Autopilot deployment implies supporting connectivity to Active Directory services at the time when user context is not yet known. Pre-logon connection operates under machine level context, therefore traditional interactive authentication methods won’t be available. Netskope client is pre-configured and rolled out with pre-logon username and tenant unique identification. This combination enables NPA to match incoming requests with correct tenant and real-time access policies for pre-logon services with Active Directory.
By default, Netskope pre-logon tunnel will be allowed in the context of the fact that the device was successfully enrolled in the Netskope tenant. However, Netskope recommends that customers add additional checks of verifying that the machine certificate issued by customer's CA is both present and valid. At the time of pre-logon tunnel establishment, Netskope will then also perform cryptographic validation of the machine certificate to ensure it is not forged, not revoked, and issued by the trusted internal enterprise CA. This further strengthens security posture and exemplifies defense-in-depth approach by verifying secure enrollment in both Netskope tenant and Active Directory structure.
Configuration guidelines
Windows Autopilot configuration
This blog post assumes that Windows Autopilot setup is already operational. It is recommended to validate correctness of device enrollment through the Autopilot process while local connectivity to Active Directory is present.
Subsequent steps described in this document will enable the same Autopilot experience for the device in the field. Detailed instructions on how Autopilot should be configured are available on Microsoft documentation portal:
https://docs.microsoft.com/en-us/mem/autopilot/windows-autopilot-hybrid
https://docs.microsoft.com/en-us/windows/deployment/windows-autopilot/demonstrate-deployment-on-vm
Note: Devices enrolled via Autopilot can't have SSL inspection enabled on their path during the initial enrollment. If the Autopilot process is initiated from the enterprise perimeter that is protected by Netskope or any third party, it is recommended to initiate it from a dedicated network segment that is excepted from the SSL interception/decryption.
User accounts enrollment and provisioning with Netskope
User accounts associated with Autopilot deployment should be synchronized with the Netskope tenant, so that user provisioning and enrollment can be enabled. More information about specific configure steps can be found in Microsoft article:
Netskope client deployment via Intune
The following steps below are required to include Netskope client deployment as a part of Autopilot deployment process:
- Enable pre-logon in the Netskope Tenant - In the Netskope tenant UI proceed to Settings - Security Cloud Platform - Netskope Client - Devices - Client Configurations. Click on the appropriate Client Configuration, set the checkbox in front of Pre-logon for Private Apps. Create an arbitrary pre-logon username, for example autopilot@prelogin.netskope.com. This pre-logon username is used as a service account inside Netskope tenant and should not be provisioned nor synchronized with Azure Active Directory. It will be automatically added to the list of users in Netskope tenant and can be used for configuration of real-time access policies for private applications. Large scale deployment may include several Client Configurations associated with specific Groups or OU and they will have individual pre-logon usernames.
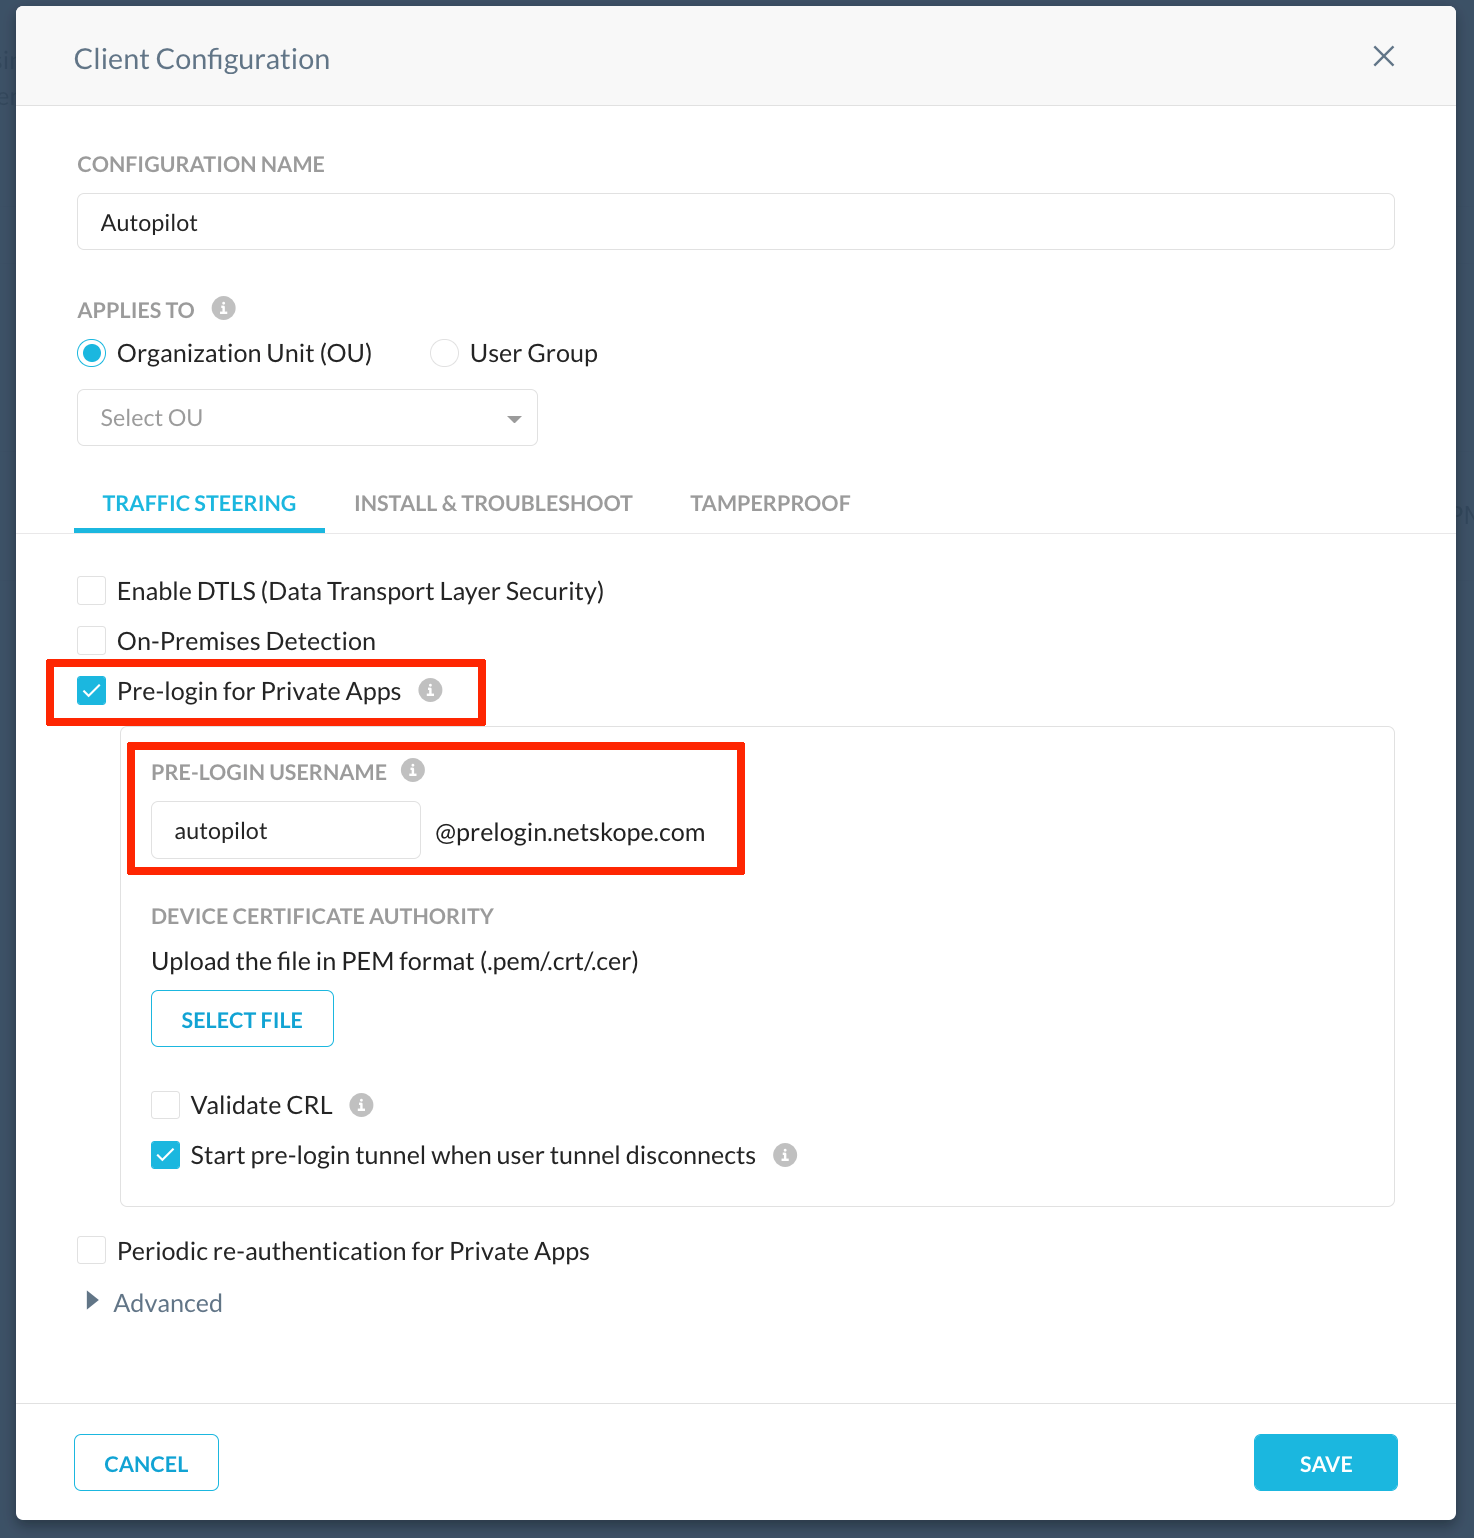
Optional and recommended configuration: Upload CA certificate to activate machine certificate validation. Enable CRL validation. Click Save
- Add Netskope client into Intune - Refer to the specific configuration steps described and the article https://docs.netskope.com/en/microsoft-intune.html . In order to enable Autopilot use case an additional argument with pre-logon username should be appended, so the entire command line arguments string will look like the following example: host=addon-<tenant-name>.goskope.com token=<org-id token> prelogonuser=autopilot@prelogon.netskope.com /qn
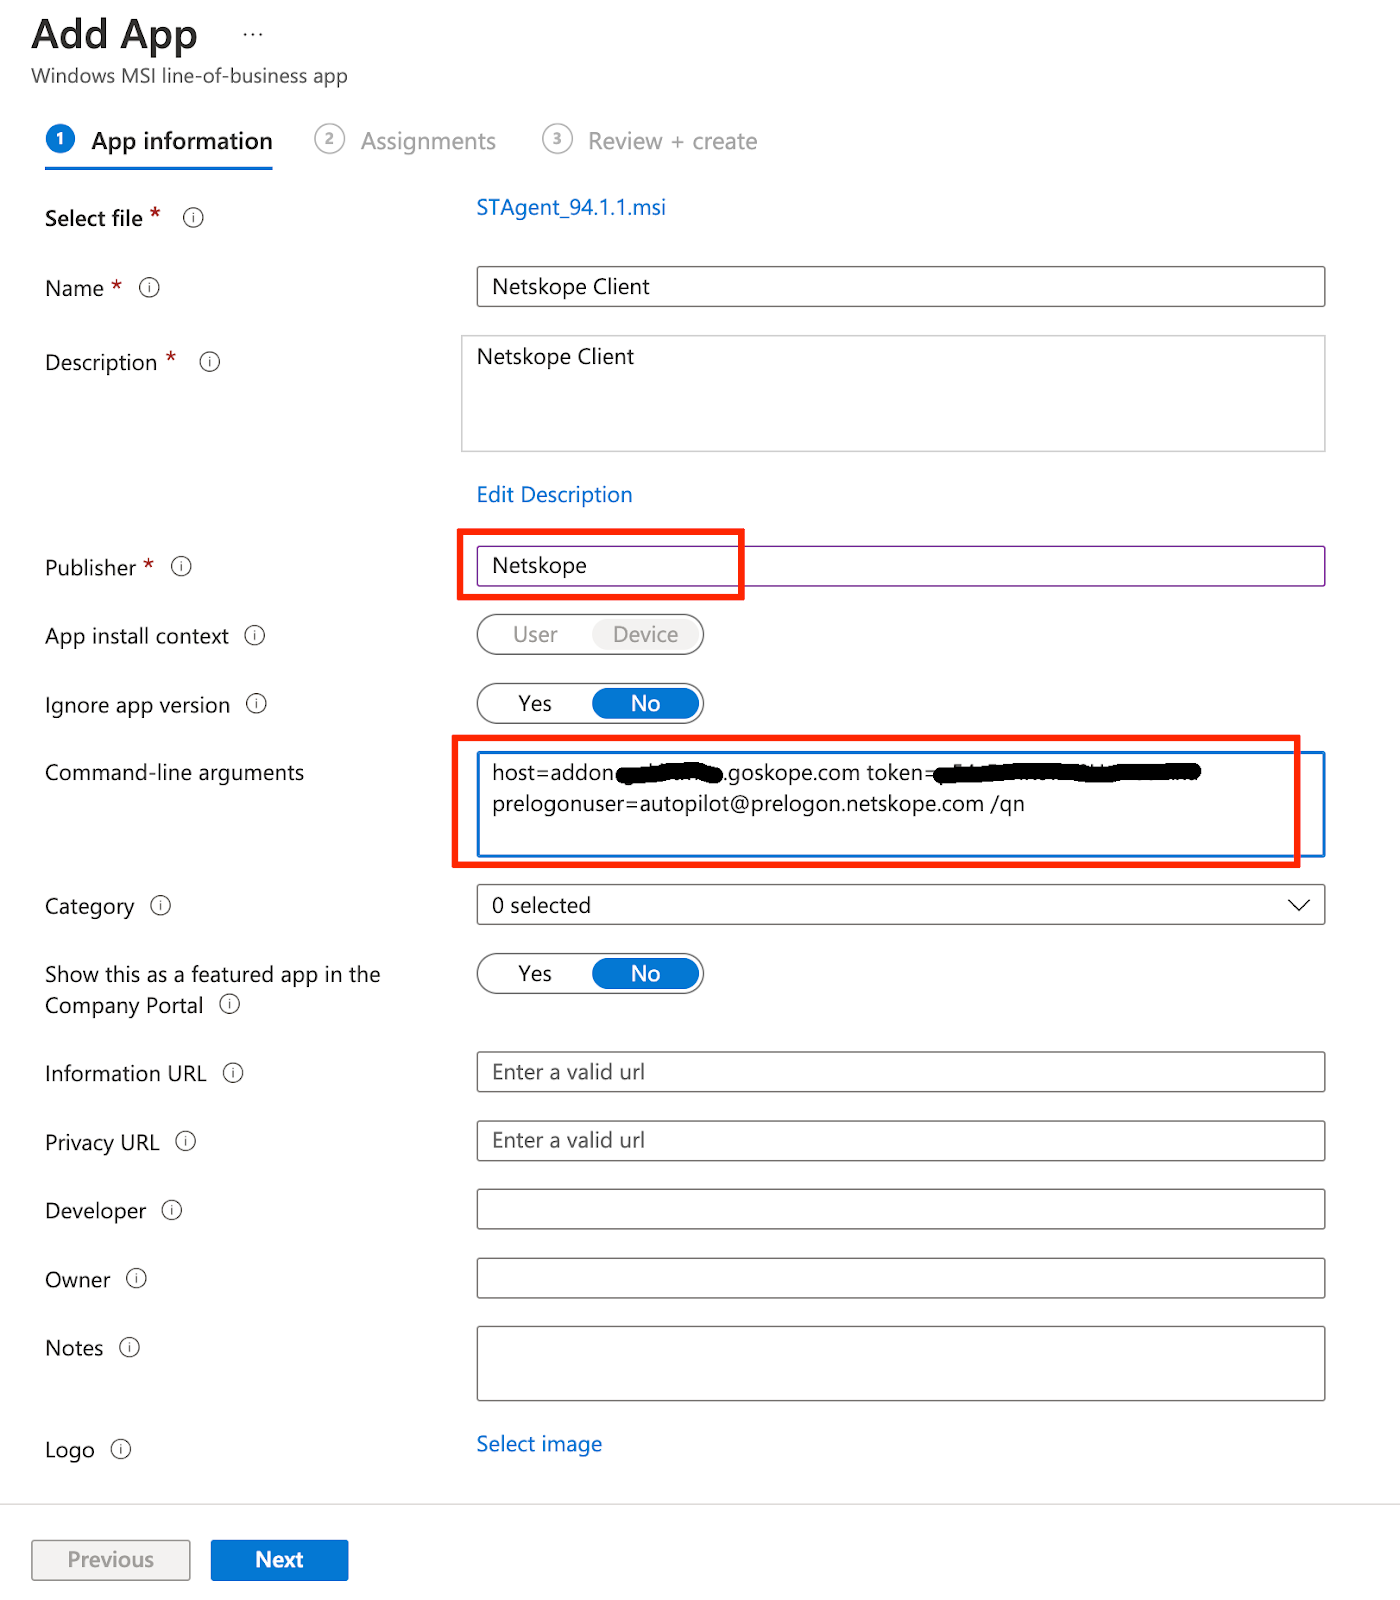
Click Next. Make an assignment with the appropriate group which is used for Autopilot deployment. Click Next and Create.
Netskope Private Access configuration in Netskope tenant
The following steps required to complete Netskope Private Access configuration to enable Autopilot enrollment for devices in the field.
- Create Private Application definitions for Active Directory services according to the article https://docs.netskope.com/en/netskope-private-access-for-microsoft-active-directory-domain-services.html
- If a Distributed File System (DFS) is expected to be used by users enrolled into Autopilot it is recommended to associate DFS configuration objects with pre-logon user accounts as well. More information about DFS configuration for NPA can be found in the article https://docs.netskope.com/en/netskope-private-access-for-smb-and-dfs-services.html
- Create NPA Access Policy - In Netskope UI proceed to Policies - Real-time Protection - New Policy - Private App Access. In the Source section select earlier created user autopilot@prelogin.netskope.com. In the Private App dropdown select earlier created Private Application definitions corresponding to Active Directory Services. Provide a name for the policy and click Save.
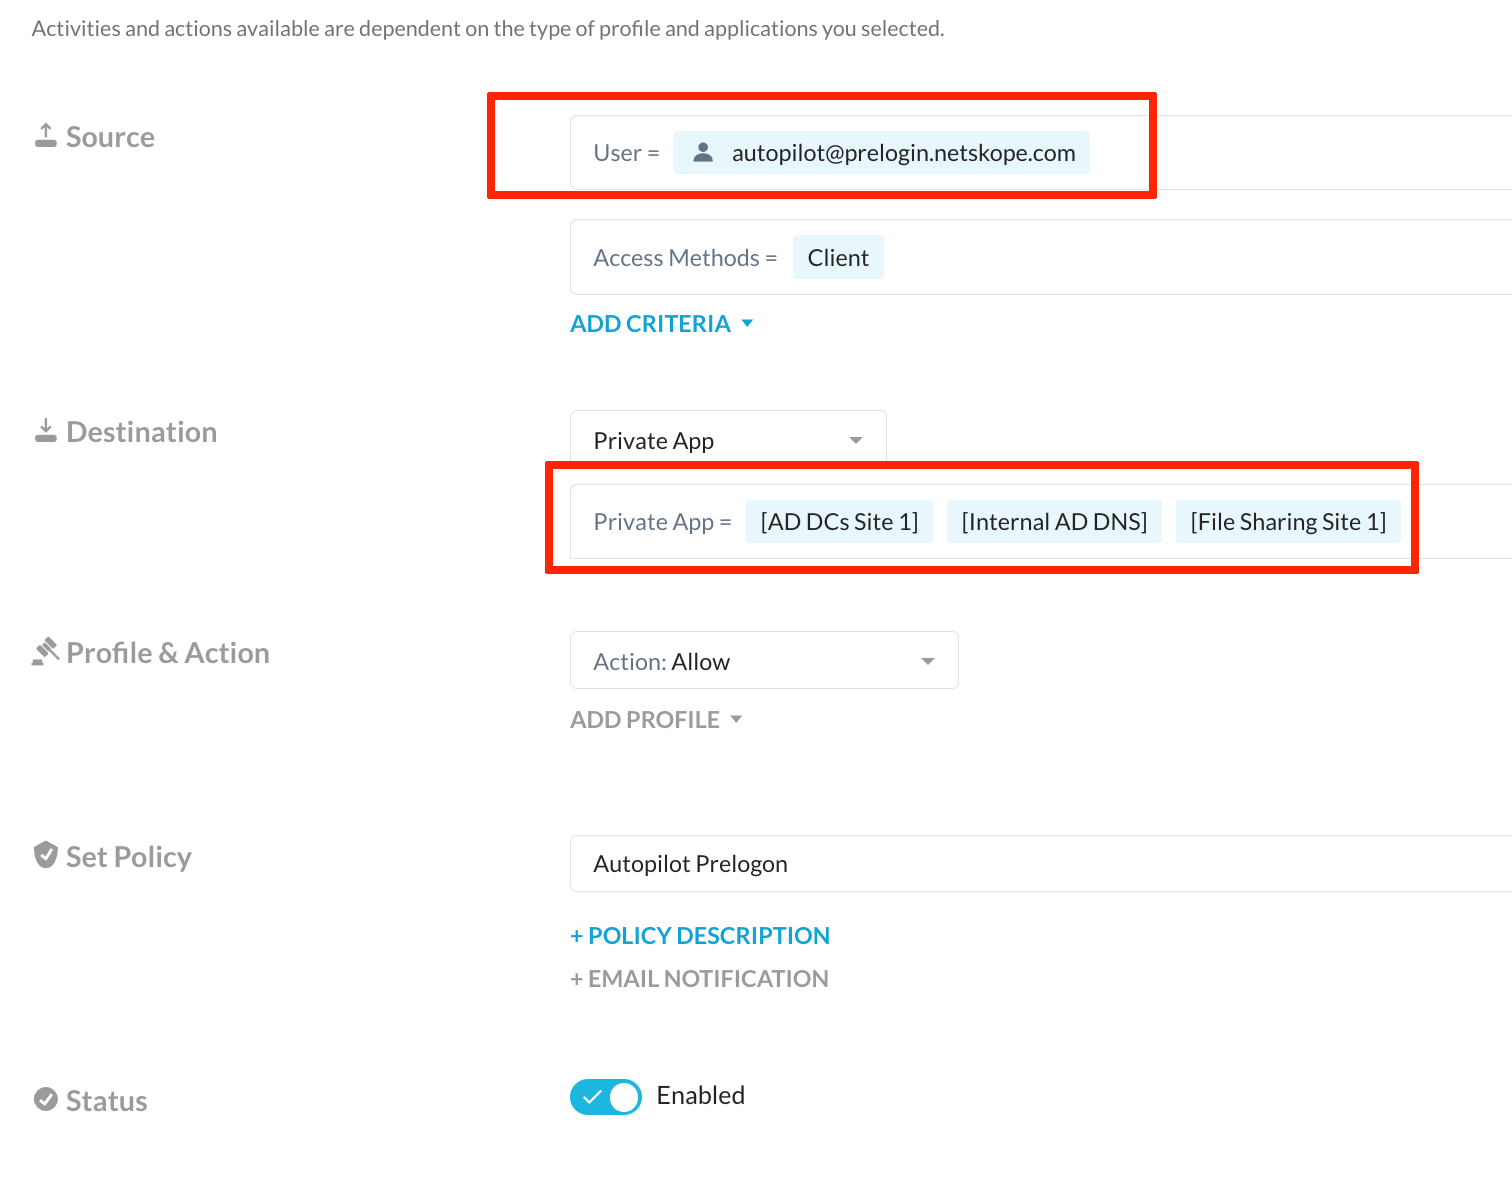
Make a decision about policy placement according to the existing hierarchy and click Save. Click Apply Changes.
Conclusion
After completion of the above steps full enrollment for devices in the field should be operational. After Autopilot enrollment is complete users should be able to perform an initial logon to the device and start working. At that point Netskope client will switch to user tunnel mode which will enable controlled and secure access to Web, SaaS and Private Applications.


