


Netskope Global Technical Success (GTS)
Case Insights - DLP Exceptions
Netskope Cloud Version - 126
What is this article about?
As a new initiative, this report examines the most recurrent “How-to” questions raised by customers and managed by Netskope Global Technical Success (GTS) Team.
Netskope DLP Exception
Cases concerning the creation of Data Loss Prevention exceptions are frequent. To illustrate the exception generation process, I will outline two past engagements.
Customer #1
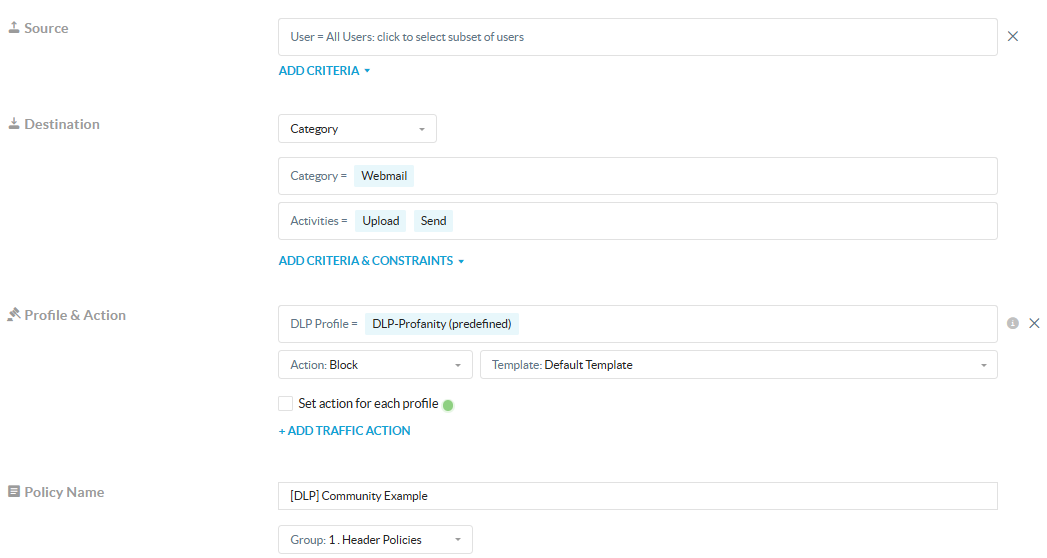
This customer implemented a policy to block any profanity language when sending and uploading content via emails, the policy had Netskope DLP predefined profile named: “DLP-Profanity” blocking activities such as Upload, and Send, for instance:
Path: Netskope Tenant UI >>> Policies >>> Real-time Protection
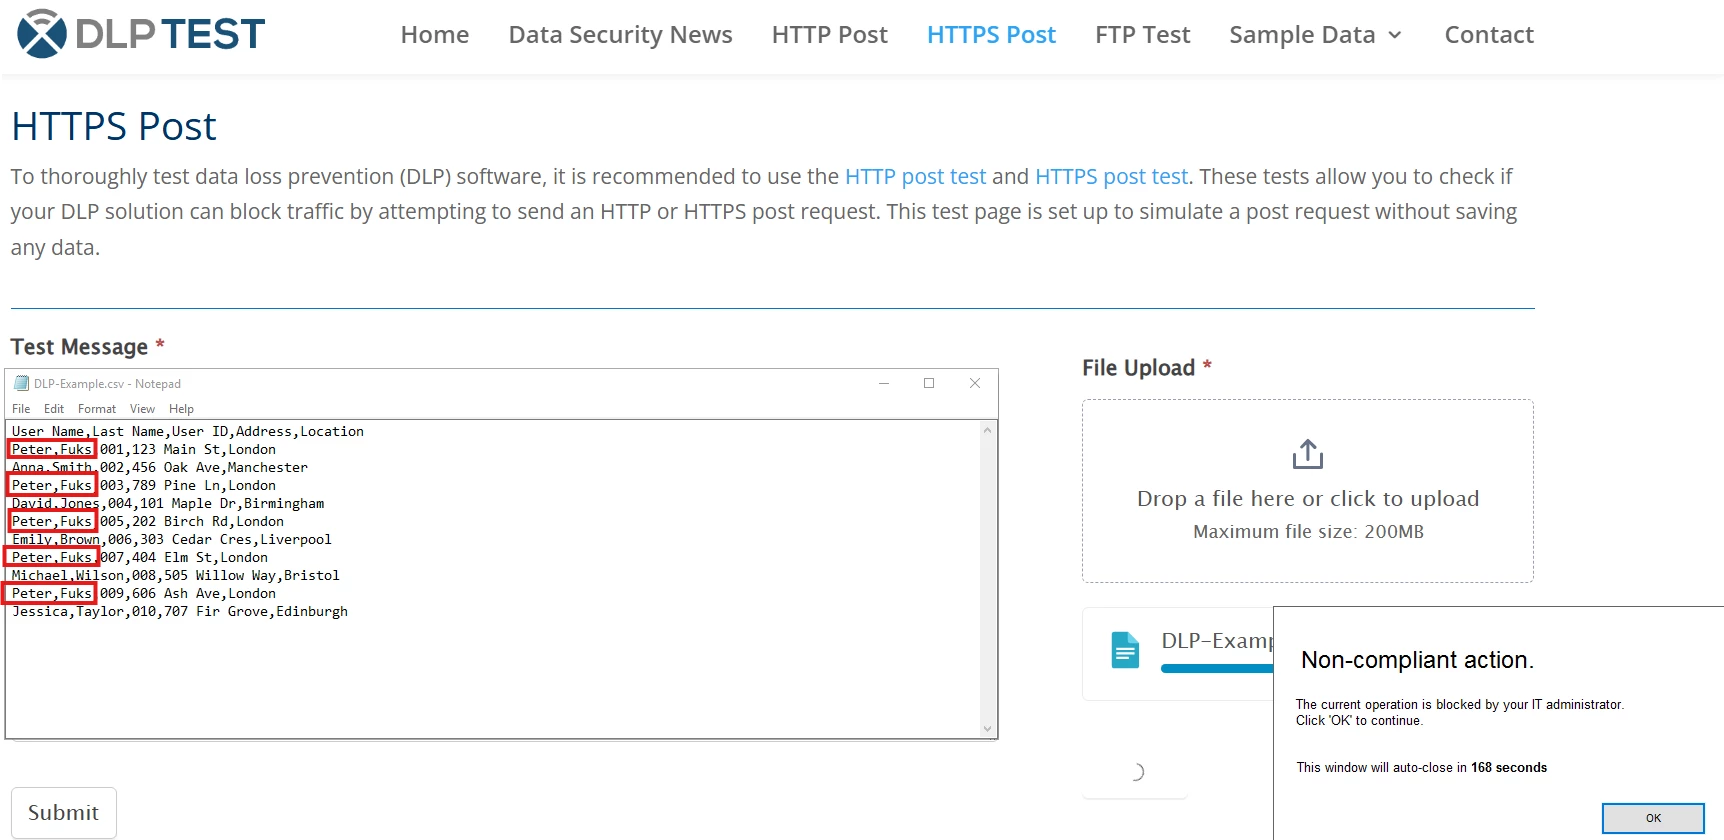
After creating and enabling the policy, they noticed that for some reason an user with last name “fuks” was triggering this DLP Profile when the user was found in some internal sheets. For this example I will use a random name, create a sheet with random values using AI, and use DLP Test website. For instance:
When looking at the incident while Netskope Forensics is enabled, we can see the following,
Path: Netskope Tenant UI >>> Incidents >>> DLP
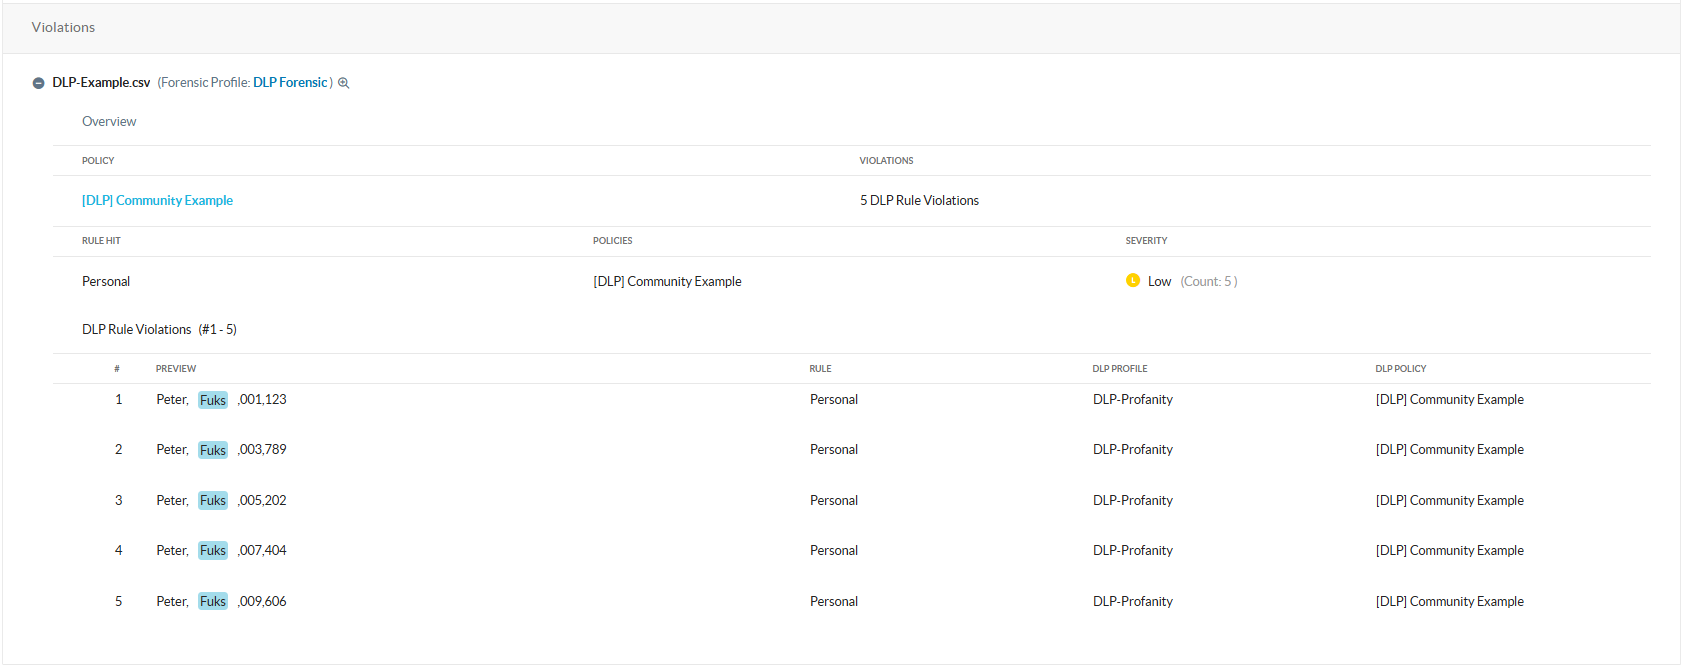
With the above information, we see that trigger happened within the “personal” rule in “DLP-Profanity”, and this is what the predefined DLP profile contains:
Path: Netskope Tenant UI >>> Policies >>> DLP

Due to the predefined DLP Rules cannot be edited, the process to exclude matching words requires creating a new DLP Rule taking the exact identifier as a baseline, and excluding the specific words, then creating a new DLP Profile with same DLP Rules except for the one provoking the false positive, for this rule, we will add our custom one.
Process workflow:
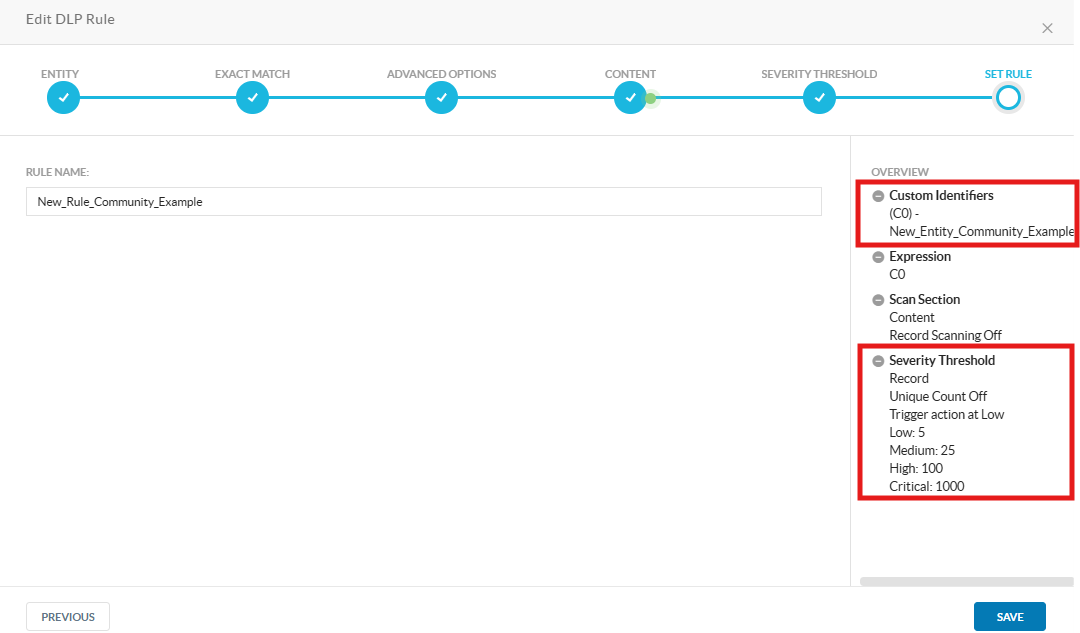
- Create a new entity with the predefined rule as baseline and excluding the required words.
- Create a new DLP Rule with the new entity.
- Create a new DLP Profile with all predefined rules except for the one causing the false positive.
- Replace predefined DLP Profile from Real-time policy.
Create a new entity with the predefined rule as baseline and excluding the required words
Path: Netskope Tenant UI >>> Policies >>> DLP >>> Entities
- Click on “New Entity”, add a name, set it up to case insensitive, search for predefined rule, then click on “Advanced Options” select “Begins with, Ends with, Does not match”, click on “Does not end with” and add the word(s) that triggered before, then save.

| ℹ️ if your tenant does not look like the above, please ask for “DLP Entity” to be enabled by raising a ticket via Support portal and selecting “How-to questions” as case type. Reference: DLP Entity |
Create a new DLP Rule with the new entity
Path: Netskope Tenant UI >>> Policies >>> DLP >>> Rules
- Click on “New Rule”, search for the new custom entity, then add a similar configuration as the predefined rule.
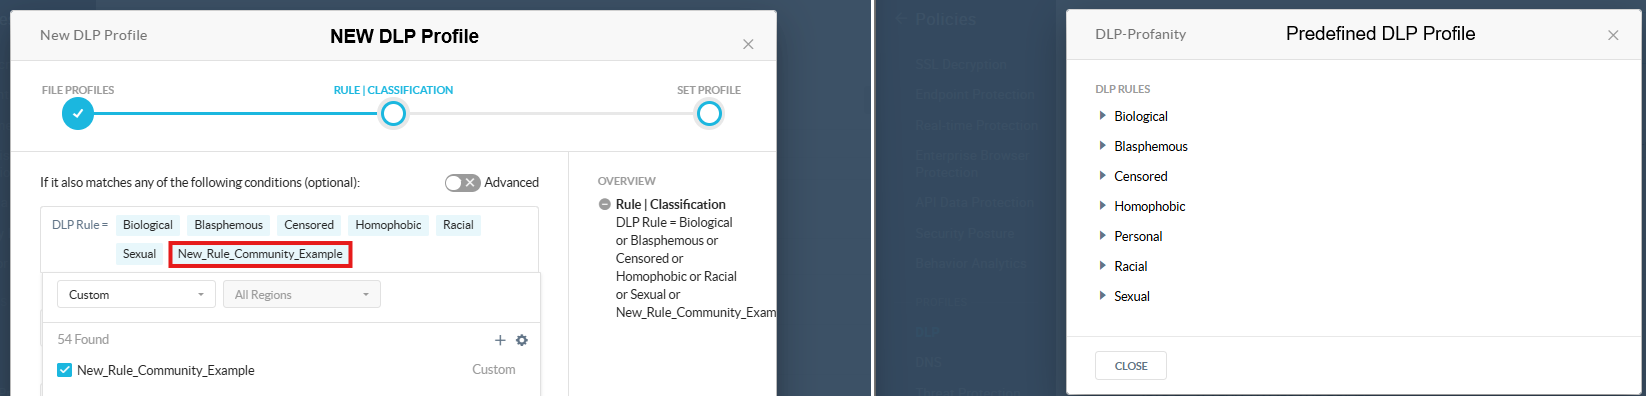
Create a new DLP Profile with all predefined rules except for the one causing the false positive
Path: Netskope Tenant UI >>> Policies >>> DLP
- Click on “New profile”, add all predefined rules contained in the predefined DLP Profile, except for the one causing the false positive for that we will use our custom DLP Rule, add a name, then save.

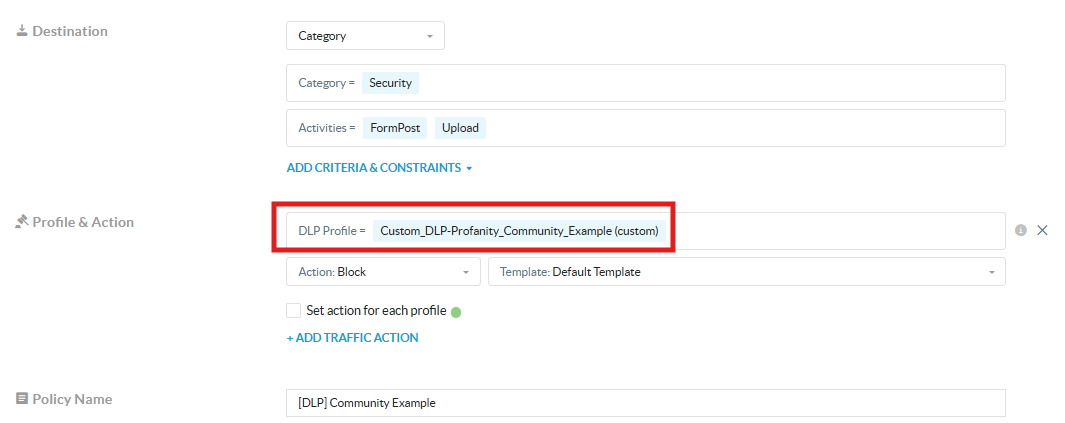
Replace predefined DLP Profile from Real-time policy
Path: Netskope Tenant UI >>> Policies >>> Real-time protection
- Open the Real-time policy with the DLP profile, then replace the DLP Profile with the new custom profile. Note: For this example, I am using a website that is categorized as Security.

Validation
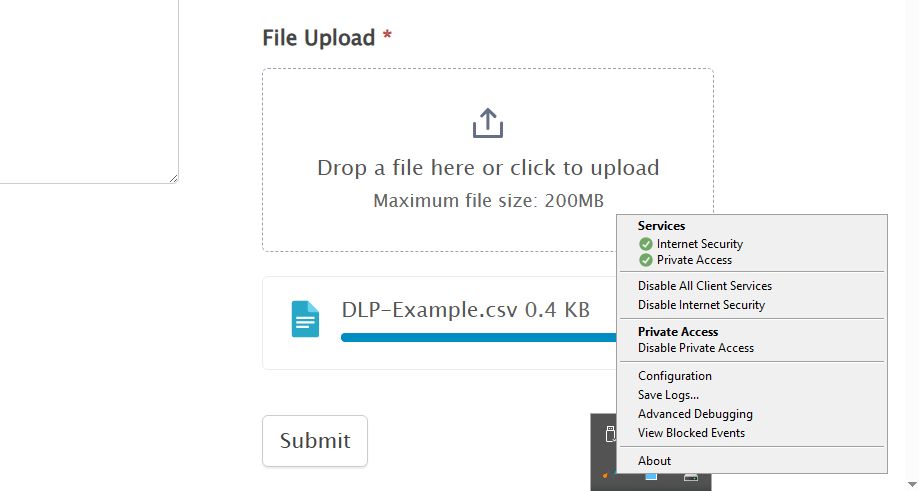
Upon uploading the test file, no block was experienced.
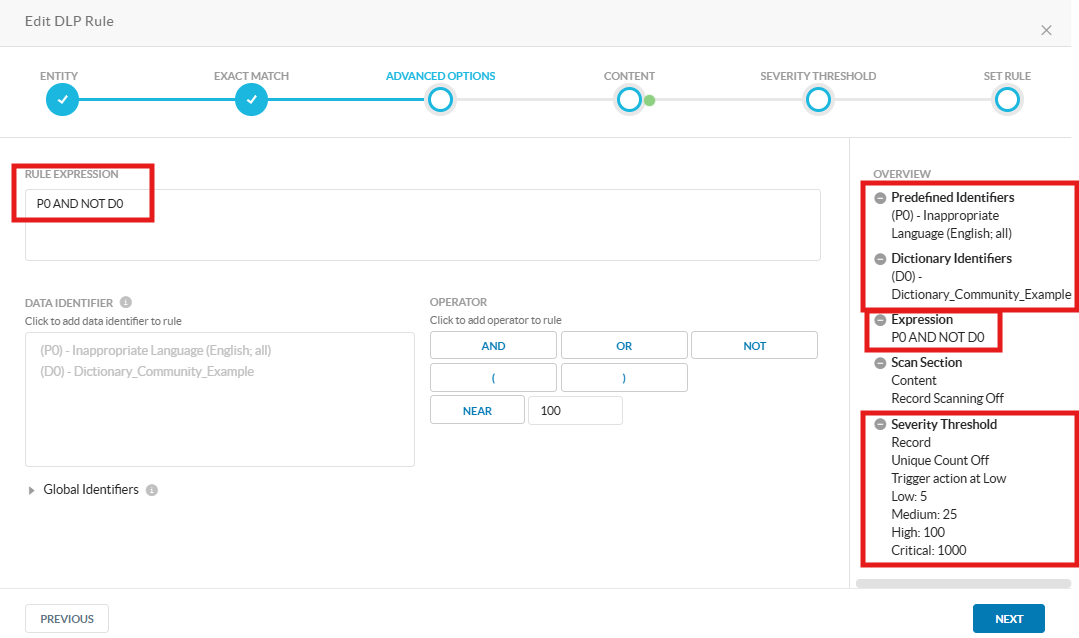
In addition to the above process, there is an alternative where we can create either a dictionary or data identifier with some contextual information rather than the specific words matching the rule, and add it within a new DLP Rule along with a predefined rule with no edition, but modifying the expression with AND NOT operator.
Process workflow:
- Create a new dictionary with contextual information.
- Create a new DLP rule with the predefined rule and a dictionary (or data identifier with a single word) while modifying the expression.
- Create a new DLP Profile with all predefined rules except for the one causing the false positive.
- Replace predefined DLP Profile from Real-time policy.
Create a new directory with contextual information
Path: Netskope Tenant UI >>> Policies >>> DLP >>> Entities
- Click on “New Entity”, add a name, select “Dictionary”, set it up to case insensitive, then upload a dictionary with contextual information (for this example I will be using “Peter”), then save.
Dictionary:

Entity:

Create a new DLP rule with the predefined rule and a dictionary while modifying the expression
Path: Netskope Tenant UI >>> Policies >>> DLP >>> Rules
- Click on “New Rule”, search for predefined rule and custom dictionary, then edit the expression to exclude the dictionary with AND NOT operator, add a name, then save.
Create a new DLP Profile with all predefined rules except for the one causing the false positive
Path: Netskope Tenant UI >>> Policies >>> DLP
- Click on “New profile”, add all predefined rules contained in the predefined DLP profile, except for our new rule, add a name, then save.
Replace predefined DLP Profile from Real-time policy
Path: Netskope Tenant UI >>> Policies >>> Real-time protection
- Open the Real-time policy with the DLP profile, then replace the DLP profile with the new custom profile. Note: For this example, I am using a website which is categorized as Security.
Validation
Upon uploading the file, no block was experienced.

Customer #2
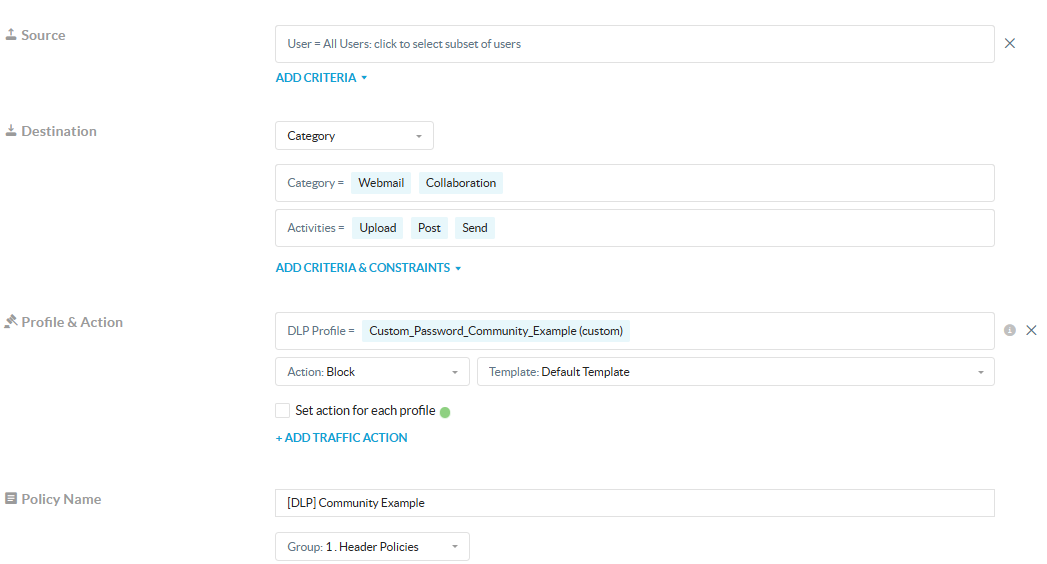
This customer wanted to block any password being sent, uploaded or posted via Webmail or Collaboration apps, so they created a policy a policy using a custom DLP profile on a Real-Time policy blocking activities such as Upload, Post, and Send, for instance:
Path: Netskope Tenant UI >>> Policies >>> Real-time Protection
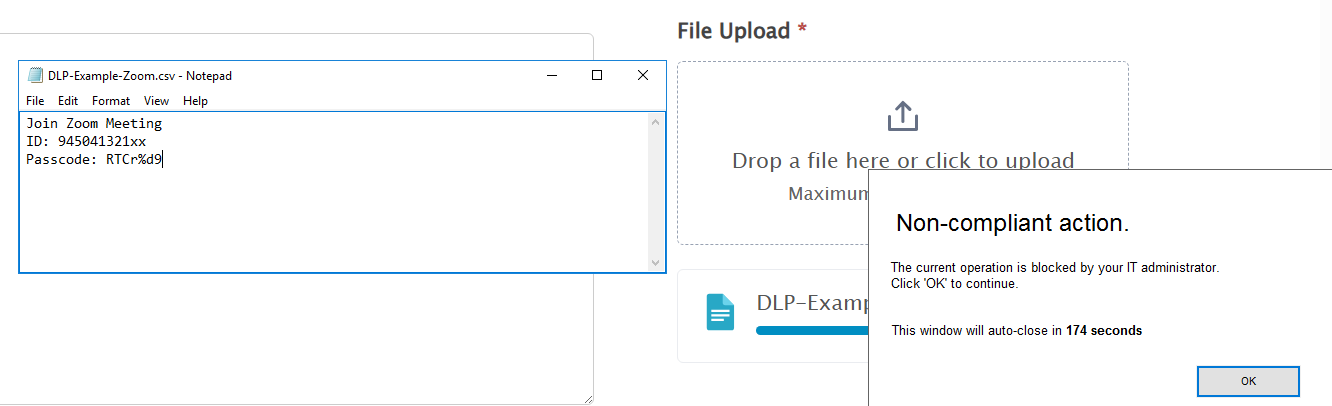
After creating and enabling the policy, they noticed that Zoom meeting invites were triggering the policy. For this example I will use a random Zoom meeting, and use DLP Test website. For instance:
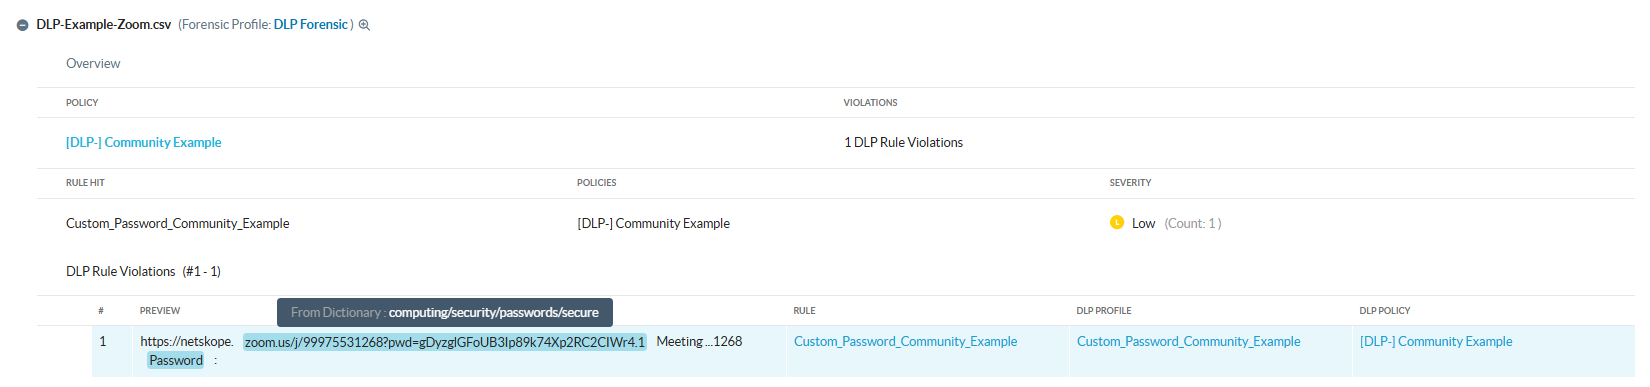
When looking at the incident while Netskope Forensics is enabled, we can see the following,
Path: Netskope Tenant UI >>> Incidents >>> DLP
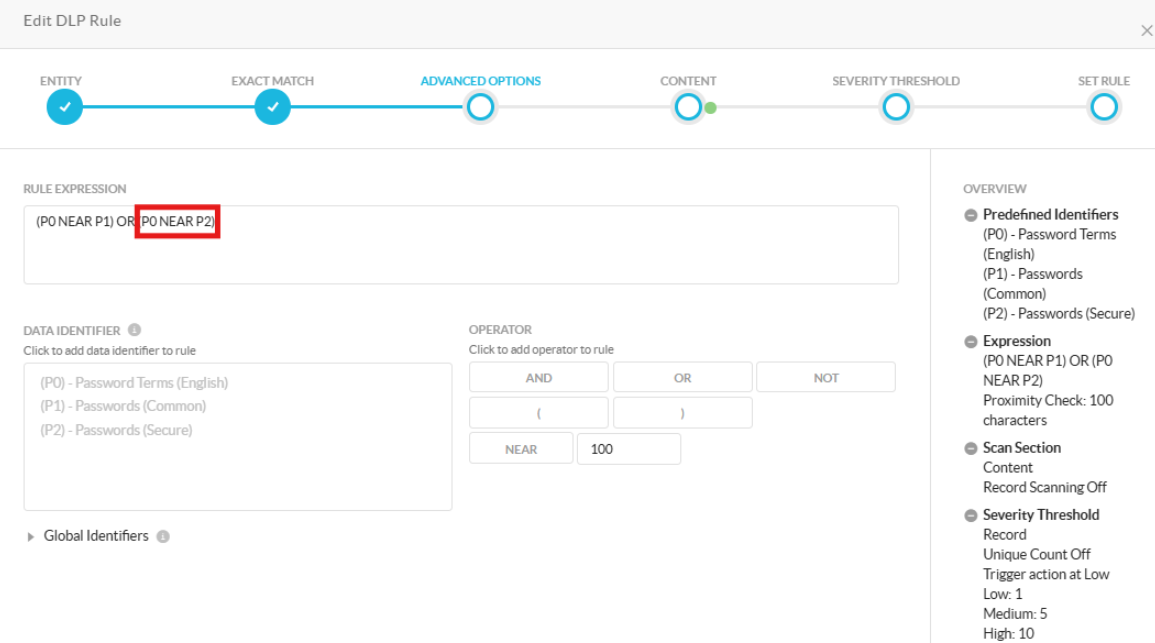
When looking at the DLP Rule expression, we can see that it is the 2nd part of the expression the one triggering the policy, however, in this case it will not be feasible applying an exclusion based on password but rather some contextual information such as Zoom
Path: Netskope Tenant UI >>> Policies >>> DLP >>> Rules
Process workflow:
- Create either a dictionary or data identifier with single word
- Edit the DLP Rule expression
Create either a dictionary or data identifier with single word
Path: Netskope Tenant UI >>> Policies >>> DLP >>> Entities
- Click on “New Entity”, add a name, set it up to case insensitive, add “Join Zoom Meeting” then save.

Edit the DLP Rule expression
Path: Netskope Tenant UI >>> Policies >>> DLP >>> Rules
- Find the DLP Rule, add the custom identifier for “Join Zoom Meeting”, change the rule expression and add “AND NOT” operator, then save.

Validation
Upon uploading the file, no block was experienced.

Terms and Conditions
- All documented information undergoes testing and verification to ensure accuracy.
- In the future, it is possible that the application's functionality may be altered by the vendor. If any such changes are brought to our attention, we will promptly update the documentation to reflect them.
Notes
- This article is authored by Netskope Global Technical Success (GTS).
- For any further inquiries related to this article, please contact Netskope GTS by submitting a support case with 'Case Type – How To Questions'.


