


The Netskope Cloud Exchange
Netskope offers an interesting solution to solve this use case and that is the Netskope Cloud Exchange (also referred to as Netskope CE). It is a free offering from Netskope with which organizations can share their IoC information between their security tools using the Threat Exchange, use the Log Shipper to import transaction logs from Netskope, use the Ticket Orchestrator to relay alerts to ticketing services and use the Risk Exchange to exchange risk scores between multiple sources. It can be installed and run in a Linux Docker environment by each customer on their own. You can read more about Netskope Cloud Exchange here. As mentioned above, there are four main modules offered with the Netskope Cloud Exchange: the Log Shipper, Ticket Orchestration, Threat Exchange, and Risk Exchange. All the modules are hosted and run in a single docker environment. Make sure you go through the system requirements once before you provision your infrastructure for the Cloud Exchange.
High Availability on Cloud Exchange
High Availability can be described as the ability of a particular hardware/software to operate continuously without any interruptions during the service period. The goal is to maintain high service levels and enable fault tolerance so that the recipient of the service is unaffected due to unexpected failure. The Netskope Cloud Exchange plays a crucial role within our Netskope SOC as the SOC utilizes all of the modules to protect Netskope and help strengthen our defensive controls. So it is important that we set up our Cloud Exchange in such a way that it is resilient against unexpected failures which would in turn affect our security team’s operations. Let’s discuss how the Netskope CustomerZero migrated our standalone Cloud Exchange setup to a High Availability setup. Please supplement this blog along with Netskope’s official Cloud Exchange documentation available here, we will also point to reference in the official documentation when required.
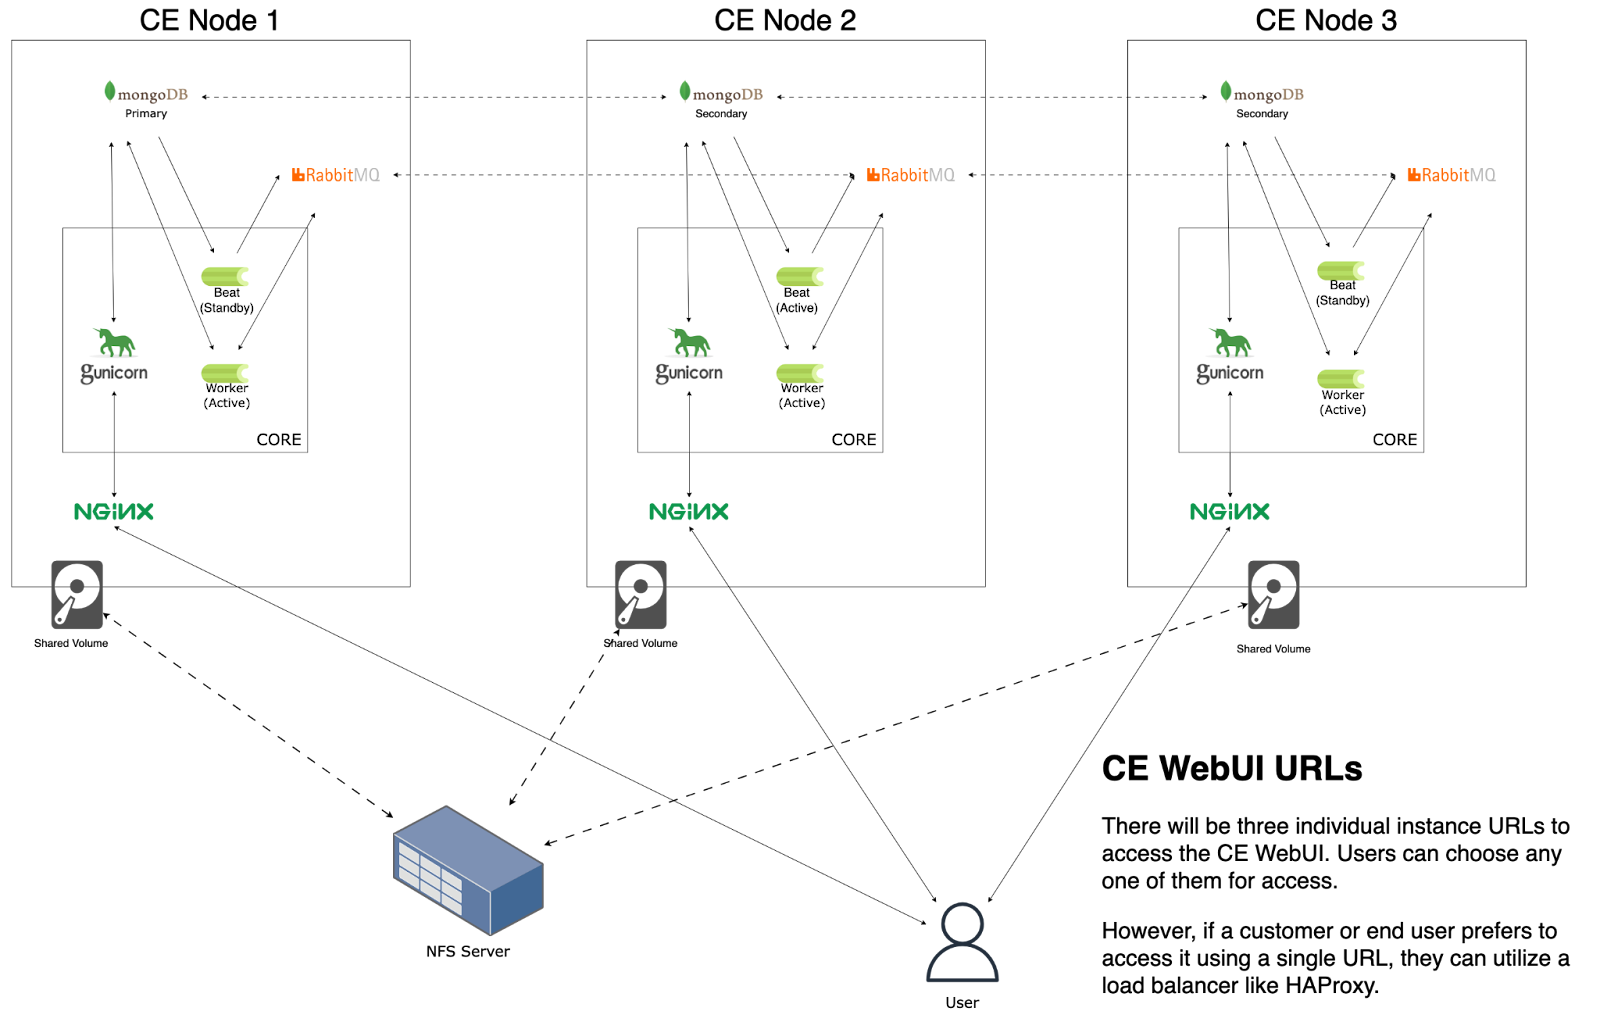
Cloud Exchange HA Deployment
Internally, the CustomerZero have set up our Cloud Exchange on a Ubuntu Virtual Machine hosted on cloud. So this document is going to be for customers who have a similar deployment as ours. In case you have a different setup and would like to understand about High Availability for your setup, feel free to reach out to your Customer Success team. Follow the steps below in order to update your Cloud Exchange from standalone to Highly Available. Once again, the below steps are to follow when you have the Cloud Exchange deployed standalone and are planning to upgrade it to high availability.
- Create a snapshot image of the existing Cloud Exchange setup before updating it to High Availability. This can be used to restore the Cloud Exchange later in case the update fails.
- Copy down the contents of the ‘ta_cloud_exchange’ folder in your primary Cloud Exchange setup. This can be used to restore the Cloud Exchange later in case the update fails.
- Ensure that the version to be installed or updated to is greater or equal to Cloud Exchange version 5 as High Availability was introduced with version 5.
- Note down the MongoDB Maintenance Password and the Maintenance Token.
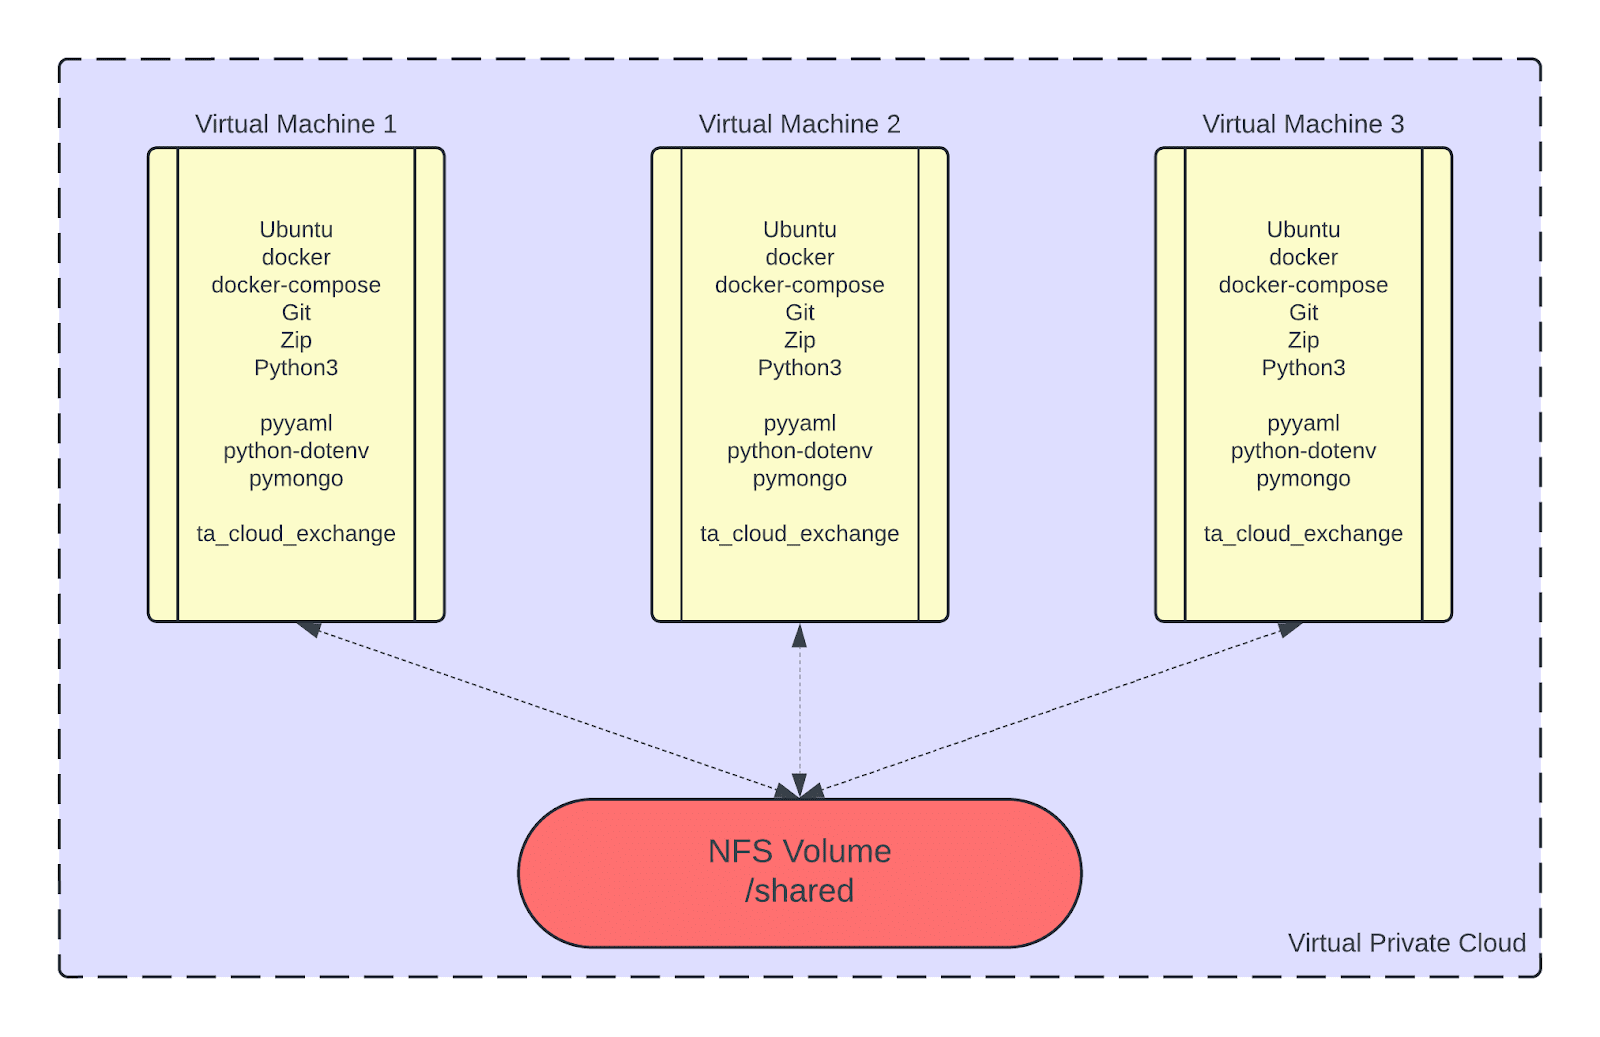
- Create 2 new virtual machines that act as the secondary nodes and make sure that the primary and secondary nodes are able to communicate with each other.
- Update all 3 Cloud Exchange nodes and their respective package managers.
- Make sure that the basic system requirements and other cloud exchange dependencies are installed on all 3 nodes as mentioned in the document.
- Operating System Requirements
- Docker & docker-compose or podman
- Python3
- Git
- Zip
- Install python dependencies on all 3 nodes as mentioned in the documentation.
- pyyaml
- python-dotenv
- pymongo
- Ensure ‘selinux’ is disabled on all the 3 nodes.
- Open up the required ports of all 3 nodes as mentioned in the Cloud Exchange documentation.
- Create a NFS volume and ensure that all 3 Cloud Exchange Nodes are able to connect to the NFS volume.
- Create a directory in the NFS volume which will be used by all the 3 nodes for information exchange.
- Mount the NFS volume to all 3 Cloud Exchange nodes and ensure its functionality by accessing the directory created on the NFS volume on Step 12.
- Pull the Cloud Exchange Github repository into 2 of the newly created nodes and update the repository in the primary node.
- If you have certificates with the standalone deployment and want to migrate them to the High Availability setup, copy the certificates to /config/ssl_certs. Further information regarding this can be found in the documentation.
- Note down the Private IP Addresses of all 3 Cloud Exchange nodes.
- Stop the Primary Cloud Exchange.
- Follow the standard installation procedure to set up the Cloud Exchange primary node first and make sure to enter the IP Addresses of all 3 nodes correctly as requested by the setup.
- The same JWT Token and Maintenance password apply for the 2 newly created nodes as well.
- Follow the same steps followed during the primary node setup and setup the secondary nodes, make sure to enter in the appropriate IP address values when requested.
- Once all 3 nodes are set up correctly and running, you should be able to see a similar setup on the Cloud Exchange dashboard.
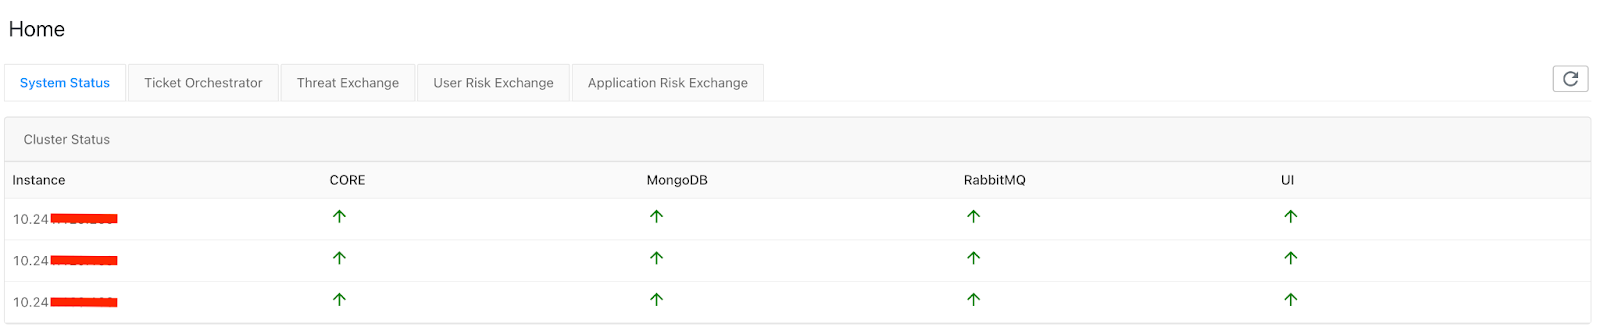
- To identify which of these is the primary node, hovering the mouse over the MongoDB column should provide further information.


