“You can’t defend against threats that you are not aware of”
What is IoC and Why share it?
IoC stands for Indicators of Compromise and as the name suggests, it points to technical identifiers or behavioral patterns which help to identify if a particular system or network or artifact has been compromised. Anything which helps to identify a particular malicious activity could be an IoC, ranging from an executable, hash, IP Address, URL, etc. As the quote above implies, organizations cannot safeguard themselves from threats and attacks they are unaware of. Utilizing heuristics can narrow the divide between familiar and unfamiliar threats, but pinpointing specific criteria significantly accelerates the process and demands fewer computational resources. That’s where a robust and strong IoC sharing program comes into lay. Through the efficient and effective exchange of IoCs among security telemetry tools, each tool acquires IoC data from others, contributing to enhanced detection capabilities across a broad spectrum of malicious activities using the shared IoC.
Using the Netskope Cloud Threat Exchange to share IoC
Netskope offers an interesting solution to solve this use case and that is the Netskope Cloud Exchange (also referred to as Netskope CE). It is a free offering from Netskope with which organizations can share their IoC information between their security tools to improve their detection posture overall. It can be installed and run in a Linux Docker environment by each customer on their own. You can read more about Netskope Cloud Exchange here. There are four main modules offered with the Netskope Cloud Exchange: the Log Shipper, Ticket Orchestration, Threat Exchange, and Risk Exchange. All the modules are hosted and run in a single docker environment. Make sure you go through the system requirements once before you provision your infrastructure for the Cloud Exchange. Here we are going to discuss the usage of Threat Exchange to solve for our use case. Once you have successfully downloaded and installed the Netskope CE, you will need to turn the ‘Threat Exchange’ module ON.
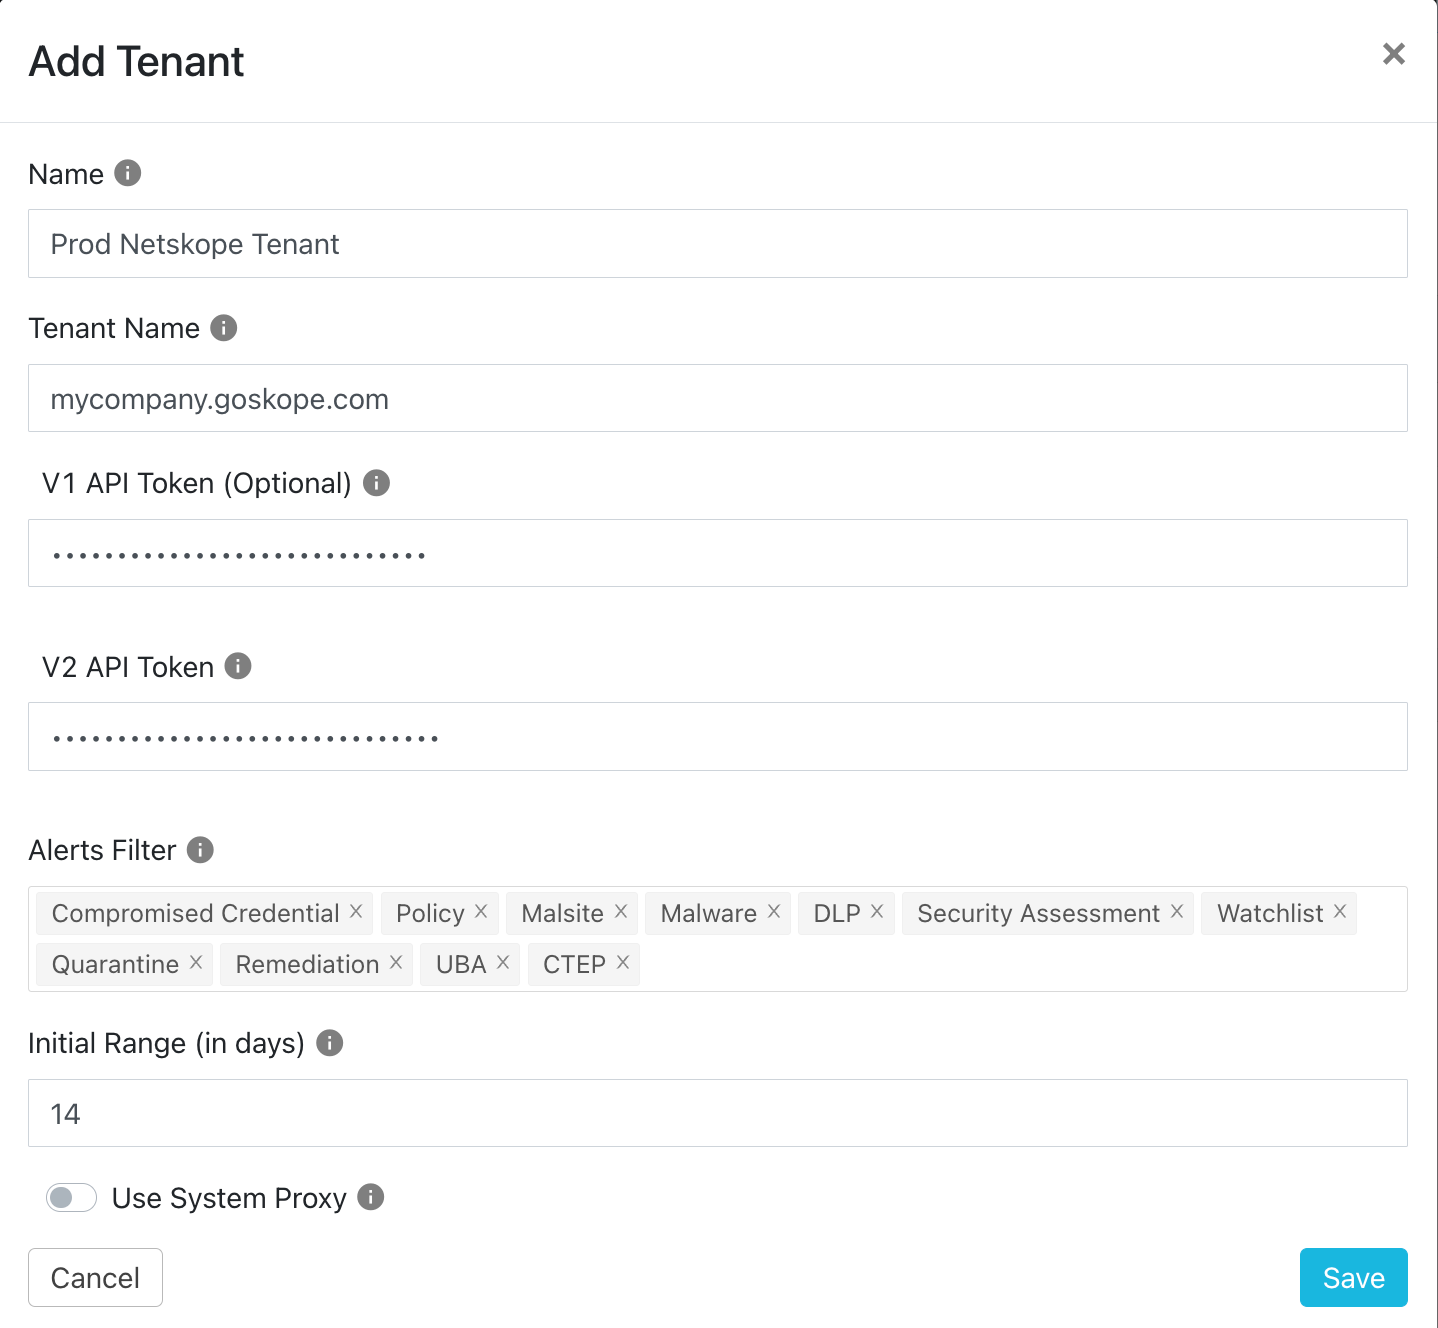
The first step we always recommend is to integrate your Netskope Tenant with your Cloud Exchange account. To configure this:
- Navigate to ‘Settings’ in the bottom left of the pane and go to ‘Netskope Tenants’
- Click on ‘Add Tenant’ and fill out the information as asked by the form.
- Using the ‘Alerts Filer’ you can select the alerts you want the Cloud Exchange to pull from your Netskope tenant.
- Using ‘Initial Range’ you can select how long you want Netskope CE to pull the Alerts data from the tenant. Within Netskope, we use a range of 14 days to pull the past 2 weeks alert information.
- Fill out the proxy information if there is a proxy server. The particular proxy server must be configured in Setting → General → Proxy before use.
Configuring new plugins for IoC sharing
The first and easiest Cloud Threat Exchange plugin to configure is the Netskope one as the tenant is already onboarded. To configure plugins for the Netskope Cloud Threat Exchange
- Navigate to ‘Threat Exchange’ in the left navigation pane and go to ‘Plugins’
- Click on ‘Configure New Plugin’ and select the required plugin.
- For Netskope, you can select the Netskope Tenant created in settings and configure the remaining parameters as required.
Some of the parameters required to configure all any plugin with Cloud Threat Exchange are:
- Aging Criteria - Specifies when the indicator is set to expire. Internally within Netskope, we use a range of 90 days.
- Last Run - While initial configuration, this parameter might not be visible, but during editing an already configured plugin, this is visible. This shows when a particular plugin was last executed. Modify this to fetch historic alert data from the source.
- Sync Interval - The interval to fetch data from the particular plugin. Internally within Netskope, we use an interval of 60 minutes.
- Initial Range - Specifies the historic range to pull the IoC from the particular source. Internally within Netskope, we use a range of 14 days to pull the past 2 weeks IoC.
- Override Reputation - Deals with duplicate IoC. If a duplicate IoC is ingested by a second source and if the second source has a higher reputation than the first source, the IoC metadata shall be replaced. Internally within Netskope, we leave this field to the default.
Sharing IoC with Business Rules and Sharing Configuration
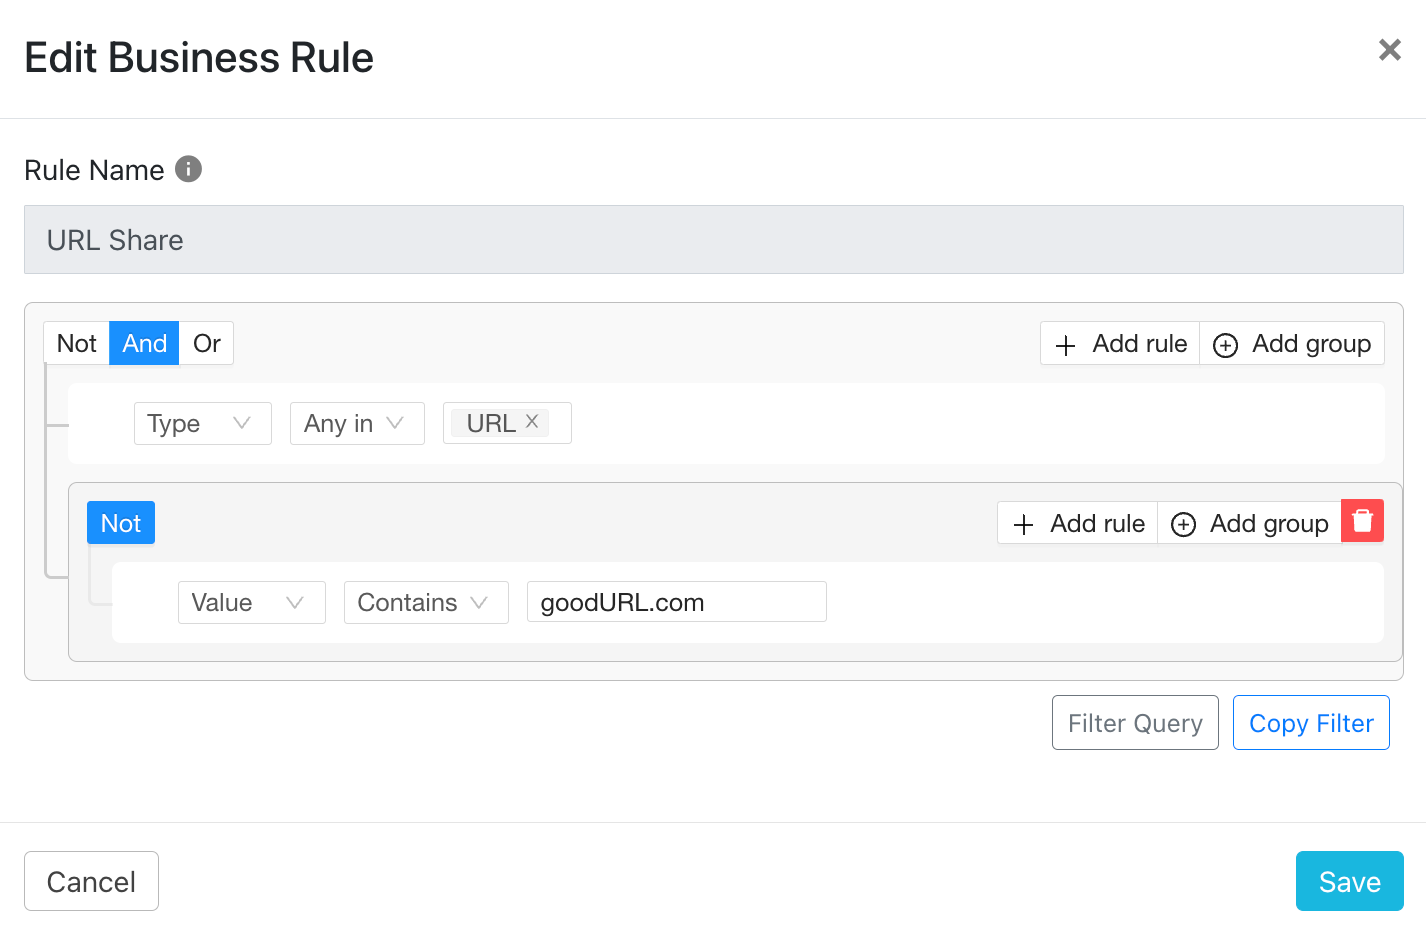
You can use Business Rules to select the IoC which you want and also remove specific IoC from being shared. Only the IoC which are selected in a business rule will be shared as Cloud Exchange does not share all IoC by default. For example, the below Business Rule is used to share all the URLs which are received by the Cloud Exchange except the ‘goodURL.com’ which will not be shared even if it is reported by multiple sources.
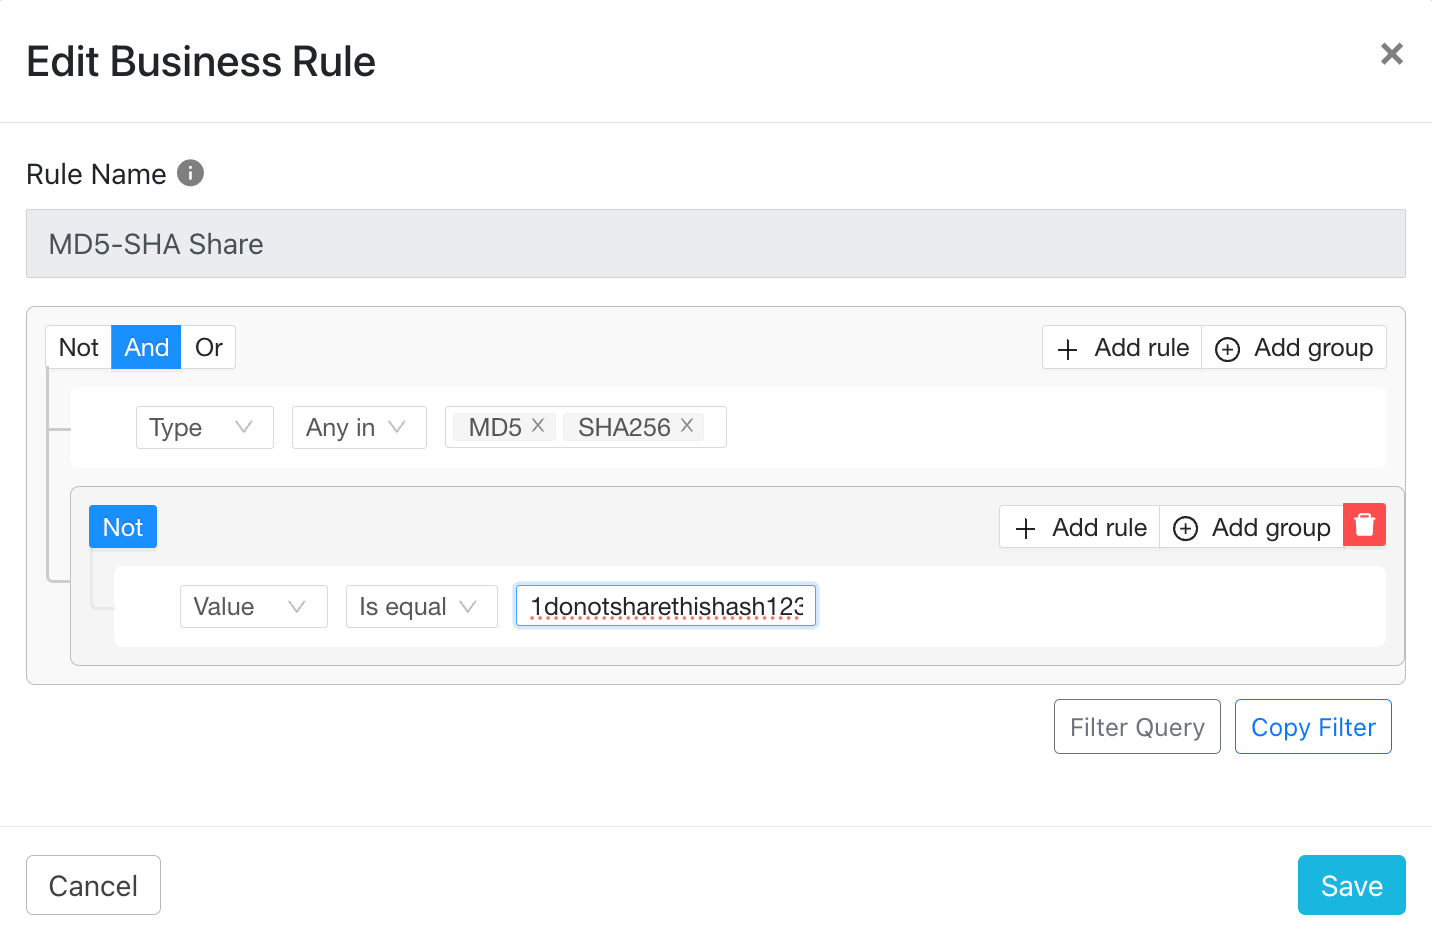
Also the below Business Rule shares all the IoC which are of the type MD5 and SHA256 but will ignore the hash ‘1donotsharethishash23’.
You can also use a single business rule to share the IoC information between sources, it all depends on your preference. Internally within Netskope we use two separate business rules, one to share URL information and other to share hash information.
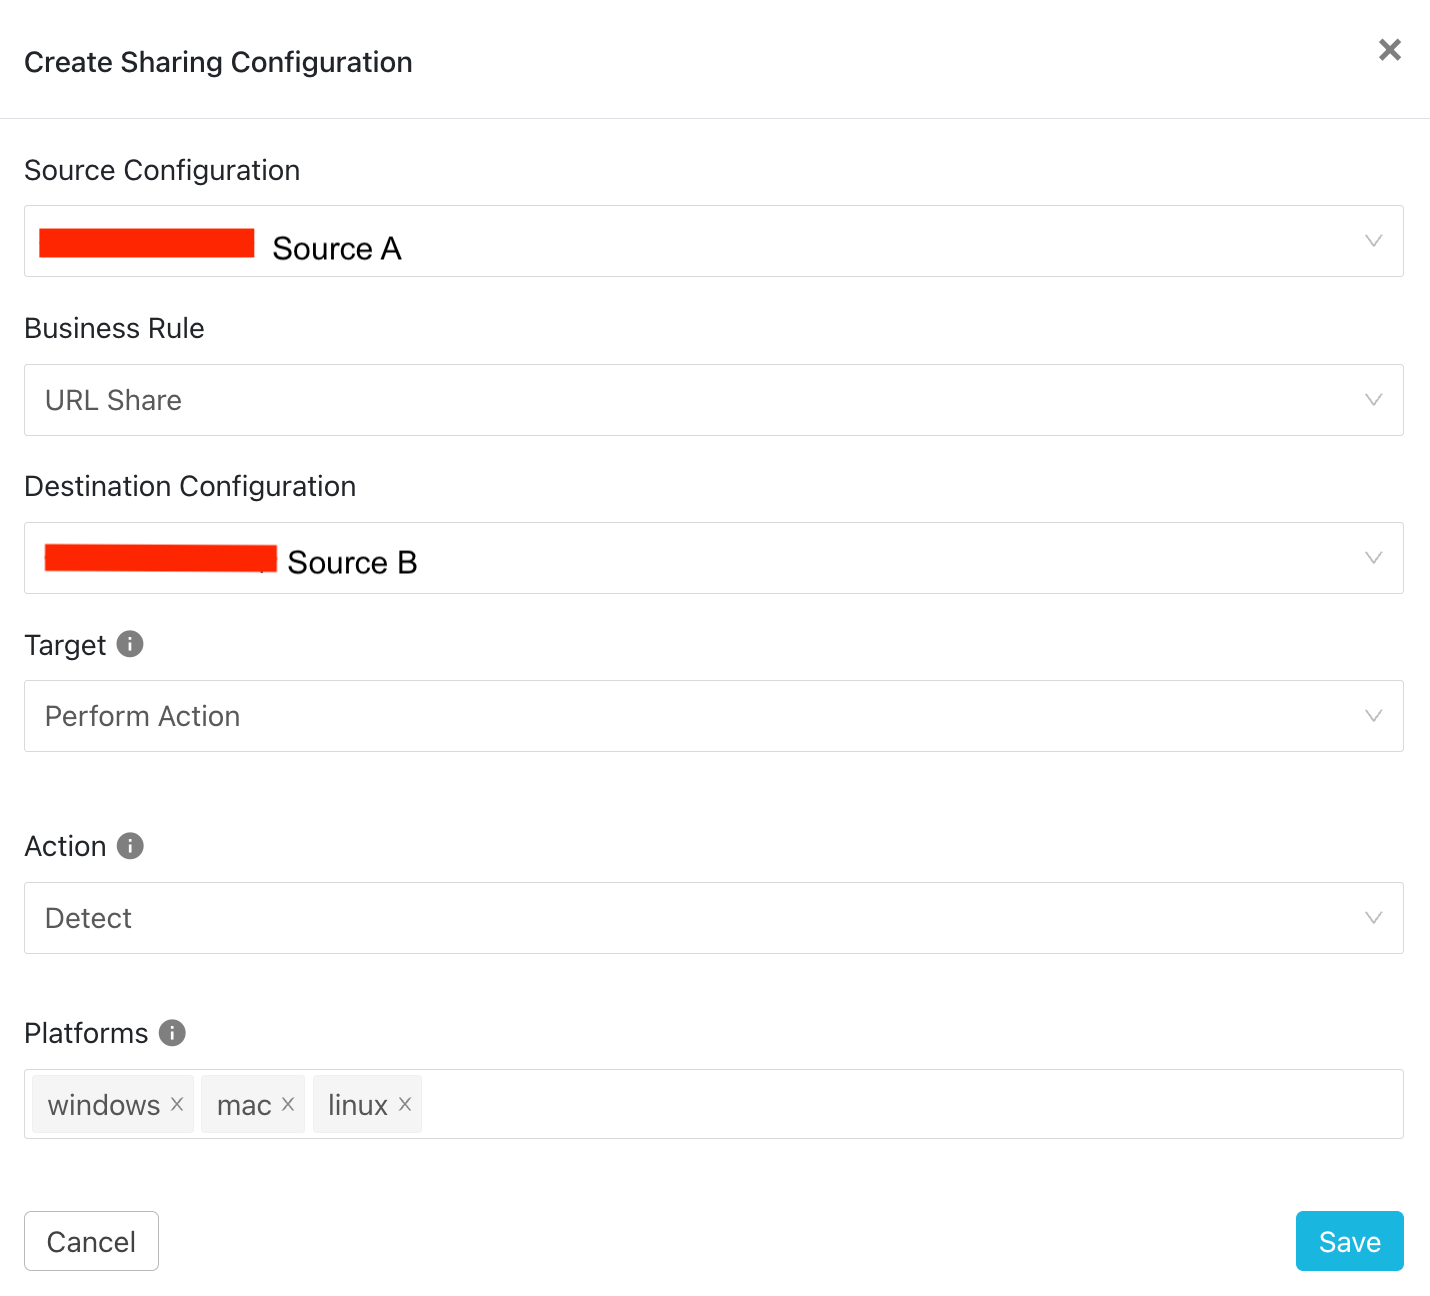
Once you have Business Rules created per your preference, you’ll have to create sharing configurations which will put the Business Rules to use. The sharing configuration is employed to specify a specific transfer of data from one source to another. It is unidirectional, so if you need a bidirectional share between two sources, you will need to set up two individual sharing configurations which are like Source A → Source B and Source B → Source A. Each sharing configuration adheres to a designated business rule, ensuring that data sharing occurs between the sources in accordance with the specified rule.
In the below screenshot, we have a sharing configuration which sends URL information from Source A to Source B and has specific configuration information regarding the action to be performed on Source B.
Deployment of CTE internally within Netskope
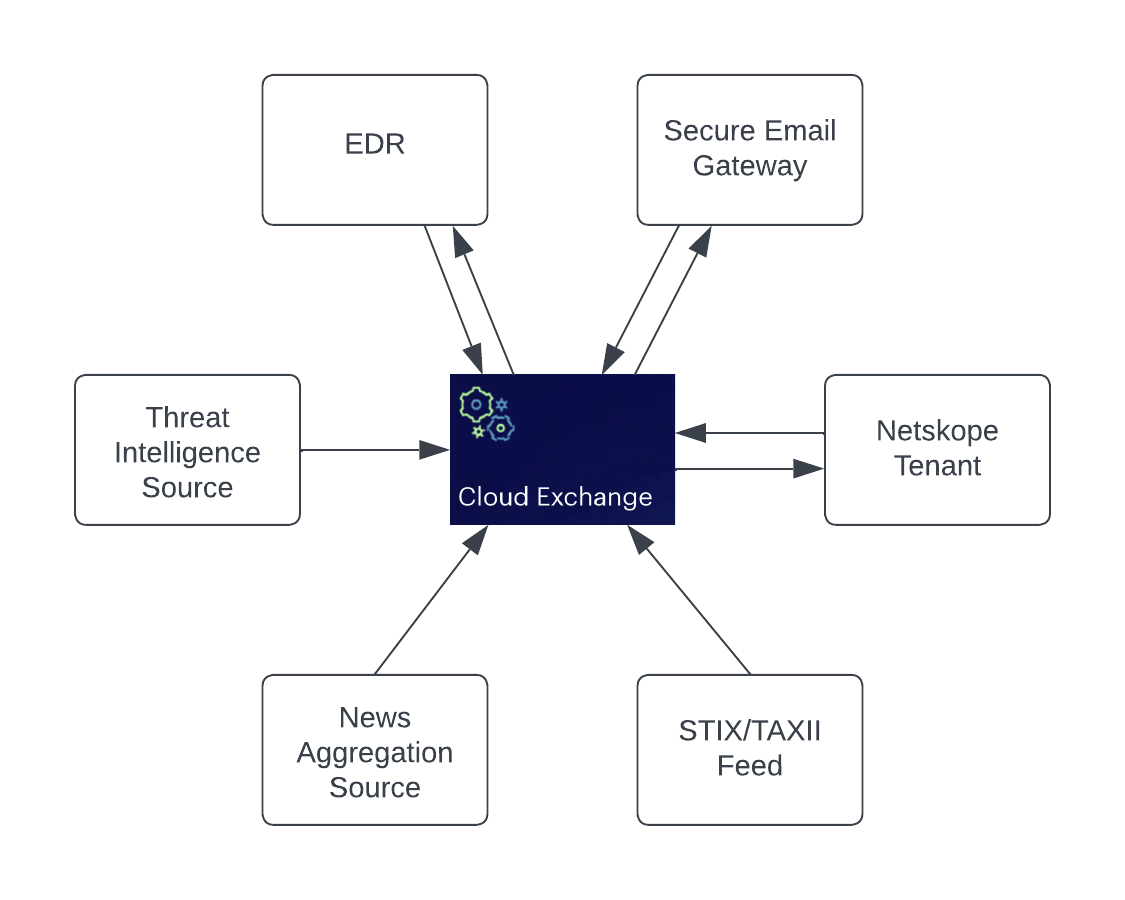
Internally within Netskope, we have two instances of Cloud Exchange where one is specifically used for Cloud Log Shipper and the other is used for Threat Exchange, Risk Exchange, and Ticket Orchestration. We have bidirectional sharing set up from our Cloud Exchange to our Netskope Tenant, EDR System, and Secure Email Gateway which helps with seamless sharing of IoC between our telemetry Security tools and improves our detection chances. Also, we have sources from threat intelligence services, STIX/TAXII feeds, news aggregators for which we have subscribed.
The feeds from these sources are also fed into the Netskope Tenant, EDR System and Secure Email Gateway. On the business rules side, we have two separate business rules, one for sharing URL and the other for sharing hash values. This helps with better control of the flow of IoC.
Another point to note is that, while sending feeds into your Netskope Tenant from Cloud Threat Exchange, using different URL lists and file profiles to feed data from different sources. Having a single URL list and a file profile for all the sources would make the source overwrite each other’s entry thereby making them ineffective.


Summary
I really believe that from this post I was able to deliver on what CTE is and how it can be effectively used in conjecture with other security tools. Undoubtedly CTE is an invaluable tool in the realm of threat intelligence and ensures unity in detections across the toolsets. By sharing the indicators among the tools like SWG, EDR and Secure Email Gateways, the chances of detecting a particular threat increases multifold thereby helping the security team prevent compromises. Any organization which runs a robust security program will have emphasis on threat intelligence usage and sharing and Cloud Threat Exchange is the star when it comes to threat intelligence sharing within the security toolset.


