


Netskope Global Technical Success (GTS)
Case Insights - Secure Enrollment
Netskope Cloud Version - 126
What is this article about?
As a new initiative, this report examines the most recurrent “How-to” questions raised by customers which are handled by Netskope Global Technical Success (GTS) Team.
Secure Enrollment
Questions and issues related to Secure Enrollment, including its impact on existing devices, troubleshooting expired tokens, and understanding the enrollment process.
The most important part about secure enrollment is understanding its purpose, which essentially is adding an extra layer of security when accessing our provisioner service in cloud that is located behind each tenant under:
addon-<tenant name>.<region>.goskope.com
Addon comes into the picture when Netskope Client is installed for first time on a device, which it will query addon service to fetch and download configuration files from users, meaning that if the user is found, then provisioner provides the enrollment file to the Netskope Client who is asking for it.
Now, when authentication token is enabled (mandatory and sufficient to cover the vulnerability found upon enrollment), it will add an extra layer of security on addon service, meaning that if any Netskope Client attempts to access addon without presenting the authentication token, it will receive an access denied.
In addition to new installation (requires fetching User configuration files for first time), there is an additional scenario where we will expect Netskope Client to query addon service, which is in multiuser mode, let’s check the below scenario:
UserA has logged in to WorkstationA, then its config files were downloaded.
UserB has logged in to WorkstationA, then its config files were downloaded.
UserC has logged in to WorkstationB, then its config files were downloaded.
Post enabling Secure Enrollment (Authentication token is sufficient),
UserA will not have any impact when connecting to WorkstationA.
UserB will not have any impact when connecting to WorkstationA.
UserC will not have any impact when connecting to WorkstationB.
However,
If UserA who has never logged in to WorstationB tries to log in, its Netskope Client will attempt to fetch its configuration files, this will only be successful if the authentication token is present on the device, otherwise it will get an access denied and its Netskope Client will remain disabled.
If UserB who has never logged in to WorstationB tries to log in, its Netskope Client will attempt to fetch its configuration files, this will only be successful if the authentication token is present on the device, otherwise it will get an access denied and its Netskope Client will remain disabled.
If UserC who has never logged in to WorstationA tries to log in, its Netskope Client will attempt to fetch its configuration files, this will only be successful if the authentication token is present on the device, otherwise it will get an access denied and its Netskope Client will remain disabled.
You can notice that lateral movement is restricted after enabling authentication tokens unless the token is given to the device.
After enabling the Authentication token, customers should take two main actions.
- Edit any script used to deploy Netskope Client on new devices and append the following:
enrollauthtoken=xxxTokenGivenByUIxxx (mandatory)
enrollencryptiontoken=xxxTokenGivenByUIxxx (optional)
For example in Windows:
msiexec /I NSClient.msi host=addon-<tenant name>.<region>.goskope.com token=ORGANIZATION_ID mode=peruserconfig enrollauthtoken=xxxTokenGivenByUIxxx enrollencryptiontoken=xxxTokenGivenByUIxxx
- On already installed devices you must insert the token if they are multisession
116.1.0 or later:
Option #1 - Re-run the MSI with authentication and encryption tokens
| ℹ️ This option is not supported if the “Protect Client configuration and resources” feature is enabled in the Client Configuration. |
Option #2 - Leverage nsdiag.exe located in "C:\Program Files (x86)\Netskope\STAgent" with command line:
Command: Nsdiag.exe -e enrollauthtoken=xxxTokenGivenByUIxxx enrollencryptiontoken==xxxTokenGivenByUIxxx
| ℹ️ The above command line must be run as an administrator. |
116.0.0 or earlier:
You will need to uninstall and reinstall Netskope Client with tokens within the context of the installation.
| ⚠️ Important: There was an important behaviour change between R120 (and earlier) and R120.1 and later, where Netskope Client fails fetching enrollment file while Authentication token is set to “Not Enfonced” For example: While the Authentication token is created and not enforced, R120.1 and later, it will not have any impact, enrollment will still proceed. 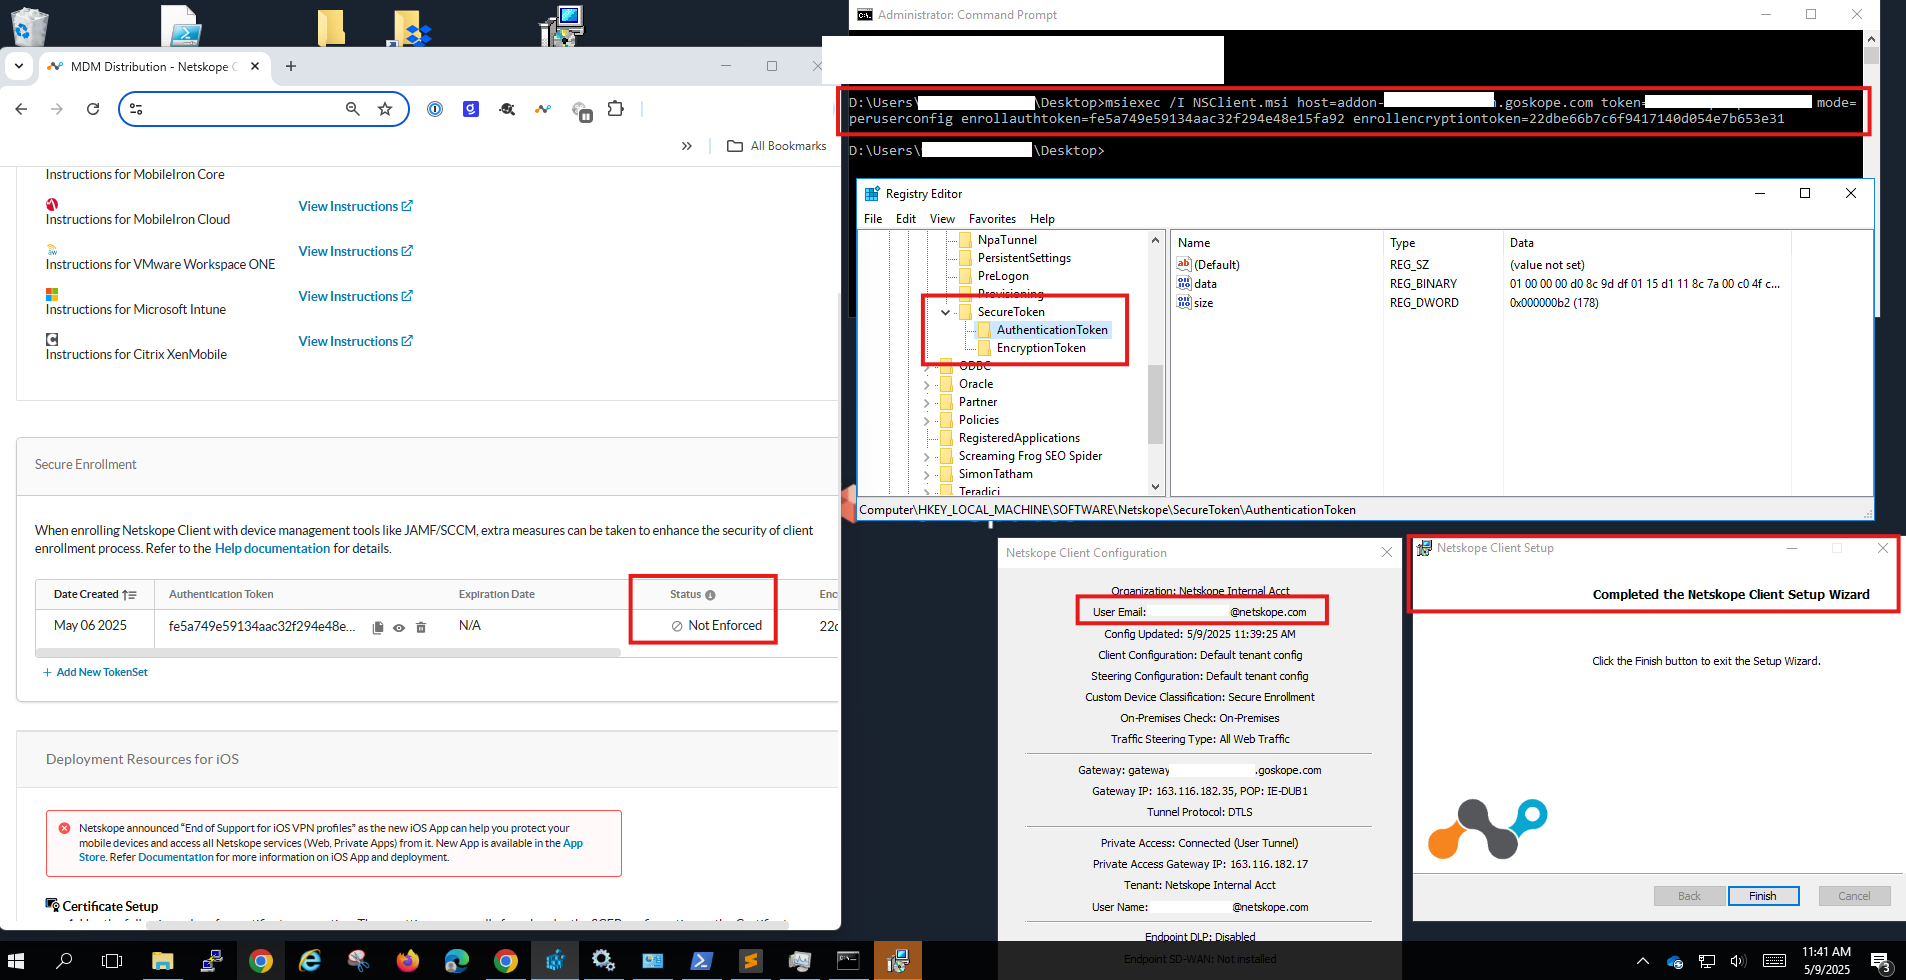 On the other hand, while the Authentication token is created and not enforced, R120 and earlier, the enrollment fails. 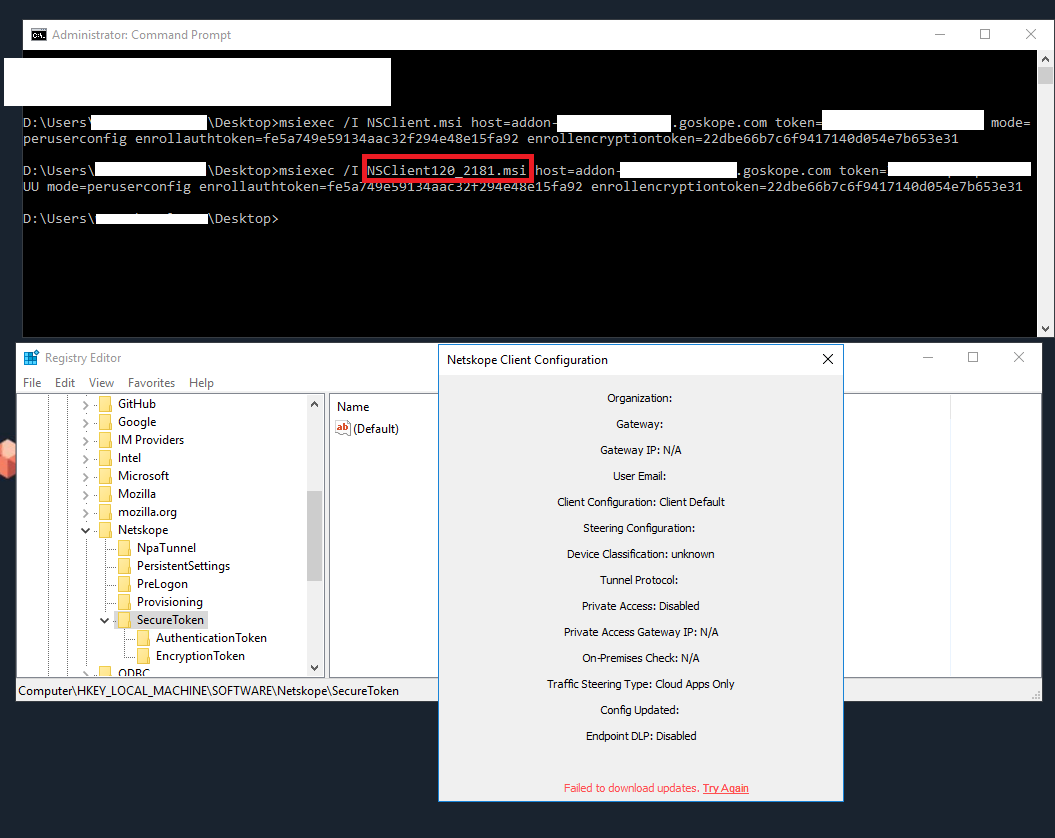
|
Reporting (For Windows)
This configuration uses Netskope Device Classification rules, examining specific values observed in practice. Introducing this reporting based on device classification is recommended only if no real-time policies are currently using Device Classification labels.
Step #1 - Create a new Device Classification
Path: Netskope Tenant UI >>> Settings >>> Manage >>> Device Classification
- Click on “New Device Classification”, add a name, and select “to the top” as position
Step #2 - Create a new Device Classification rule
Path: Netskope Tenant UI >>> Settings >>> Manage >>> Device Classification
- Click on “New Device Classification rule”, add a name, select your device classification, add the following registry keys, and save

| ℹ️
Once saved, this is how it should look |

Step #3 - Pull the list of devices with the device classification
Path: Netskope Tenant UI >>> Settings >>> Security Cloud Platform >>> Devices
- Click on “+Add filter”, select “Device Classification” and add the classification previously created.

Helpful content: Secure Enrollment
Terms and Conditions
- All documented information undergoes testing and verification to ensure accuracy.
- In the future, it is possible that the application's functionality may be altered by the vendor. If any such changes are brought to our attention, we will promptly update the documentation to reflect them.
Notes
- This article is authored by Netskope Global Technical Success (GTS).
- For any further inquiries related to this article, please contact Netskope GTS by submitting a support case with 'Case Type – How To Questions'.


