



Turning CrowdStrike Zero Trust Scores Into Automatic Netskope Policy Response
A direct, visual Fusion SOAR workflow that resolves a device, applies a Netskope risk tag, and lets policy take it from there — across three tiers of risk.
By Gary Jenkins, Principal Solutions Architect, Netskope Technology Alliances
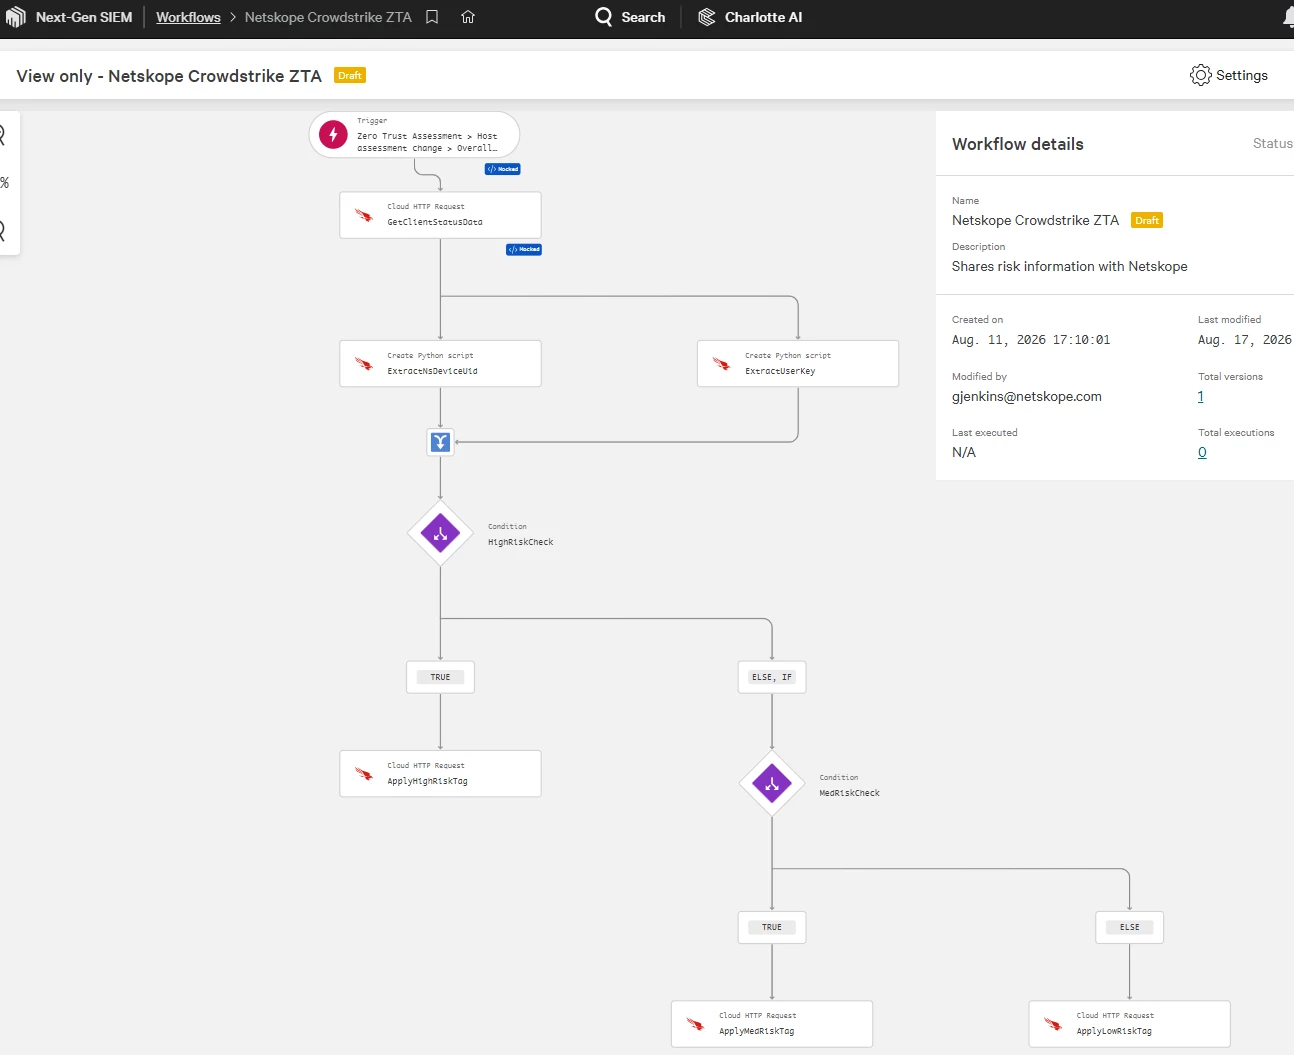
Why This Approach Works Well
CrowdStrike's Falcon Fusion SOAR ships a native Cloud HTTP Request action — no custom Foundry app, no code to deploy, just point it at a URL from inside a visual workflow builder. Netskope, on the Device Tags REST API, lets an external system push a tag onto a specific device, which a Device Classification rule can then watch for. Put those two together and you get a straight line from a CrowdStrike event to a Netskope policy decision, with the entire logic living in one place.
That directness is the real advantage. The whole decision chain — trigger, risk-tier logic, device resolution, tag application — lives in a single visual workflow you can open and read top to bottom, with nothing extra to stand up or maintain. It's a natural fit for teams already comfortable building automations in Fusion SOAR who want this integration to live right alongside everything else they've built. And because it's just a REST call under the hood, it's easy to reason about, easy to extend, and easy to hand off to someone else later.
The Chain, End to End
The finished automation is a single continuous chain: a CrowdStrike ZTA score-change event fires a Fusion SOAR workflow, which resolves the device's identity on the Netskope side, applies a risk tag through the Device Tags API, and lets a Netskope Device Classification rule and Real-Time Protection policy take it from there.
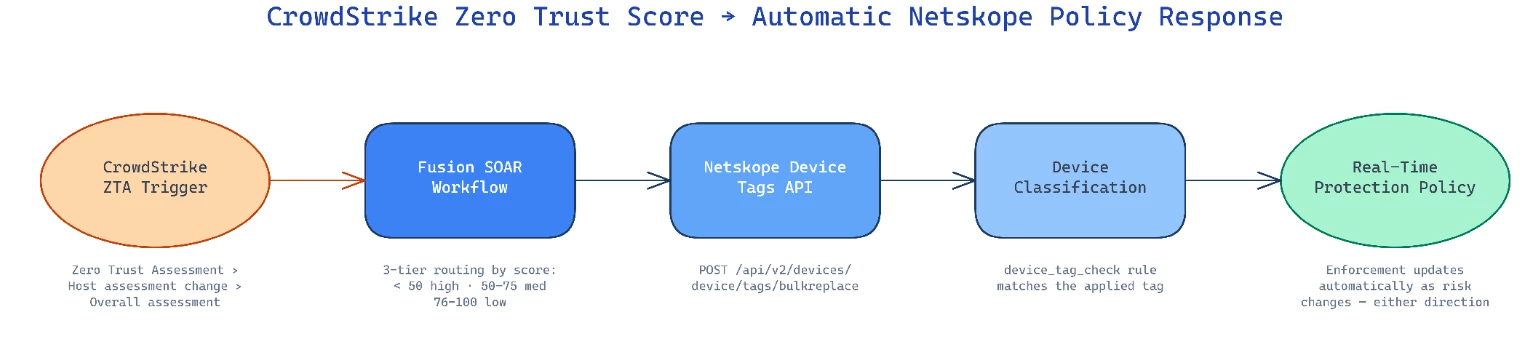
We also moved beyond a simple two-state "risky or not" model. The finished workflow scores every device into one of three tiers based on its ZTA Overall Assessment:
- 0–49 → crowdstrike-zta-high-risk
- 50–75 → crowdstrike-zta-med-risk
- 76–100 → crowdstrike-zta-low-risk
Each tag maps to its own Netskope Device Classification rule and its own Real-Time Protection policy, so a device's actual enforcement posture shifts automatically as its score moves between bands — in either direction.
Building the Workflow
The trigger and the risk bands
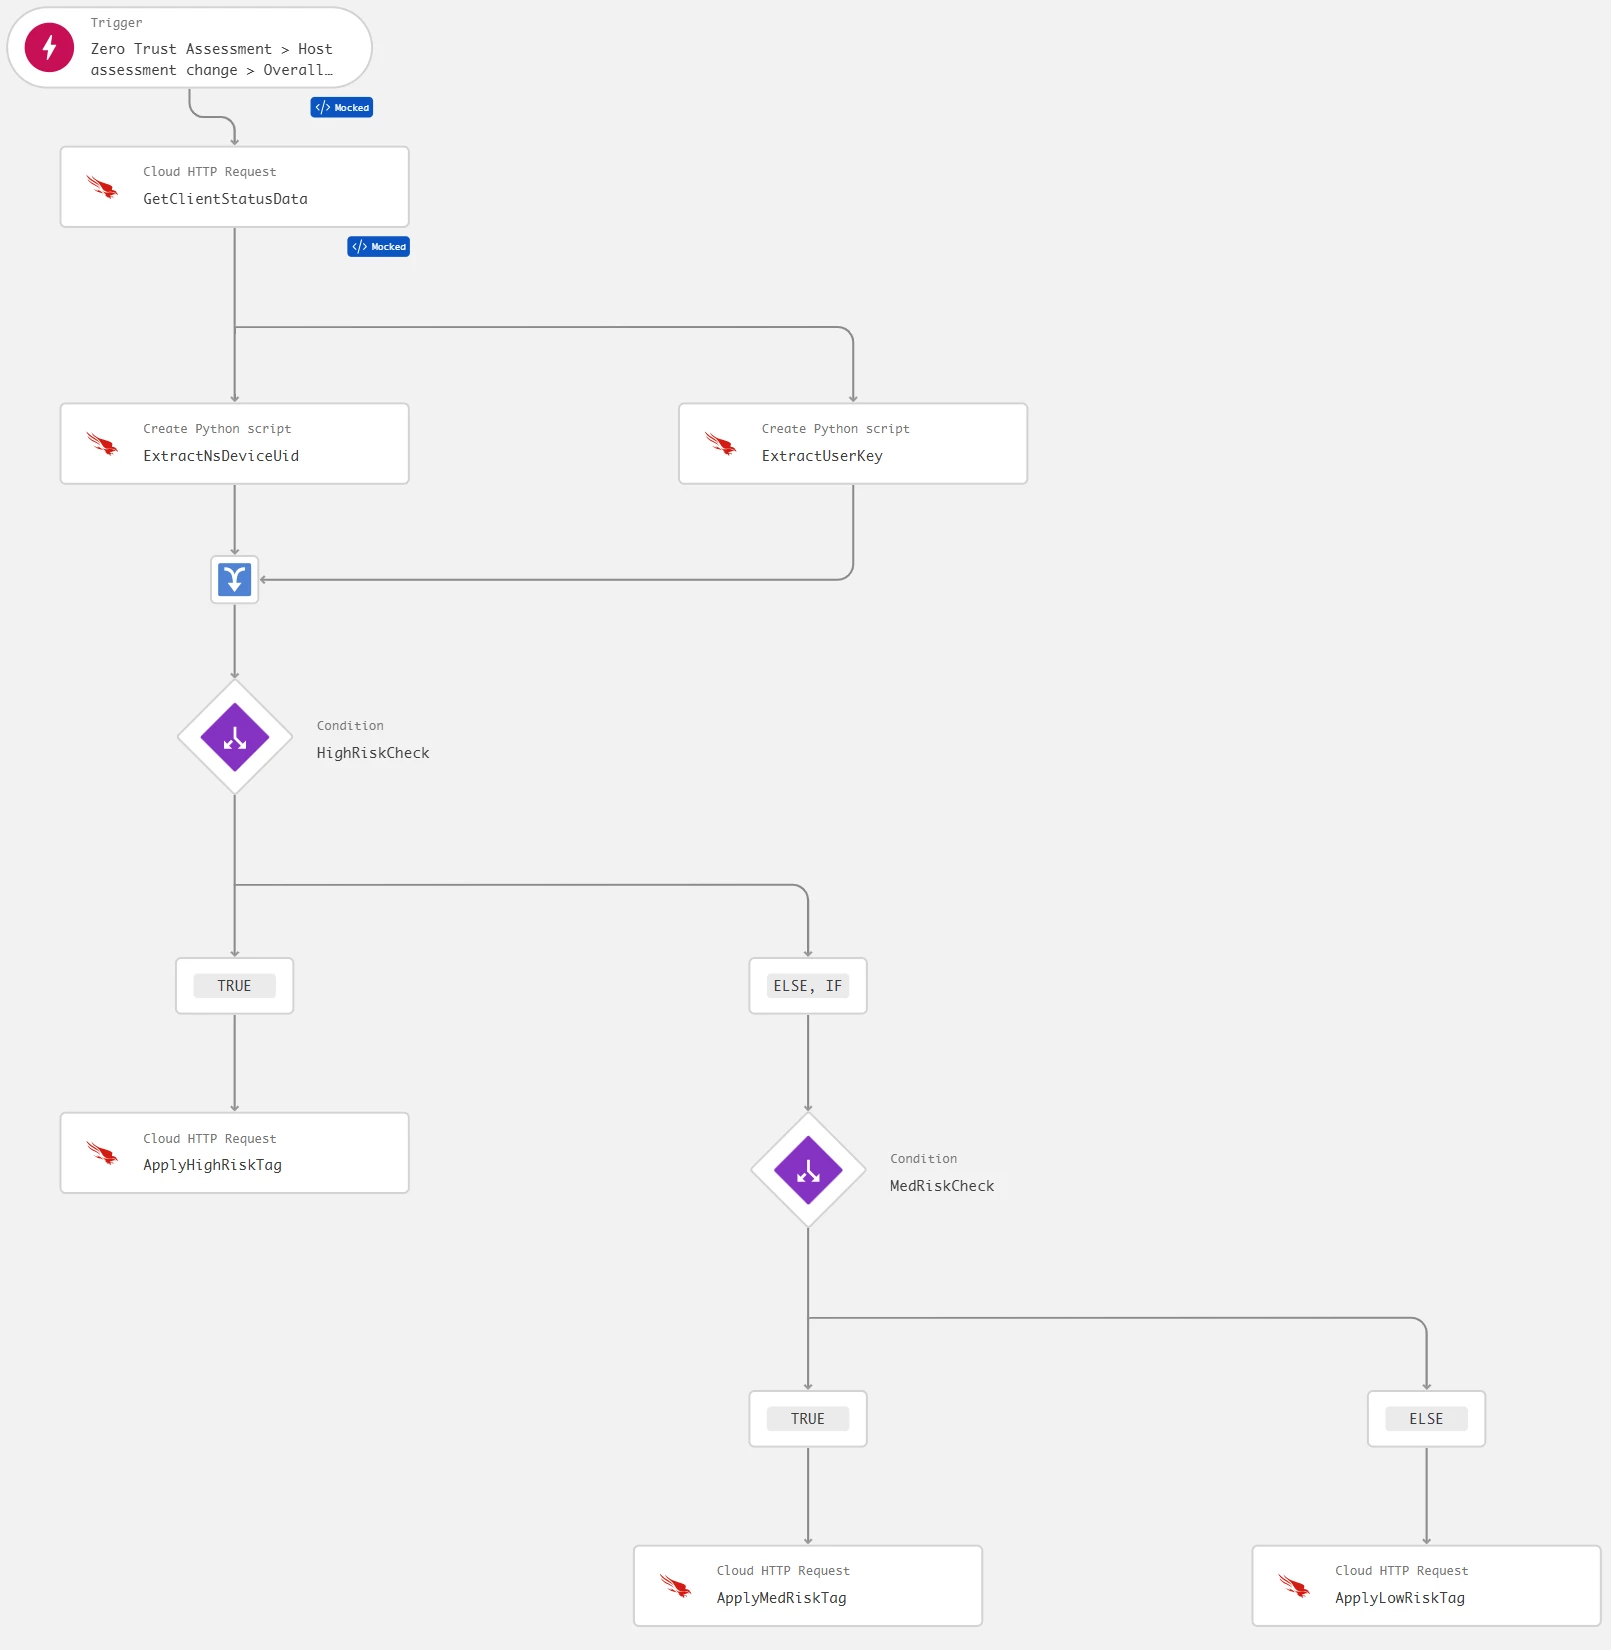
The workflow listens for CrowdStrike's Zero Trust Assessment > Host assessment change > Overall assessment event — fired natively whenever a host's aggregate ZTA score changes. From there, three chained conditions do the tier routing: is the score below 50? If not, is it below 76? If not, it falls through to the low-risk path. Fusion SOAR doesn't have a native multi-way branch primitive, so a three-tier split becomes two nested binary conditions — an ELSE IF followed by a final ELSE.
Resolving CrowdStrike's host into Netskope's device
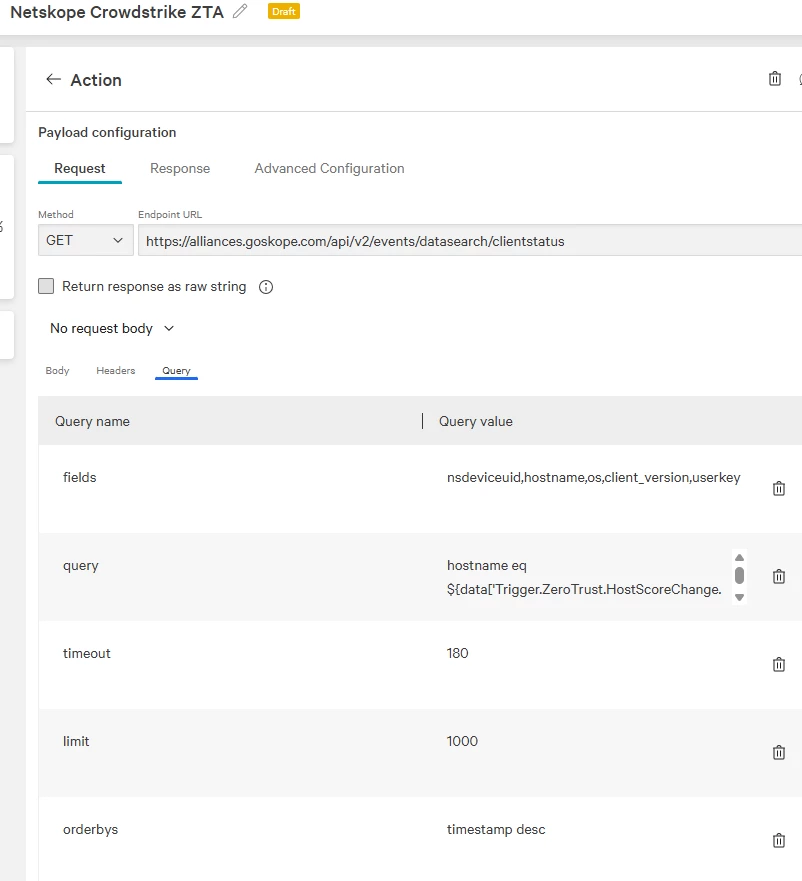
CrowdStrike and Netskope don't share a device identifier, so the workflow has to bridge them by hostname. A Cloud HTTP Request action queries Netskope's client status search endpoint, filtered server-side by the trigger's hostname — no need to pull every device in the tenant and filter client-side.
| GET /api/v2/events/datasearch/clientstatus ?query=hostname eq '<hostname>' &fields=nsdeviceuid,hostname,os,client_version,userkey &orderbys=timestamp desc |
That last parameter — sorting by timestamp — turned out to matter more than it looks. A single hostname can have multiple historical client-status records (reinstalls, version upgrades, re-enrollments), and without an explicit sort the API doesn't guarantee you get the current one back first.
A Python step, out of necessity
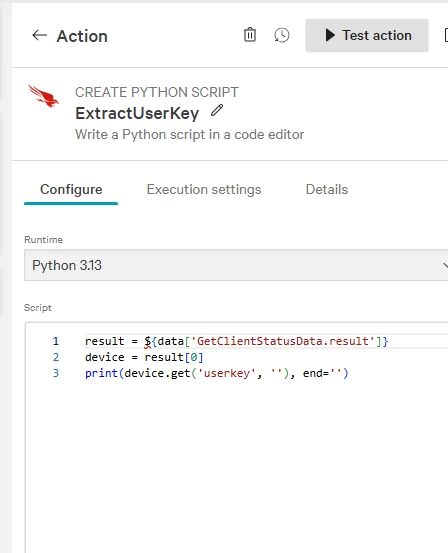
Fusion SOAR's data-reference syntax turned out to reject array indexing outright — there's no way to reference "the first item in this array" directly in an action's configuration. The workaround is a small Python script action that does the indexing in real code and returns a single value:
| result = ${data['GetClientStatusData.result']} device = result[0] print(device.get('nsdeviceuid', ''), end='') |
A second, near-identical script extracts the device's userkey the same way — more on why that value matters below.
Applying the tag
The final action in each branch is a POST to Netskope's bulk tag-replace endpoint, with the extracted device identity and the branch's target tag:
| POST /api/v2/devices/device/tags/bulkreplace { "tags": [<tag_id>], "devices": [{ "nsdeviceuid": "<from Python step>", "userkey": "<from Python step>", "hostname": "<from trigger>" }], "device_classifications": [] } |
Because this endpoint replaces a device's full tag list rather than appending to it, moving a device between tiers is automatic — applying the med-risk tag on a later run cleanly removes the high-risk tag from a previous one, with no separate cleanup logic required.
What Tripped Us Up
A build like this rarely goes in a straight line, and a few of the wrong turns are worth sharing — they cost real time, and the fixes are simple once you know what to look for.
The trailing colon that broke everything
For a long stretch, the tag-apply action failed with a cryptic "execution failed host" error — 400, no useful detail. The eventual root cause: a manually-added Content-Type header whose name had been typed as Content-Type: — with a trailing colon. A colon is illegal inside an HTTP header name, so the platform's own HTTP client couldn't construct the request and returned a generic failure before anything ever reached Netskope. The fix was one character. The lesson: when a Cloud HTTP Request fails with no obviously relevant error, check the execution record's fully-resolved request — headers included — rather than assuming the problem is in your payload logic.
userkey is not a device ID
A commonly-referenced example for the bulk tag-replace body sets userkey to the same value as the device UID. It's wrong. userkey is a separate, opaque identifier — one per user-enrollment of a device, not one per physical machine — and passing a device UID into it silently creates a phantom tag association instead of tagging the real device. The API call still returns success, which is what makes this particular mistake so easy to miss.
Test mode isn't always what it looks like
Running a single action's test in isolation waits for the next real occurrence of that trigger, tenant-wide — it doesn't let you target a specific device, and it isn't obviously different in the UI from a deliberately mocked run. A workflow that looked broken for a while turned out to be working correctly against a random unrelated host. Testing the full workflow with an explicit mock payload, run live end-to-end, is the more trustworthy path.
Verifying It Actually Works
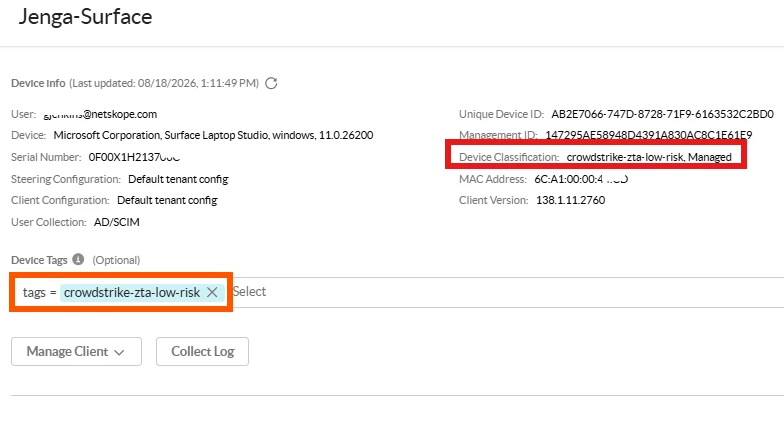
The most convincing verification isn't a green checkmark in the workflow canvas — it's checking the actual device state on the Netskope side before and after each run. Cycling a single test device through all three score bands and confirming its tag (and only its tag) changed each time is what turns "looks right" into "is right."

Where This Goes Next
The pattern here generalizes well beyond CrowdStrike ZTA scores. Any system that can call an outbound webhook or fire a native SOAR trigger can drive Netskope policy the same way — resolve identity, apply a tag, let Device Classification do the rest.
Have questions about building your own Fusion SOAR-to-Netskope integration? Reach out — happy to compare notes.