




Deploy Netskope AI Guardrails with Kong AI Gateway
Configuration guide: sending prompts from Kong to Netskope for evaluation
Integration Guide: AI Guardrails on Demand
This guide covers one thing: configuring Kong's AI Custom Guardrail policy so that every prompt passing through your Kong AI Gateway is sent to Netskope AI Guardrails for real-time evaluation, and blocked if it violates your Guardrails profile. It assumes you already have (or are about to set up) the two systems below — it does not walk through deploying them.
Required
- Netskope tenant with the AI Guardrails license enabled
- Kong Konnect account with AI Gateway access
Pre-work
If you don't already have these deployed, set them up first using Netskope's and Kong's own documentation:
- Netskope AI Guardrails appliance (Virtual Private Edge):
- Kong AI Gateway: developer.konghq.com/ai-gateway
Tip: It is recommended to have them both in the same VPC.
Step 1 — Get two values from your Netskope deployment
This guide refers to two placeholders you'll need before configuring the policy: <guardrails-host>
The hostname of your deployed AI Guardrails appliance.
- If you used the CloudFormation deployment, this is the GuardrailsHostUrl stack output (for example guardrails.aigw.internal).
- If you enrolled the appliance directly via Configuring Virtual Private Edge, it's the hostname you assigned during enrollment and service-template setup.
Note: this host is typically only reachable from inside the VPC/network the appliance runs in. Your Kong data plane needs network access to it — confirm this before moving on.
The ID of the AI Guardrails profile you want Kong to enforce. <guid>
- In your Netskope tenant, open the AI Guardrails profile you want to use and copy its profile ID — not its display name.
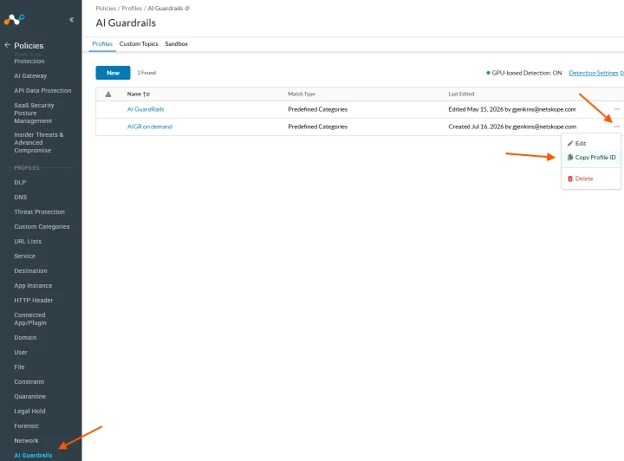
Common gotcha: if every prompt comes back allowed — even obviously unsafe ones — you're almost always using the wrong value here (a stale ID, or the appliance's own node ID instead of the profile ID), not a broken integration.
Step 2 — Create the AI Custom Guardrail policy in Kong
- In Konnect, go to AI Gateway and open your gateway.
- Go to Policies → New Policy.
- Under the Guardrails category, select AI Custom Guardrail → Configure.
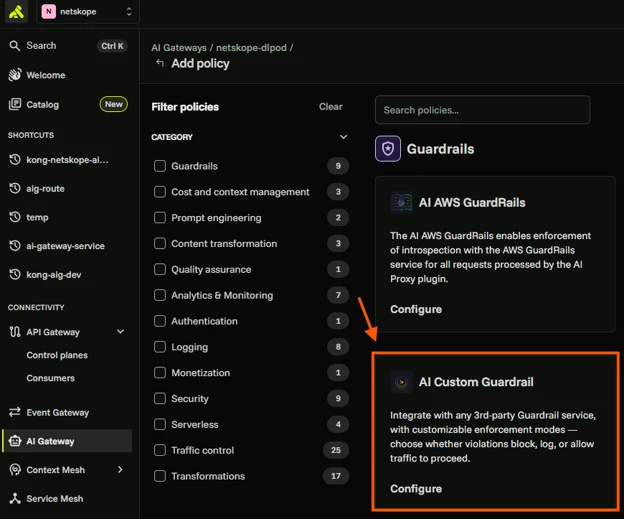
- Choose Scope: Global (applies to all AI traffic on this gateway) or Scoped (attach to a specific Model later, in Step 3).
- Fill in the policy configuration fields exactly as below.
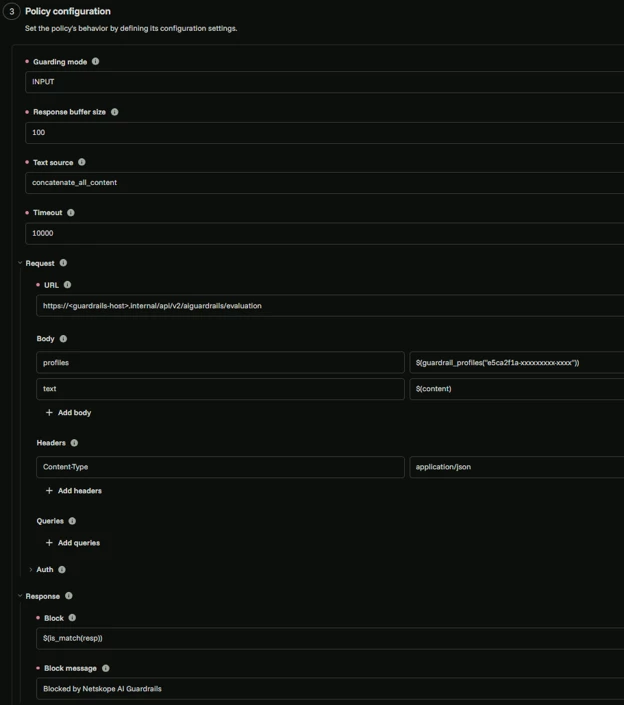
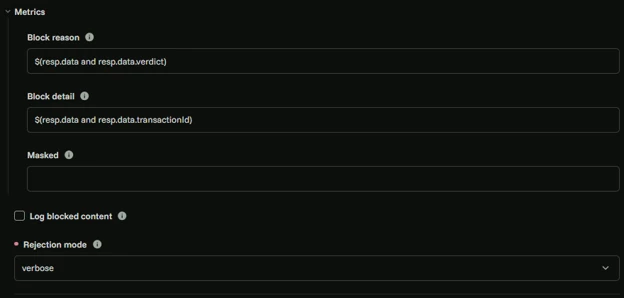
Policy configuration fields, in the order they appear on the form:
See picture below table
| Field | Value | Notes |
|---|---|---|
| Guarding mode | INPUT | Inspect prompts only. Use BOTH to also inspect model responses. |
| Response buffer size | 100 (leave default) | Only used when Guarding mode includes OUTPUT. |
| Text source | concatenate_all_content | Covers multi-turn conversations, not just the latest message. |
| Timeout | 10000 | Matches Netskope's own 10-second API timeout. |
| Request → URL | https://<guardrails-host>/api/v2/aiguardrails/evaluation | From Step 1. |
| Request → Body | see Body table below | Two fields per row: Key and Value — not one combined field. |
| Request → Body → profiles | $(guardrail_profiles(conf.params.profile_id)) | Builds Netskope's required nested profile list — function defined below. |
| Request → Headers | see Headers table below | Same Key/Value structure as Body. |
| Request → Queries | (leave empty) | Not needed. |
| Request → Auth | (leave empty) | Netskope's Guardrails API needs no auth. |
| Response → Block | $(is_match(resp)) | Function defined below. |
| Response → Block message | Blocked by Netskope AI Guardrails | Shown to the client when a prompt is blocked. |
| Metrics → Block reason | $(resp.data and resp.data.verdict) | Optional, useful for analytics. |
| Metrics → Block detail | $(resp.data and resp.data.transactionId) | Optional. |
| Metrics → Masked | (leave empty) | Not using masking. |
| Log blocked content | leave unchecked | Logs the blocked content itself if enabled — consider data sensitivity first. |
| Rejection mode | verbose | Required. See note below — don't leave this on the default without reading it. |
Body and Headers are Key + Value pairs — two separate boxes per row
Each row has a Key box (left) and a Value box (right, with a "Look up key in vault" helper). Easy mistake: typing the expression into the Key box and leaving Value empty — the Key box's placeholder literally says "Key" when empty, which is the quickest way to check you have it right.
Body:
| Key | Value |
|---|---|
| text | $(content) |
| profiles | $(guardrail_profiles(conf.params.profile_id)) |
Headers:
| Key | Value |
|---|---|
| Content-Type | application/json |
Delete any extra blank row left over in either section with its X — an empty row doesn't need to stay.
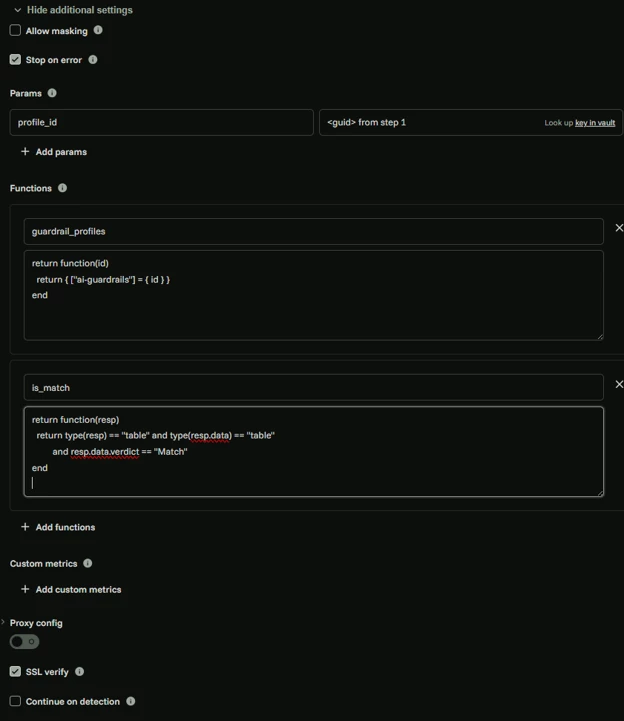
Params, Functions, and the remaining fields below are hidden by default — click Show additional settings near the bottom of the form to reveal them.
| Field | Value | Notes |
|---|---|---|
| Allow masking | leave unchecked | We want to block, not mask. |
| Stop on error | checked (true) | Blocks the request if Netskope can't be reached — fails closed. |
| Params → profile_id | <guid> | From Step 1. Click Add params once. |
| Functions → guardrail_profiles | see code below | Click Add functions, then paste in. |
| Functions → is_match | see code below | Click Add functions again for the second one. |
| Custom metrics | (leave empty) | Optional. |
| Proxy config | leave off | Only needed if routing through a forward proxy. |
| SSL verify | checked (true) | Keep this on — see the TLS note below. |
| Continue on detection | leave default | Not documented at the time of writing — check its ⓘ tooltip if you need to change it. |
Functions (add both — click Add functions twice):
guardrail_profiles — builds the nested object Netskope's API expects:
return function(id)
return { ["ai-guardrails"] = { id } }
end
is_match — returns a real true/false instead of passing Netskope's "Match"/"Not Match" string straight through:
return function(resp)
return type(resp) == "table" and type(resp.data) == "table"
and resp.data.verdict == "Match"
end
Rejection mode — what each option actually returns
| Mode | Client receives |
|---|---|
| none (default) | HTTP 400, {"error":{"message":"<block_message>"}} |
| verbose (recommended for testing) | HTTP 403, structured body including code GUARDRAIL_BLOCKED and your block_message as reason |
| stealth | HTTP 403, generic {"error":{"message":"request forbidden"}} — deliberately hides why |
All three modes enforce the block when Response → Block evaluates true — this field only changes the response shape, not whether blocking happens. It has no effect on call failures (timeouts, unreachable Guardrails); that's governed by Stop on error above.
TLS note
If your Guardrails appliance uses a self-signed certificate, don't turn off SSL verify to work around it. Trust the appliance's certificate on the Kong data plane instead, and keep verification on.
Save the policy
Click Create / Save.
Step 3 — Attach the policy and test
- If you chose Scoped in Step 2, open the target AI Model and add this policy's name to its Policies list. Skip this if you chose Global.
- Send a benign prompt through your Kong AI Gateway route and confirm it passes through normally.
- Send a prompt that should trigger your Guardrails profile (for example, a known-bad test prompt) and confirm it comes back blocked with the message from Step 2.
Example test requests:
# Expect: allowed, normal model response
curl -X POST "http://<kong-host>:8000/<your-route>" \
-H "Content-Type: application/json" \
-d '{"messages":[{"role":"user","content":"What is the capital of France?"}]}'
# Expect: blocked
curl -X POST "http://<kong-host>:8000/<your-route>" \
-H "Content-Type: application/json" \
-d '{"messages":[{"role":"user","content":"<a known-bad test prompt>"}]}'
Once both tests behave as expected, your Kong AI Gateway is sending prompts to Netskope AI Guardrails for evaluation and enforcing the verdict.