



Less Clicking, More Describing
Spending an entire afternoon navigating the Netskope Tenant to extract a report, conduct an investigation, or trace a misconfiguration is a familiar, time-consuming challenge. However, this entire equation is rewritten by combining the Netskope CLI with Cowork and Claude Code. Work that previously consumed hours collapses into a single conversation as you simply describe your objectives in plain English, allowing AI to convert intent into direct action instead of navigating sections in the Tenant. This post puts that promise to the test across the standard workflows administrators handle each week: examining user activity across diverse tenant sections; extracting months of Skope IT logs to optimize CASB and real-time policies; evaluating actual user experience via Digital Experience Management; and confirming the reachability and connectivity of publishers and private applications. Each of these workflows typically requires hours of data exporting, clicking, and cross-referencing, yet each transitions into a swift, repeatable dialogue when Claude and the CLI operate side by side. More than just a time-saving mechanism, this offers a glimpse into the future of security operations. As security administration shifts toward an AI-assisted model, the administrators who integrate these tools today will do more than accelerate their tasks; they will define the structure of tomorrow's security teams.
What is the Netskope CLI?
The Netskope CLI provides an open-source, community-driven terminal interface to manage your Netskope Security Cloud tenant without clicking through the web console. You can easily install the tool using pip install netskope, which grants access to both the standard netskope command and its concise ntsk alias. Running the ntsk config setup wizard quickly configures authentication to get you started.
Acting as an administrative multi-tool, it enables you to audit Skope IT events, triage incident alerts, manage users and policies, configure Private Access, review device inventory, check posture security, and track Digital Experience via scriptable commands. Precision filtering is supported natively through JSON Query Language (JQL), allowing you to output data as colorized terminal tables or export it into formats like JSON, CSV, YAML, and JSONL for scripting. Crucially for this discussion, the CLI features an integrated Claude Code skill. By adding netskope.md to your workspace, Claude gains full capability to execute these commands automatically, forming the core foundation for the workflows detailed below.
Connecting Netskope CLI and Claude Code
Getting the two tools talking to each other is a one-time setup, and it's refreshingly light—no plugins to license, no infrastructure to stand up. Here's the path from zero to a working Claude-plus-CLI environment:
- Install the Netskope CLI. Start on your laptop by following the official getting-started guide. A quick pip install netskope (or pipx/Homebrew) is usually all it takes.
- Confirm it's healthy. Run ntsk doctor to make sure the CLI is installed correctly, your configuration is valid, and it can reach your tenant.
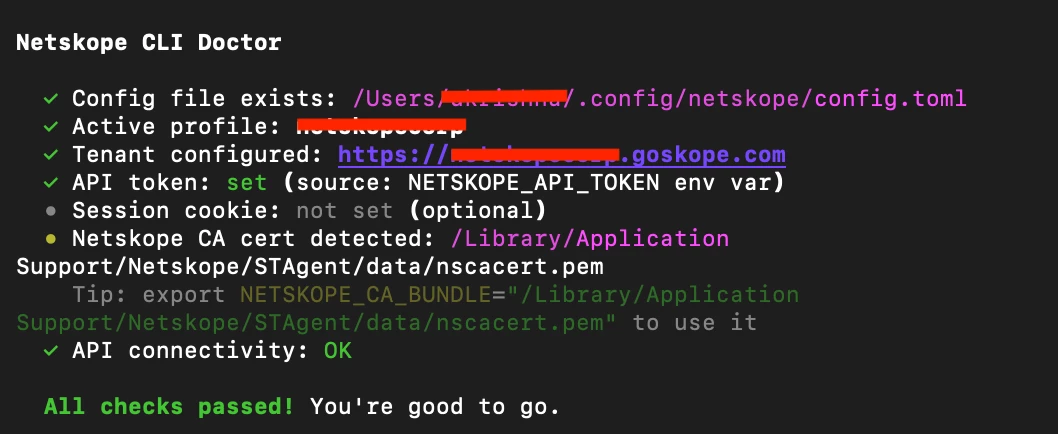
- Create a dedicated project directory. Set up a single working folder where everything related to your Netskope + Claude integration will live, they can be skills, instructions, scripts, and any data you pull. Keeping it all in one place is what gives Claude the context to work effectively. The folder should contain the CLAUDE.md file and netskope.md file.
- Add the Netskope CLI skill. The CLI ships with a purpose-built Claude skill that teaches the agent how to use every command. Drop this skill (the netskope.md file) into your project directory so Claude knows exactly how to drive the tool.
- Write your CLAUDE.md. This is where you tell Claude who it's working for and what it's allowed to do. Every use case, guardrail, and standing instruction. For example, "stay read-only unless I approve a change" or "default to the production tenant profile", all this lives in the CLAUDE.md file at the root of your project. This is also where we will be provisioning instructions on how Claude can use the Netskope CLI tool to tackle situations and the output expected by the administrator.
- Verify the connection. Finally, put it to the test: ask Claude to verify connectivity to your tenant. If it reaches Netskope and returns a clean result, your environment is ready.
This designated working folder centralizes your required Claude skills and the CLAUDE.md file, serving as the storage location for all outputs generated when querying the Tenant. Consolidating these results within a unified directory provides an invaluable reference point for subsequent tasks and ongoing processes. With those six steps done, Claude has the tool, the know-how, and your rules of engagement. From here on, running a Netskope task is as simple as describing it in plain language.
Using Claude Skills
Below are some of the use cases for which the integration between Claude Code and Netskope CLI makes the life of Administrators a lot easier:
1. Running User Investigations
Skill - To be added in CLAUDE.md file
Investigate User activity in the Netskope tenant
a. You may be asked to review the activity of a particular user with the help of Netskope Tenant
b. In that case, get a confirmation from the Admin on the user Email, the applications and the lookback period
c. Create a folder with the user Email in the working directory
d. Using the Netskope-CLI tool and 'netskope.md' skill, pull the Application Events, Page Events, Network Events, Endpoint Events, Transaction Events and Alert data from the Tenant for the particular user as per Admin's request and stroe them as a CSV in the directory created with the user Email
e. Also using the Netskope-CLI tool, pull the devices details associated with the user for the past 1 year. This is to check if the user has installed their Netskope Client in any personal or unmanaged device. Create a report with the user devices details such as Device Serial Number, Client version, last active time, service details of Internet Security, Private access and EPDLP.
e. Now before you analyze the data, check with the Admin what to look for in the data. Are we looking for uploads? Downloads? Logins? Access of Unsanctioned applications?
f. Once you have the requirement, analyse all the data retrieved and present the trends and findings to the Admin
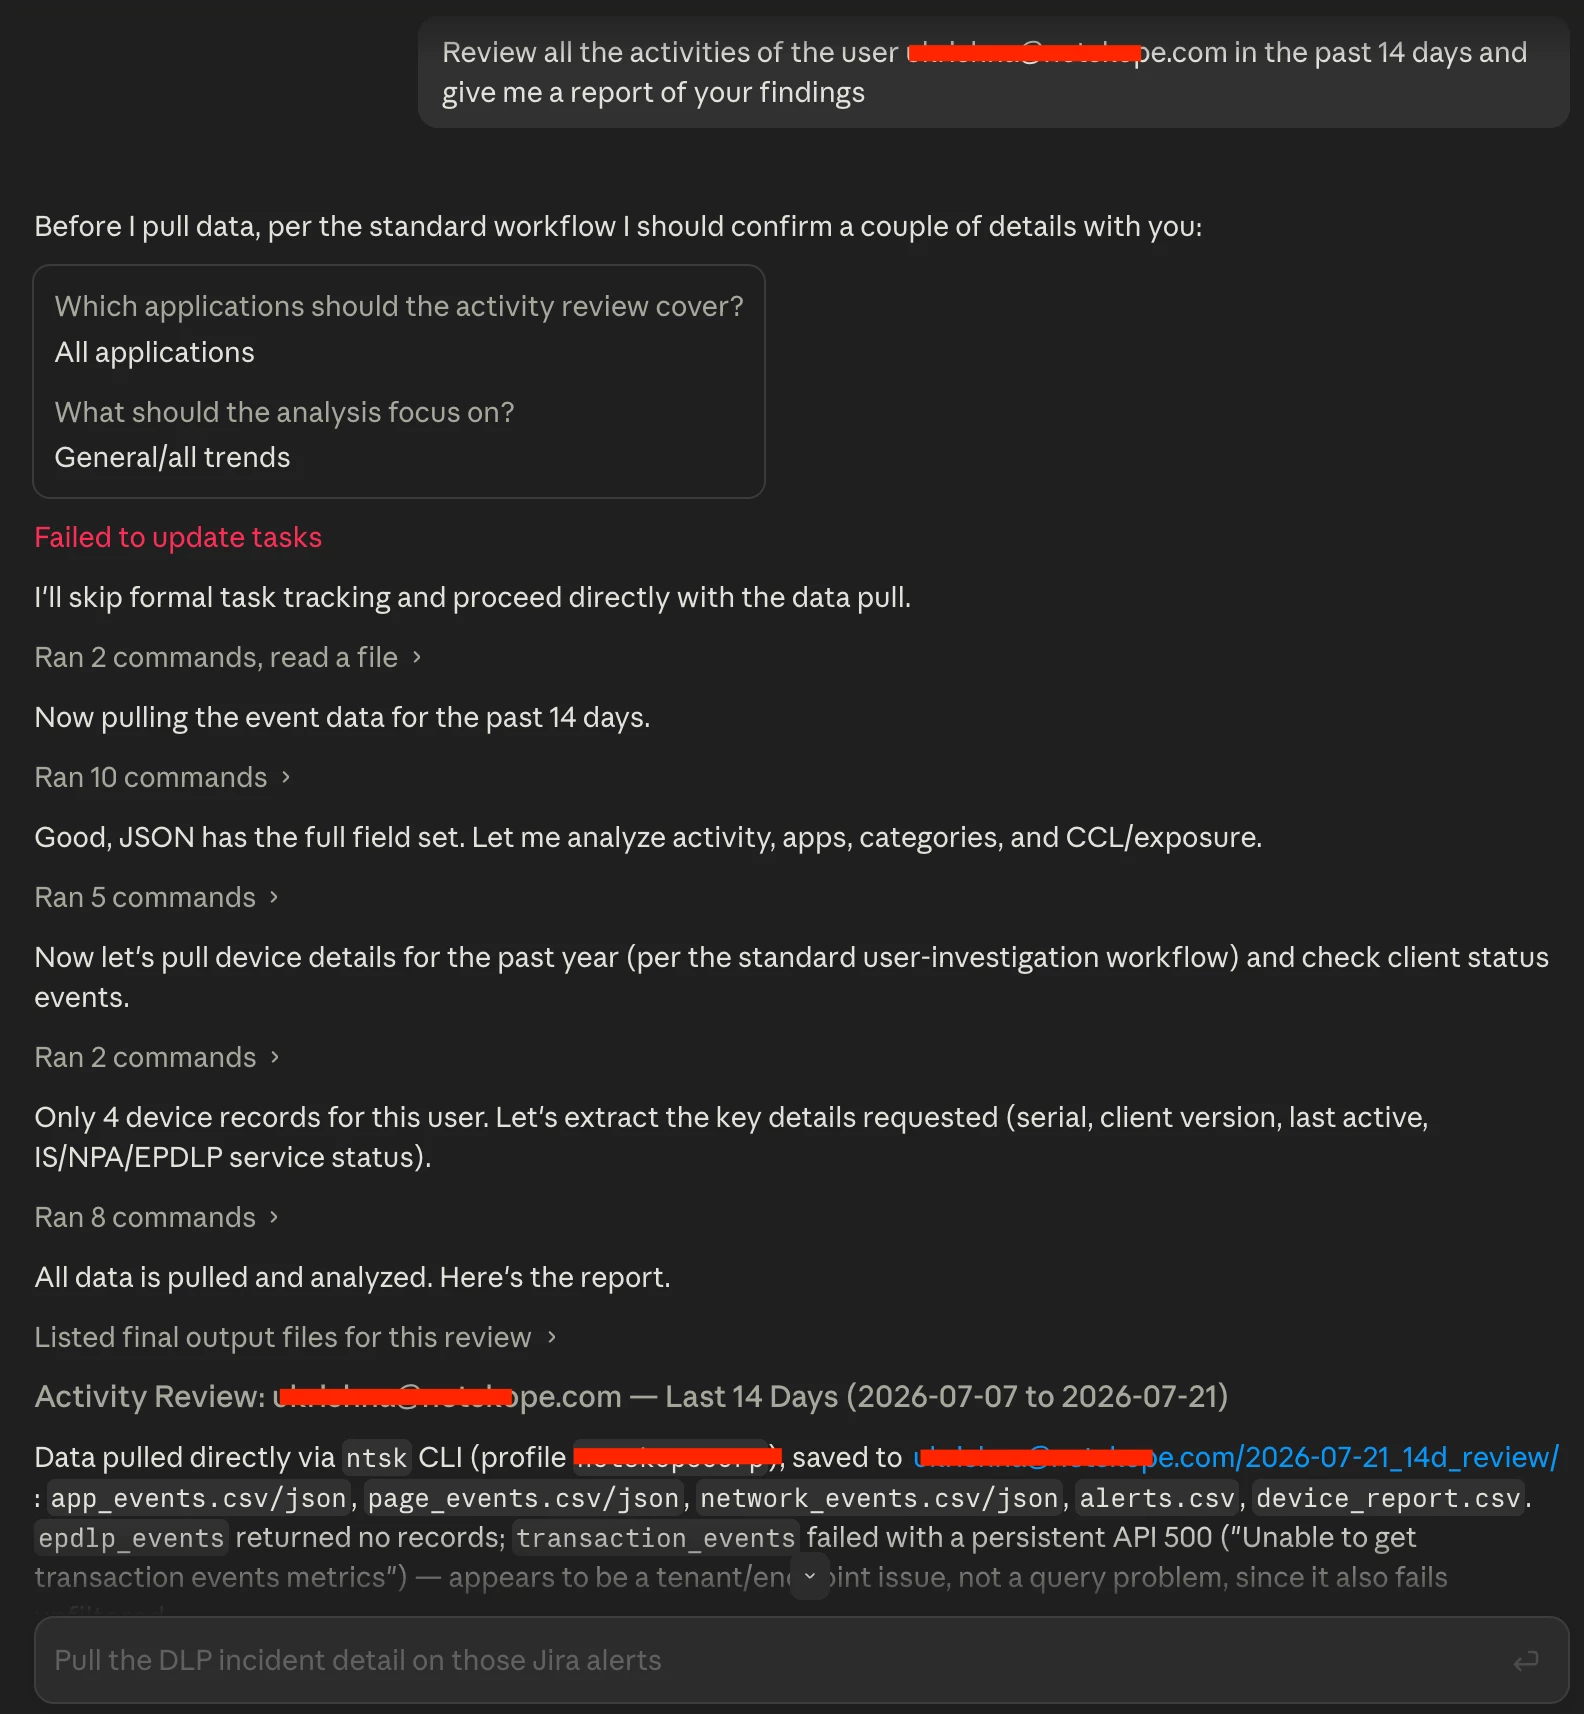
Administrators and Analysts frequently handle the tedious and time-consuming request to "pull everything on a user." But now, Claude can take care of this process as a unified, guided workflow. Claude leverages the Netskope CLI to gather comprehensive logs from Skope IT, including application, page, network, endpoint, and transaction events, along with any alerts. Each dataset is preserved as an individual CSV to maintain the raw source evidence. Simultaneously, it retrieves a full year of device history to help administrators identify whether the user has installed the Netskope Client on personal or unauthorized hardware. Finally, Claude evaluates the collected data against those goals and delivers a comprehensive, well-structured report. It details client health, heartbeats, and any monitoring shifts. It includes a comprehensive list of endpoints active over the past year tracking hostname, device type, version, timestamp, and registration while highlighting unmanaged systems. It also tracks application behavior, traffic volume, key services, shadow IT, and DLP or policy violations categorized by severity and data type. The report effectively filters out irrelevant noise, isolating true user-driven activity from standard configuration logs and recommending optimized filters for future queries. The output can also be exported as a PDF or a HTML page as per requirement.
2. Policy Fine-Tuning
Skill - To be added in CLAUDE.md file
Help Analyze logs, events and patterns to fine tune the policies
a. You may be asked to pull Application Events, Page Events, Network Events, Endpoint Events, AI Gateway Events or Alert data from Skope IT
b. You can pull the above data using Netskope CLI tool
c. Remember that you may be asked to pull huge amount of data. So make sure to use pagination if required
d. Ask the Admin for the look back period, usually it may go as long as 180 days of events
e. Check with the Admin on the objective of pulling this data, it may be to finetune real-time policies or CASB API policies or any other section in the Tenant.
f. Save the pulled information in a dedicated directory and use a naming format which is not confusion and without conflicts with other runs
g. Use the data to identify and present trends to the Admin based on the requirement
h. Incase the admin wants to know if their policies are setup right, compare the all the tenant events such as application events, page events, etc. and the alerts to confirm what the users are doing and what kind of policies could be drafted to address the gaps
Using your own traffic data is the most effective approach for policy optimization. Rather than manually examining rule configurations, this method reviews logs, events, and traffic patterns to identify where real-time policy coverage may be insufficient such as activity without an associated policy, unsanctioned application usage, or unmonitored file transfers. Once data retrieval is complete, Claude examines the tenant's activities including application and page events before cross-referencing them with active real-time policies to map existing protections against unaddressed gaps. This unified evaluation of policies and traffic logs allows Claude to generate insightful recommendations detailing effective controls, behavioral discrepancies, and recommended risk mitigations.
Using Claude Routines
As a cloud-based feature for automation within Claude Code, a Claude Routine functions as a saved configuration containing a prompt, repository, and connectors. Once established, it can be executed on a set schedule, triggered via an API call, or run in response to specific events. Any segment which the Admin wants monitored in the Netskope Tenant and reported on can be added to a Claude Code routine. Below are couple of use cases for Claude Code Routines with the Netskope Tenant:
1. Netskope Tenant Publisher Health
Routine - To be created in Claude Code
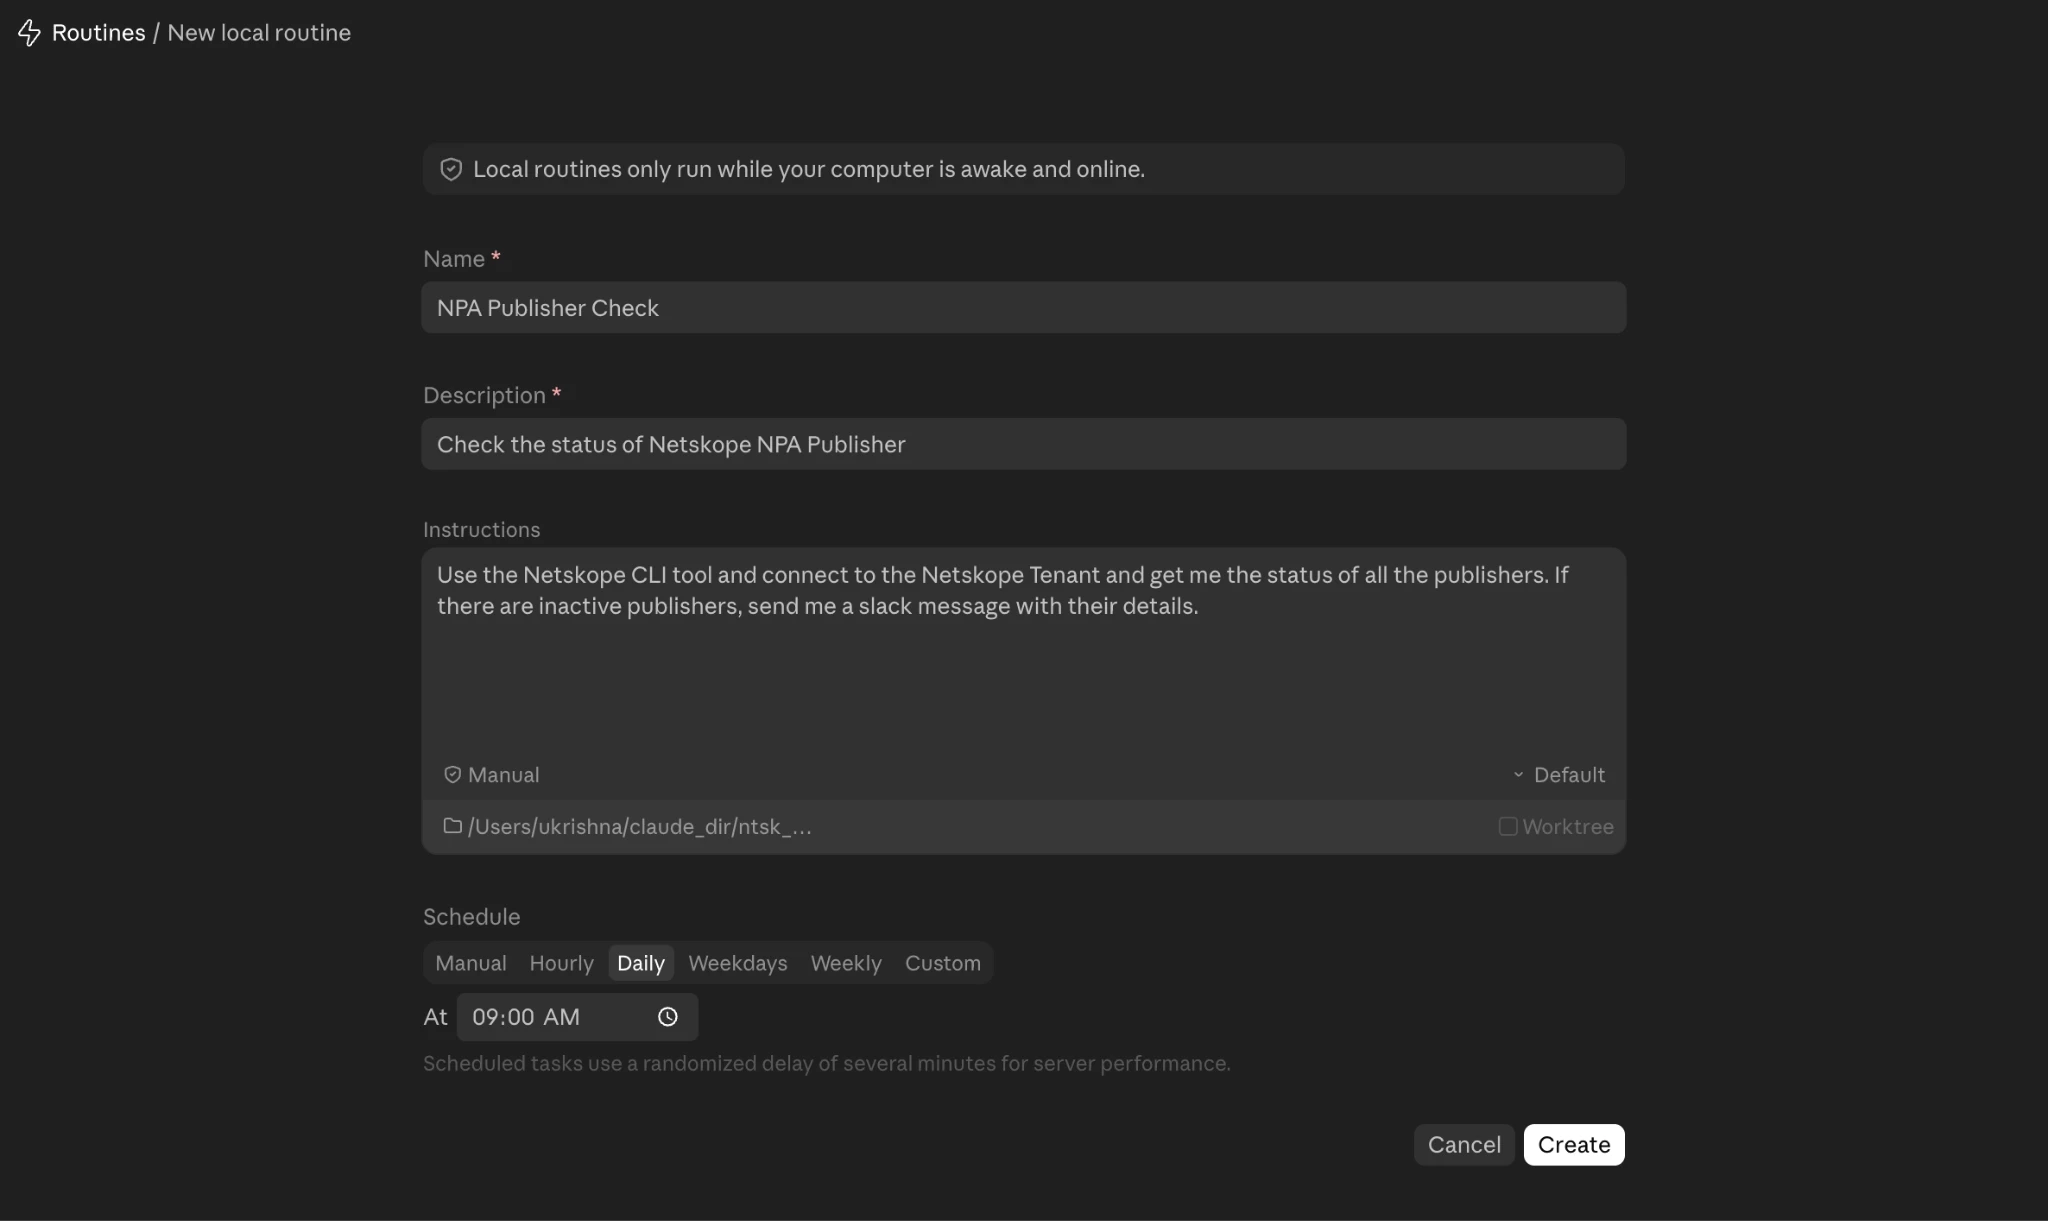
Use the Netskope CLI tool and connect to the Netskope Tenant and get me the status of all the publishers. If there are inactive publishers, send me a Slack message with their details.
To monitor the status of Netskope NPA Publishers, this Claude routine can be configured to run each morning. It automatically sends a Slack notification if any Publisher is down or unreachable.
2. Netskope Tenant Private App Segment Status
Routine - To be created in Claude Code
Check with the Netskope Tenant and list me private app segments which are not reachable. You can leave out the app segments are are reachable and also the app segments whose connectivity status cannot be identified. Send me a Slack message if any Private App Segment is not reachable.
An analogous Claude Code routine can be scheduled to run on an hourly basis to check for any Netskope NPA Private App Segments that are offline or unreachable. This automation can be targeted specifically at business-critical applications with zero downtime tolerances, allowing their connectivity to be closely monitored and any related issues to be reported immediately.
Conclusion
The ultimate impact of these changes is a fundamental shift in how administration is handled: it evolves from tedious console-clicking and spreadsheet exporting into a dynamic dialogue, where you simply outline your desired outcome and let AI manage the underlying assembly, analysis, and reporting. Crucially, this transformation unfolds entirely on your own terms. Because every guardrail, rule, and boundary resides within your CLAUDE.md file, Claude operates strictly within your parameters defaulting to read-only access and requesting explicit confirmation before ever altering your tenant. The resulting benefits extend far beyond accelerated analysis as it introduces a more predictable, proactive approach to security operations where routine analysis runs seamlessly in the background, allowing your team to focus exclusively on critical findings. This represents the next frontier of security management. Getting started is straightforward: install the CLI, configure your CLAUDE.md, and initiate your first query. The administrators who embrace this paradigm shift today will not only stay ahead of evolving threats but will actively shape the future of modern security teams.