




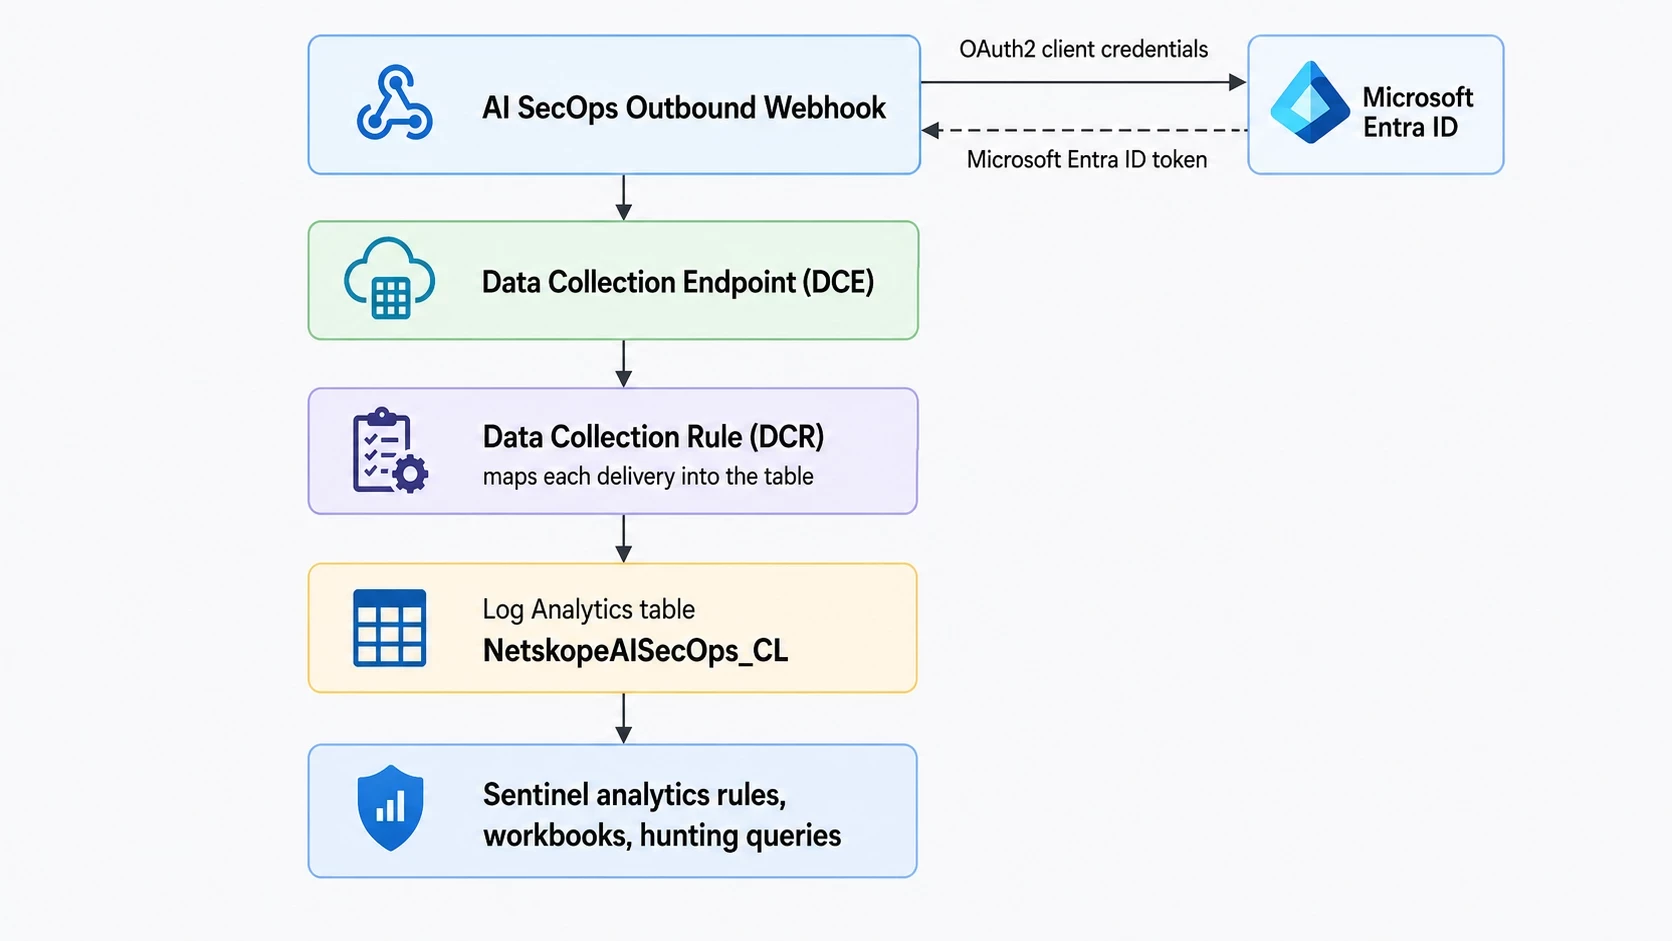
Netskope AI SecOps can deliver Cases, User Risk, and AI Risk events to Microsoft Sentinel in near real time through Outbound Webhooks and the Azure Monitor Logs Ingestion API.
The AI SecOps connector is part of the Netskope Data connector (Netskopev2) solution in the Microsoft Sentinel Content Hub. With one click it deploys the Azure resources and the Microsoft Entra identity for you. This article walks through installing the connector, copying the generated values, configuring the webhook in Netskope AI SecOps, and querying the data.
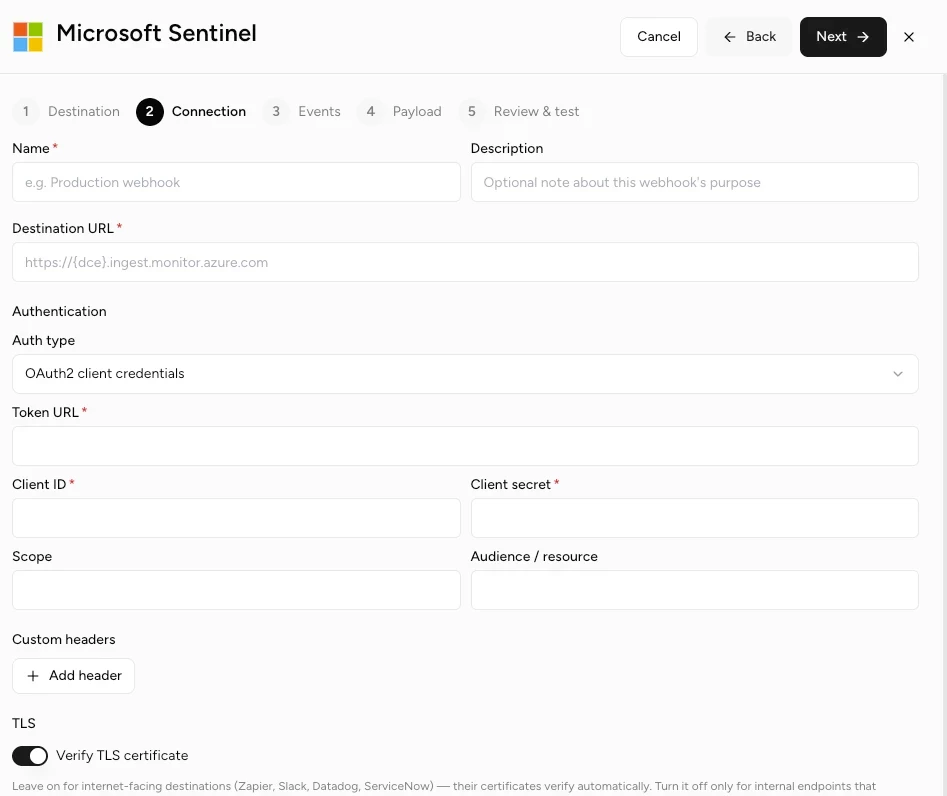
What you will build
Prerequisites
- Workspace: read and write permissions on the Log Analytics workspace used by Microsoft Sentinel.
- Microsoft Entra: permission to create an app registration in Microsoft Entra ID. This typically needs the Application Developer role or higher.
- Microsoft Azure: permission to assign the Monitoring Metrics Publisher role on the data collection rule (DCR). This typically needs the Azure RBAC Owner or User Access Administrator role.
- Netskope AI SecOps admin console: a Netskope AI SecOps tenant with the Outbound Webhooks feature, and permission to configure an outbound event destination in your tenant's AI SecOps settings.
Values you will collect along the way
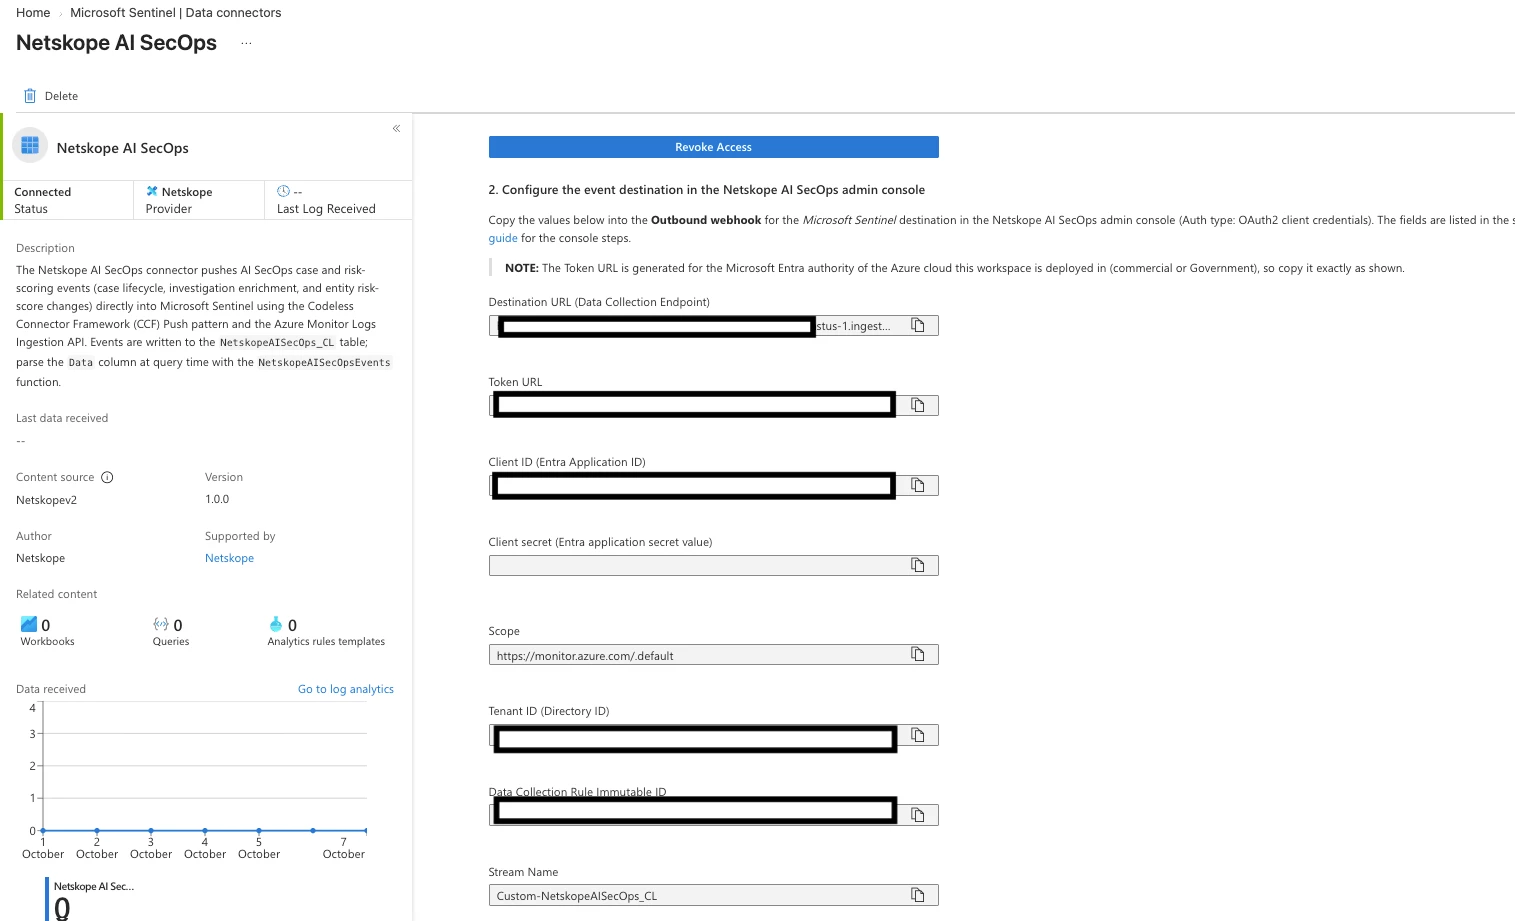
The connector page shows all of these values after deployment.
| Value | Connector field | Used in |
|---|---|---|
| Destination URL | Destination URL (Data Collection Endpoint) | Step 2, Connection tab |
| Token URL | Token URL | Step 2, Connection tab |
| Client ID | Client ID (Entra Application ID) | Step 2, Connection tab |
| Client secret | Client secret (Entra application secret value). Shown once. | Step 2, Connection tab |
| Scope | Scope | Step 2, Connection tab |
| DCR immutable ID | Data Collection Rule Immutable ID | Step 2, Payload tab |
| DCR stream name | Stream Name | Step 2, Payload tab |
Step 1 — Deploy the connector in Microsoft Sentinel
1.1 Install the solution and open the connector
- In Microsoft Sentinel, go to Content management > Content hub.
- Search for Netskope and install (or update) the Netskope Data connector solution.
- Go to Configuration > Data connectors and select Netskope AI SecOps.
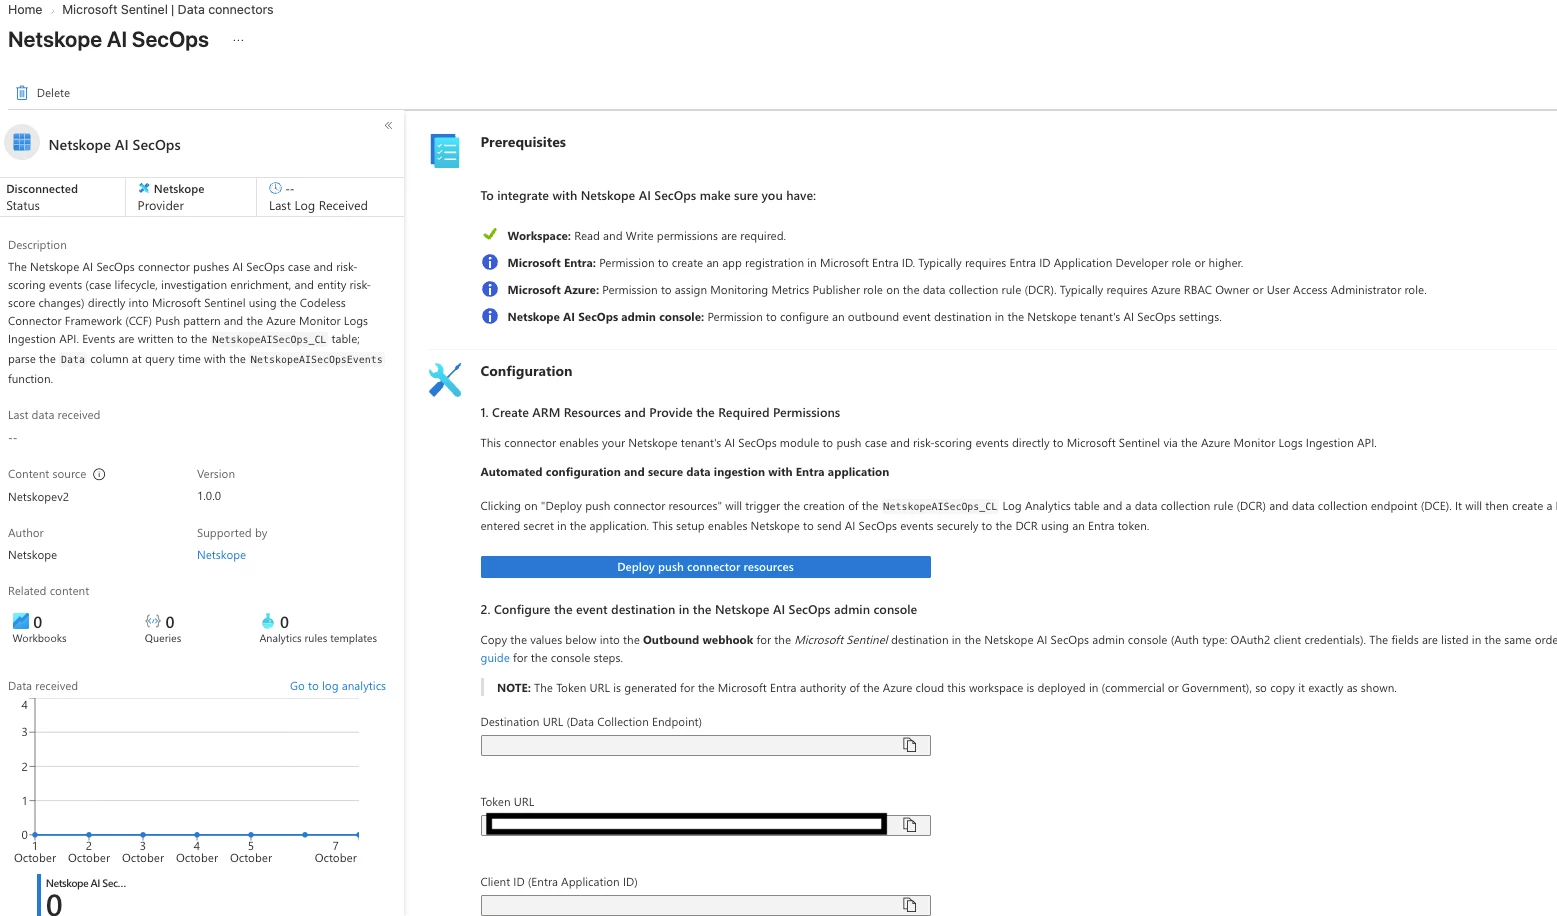
1.2 Deploy the push connector resources
Click Deploy push connector resources. The connector then:
- Creates the
NetskopeAISecOps_CLLog Analytics table. - Creates a Data Collection Endpoint (DCE) and a Data Collection Rule (DCR).
- Creates a Microsoft Entra app registration, links the DCR to it, and sets the client secret.
When the deployment finishes, the status changes to Connected and the button changes to Revoke Access.
⚠️ Copy the values now, especially the client secret. The client secret is shown only once. Save it in a secret store before you leave or refresh the page. If you lose it, create a new secret on the app registration in Microsoft Entra ID (Certificates & secrets > New client secret) and copy the Value, not the Secret ID.
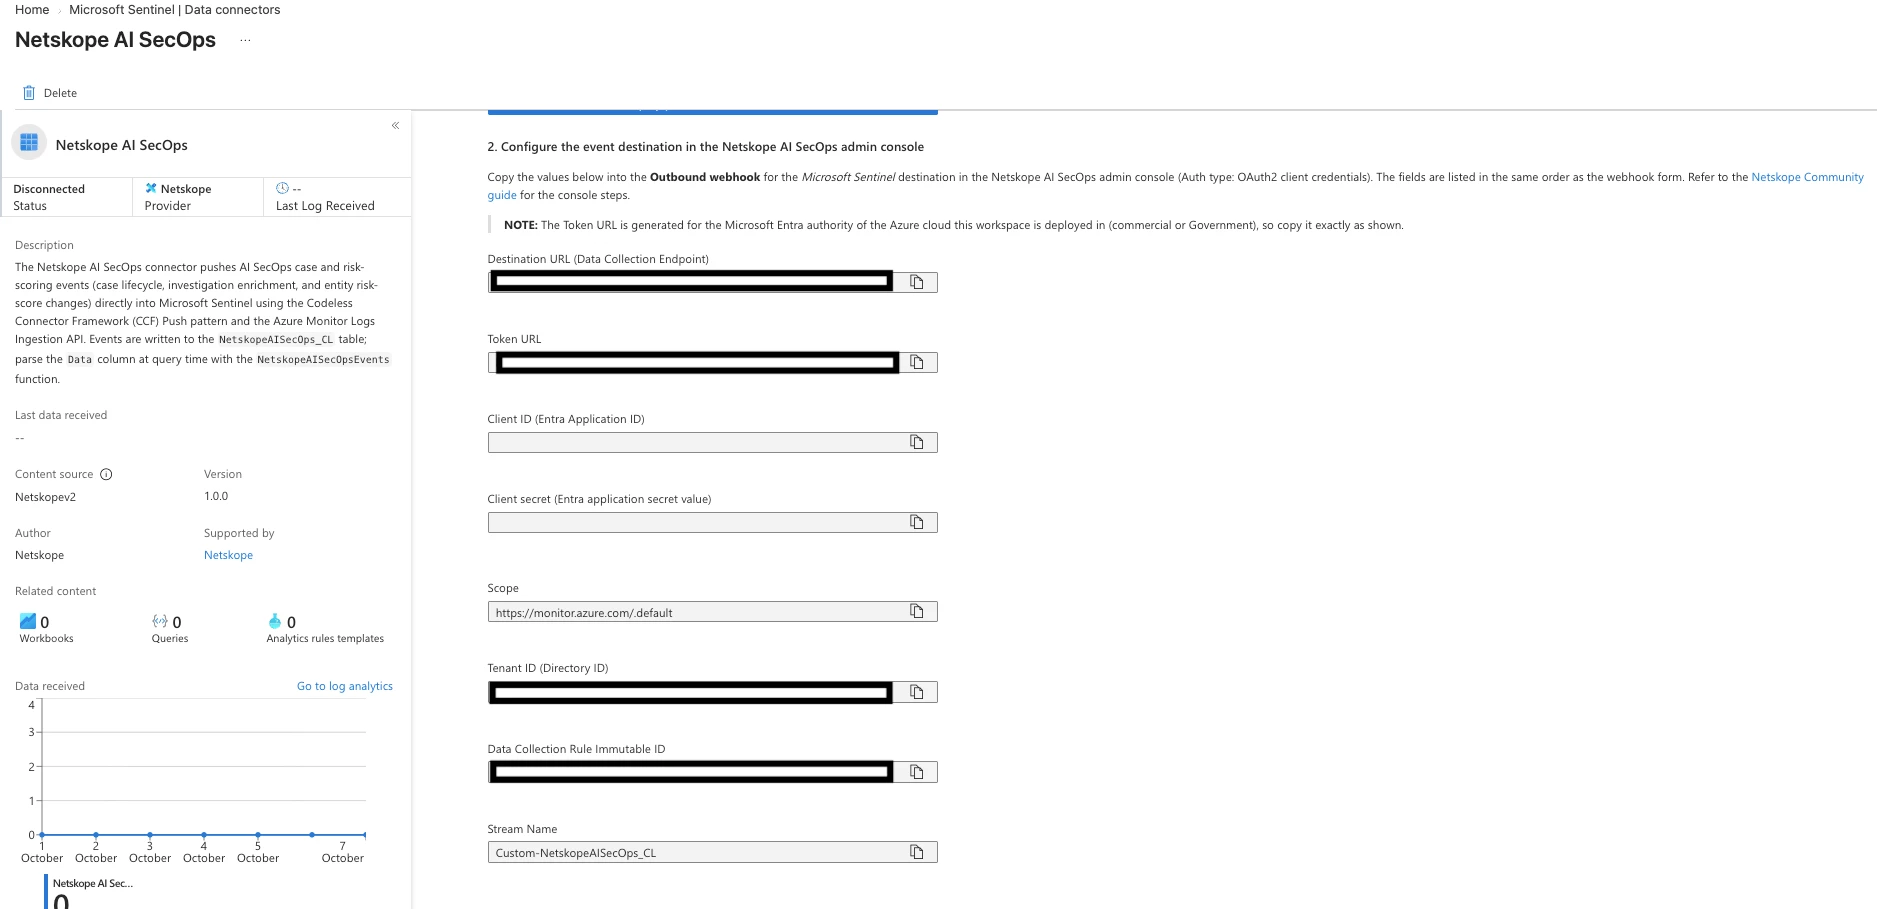
1.3 Copy the generated values
The connector page lists everything the Netskope webhook needs, in the same order as the webhook form in AI SecOps:
| Connector field | Where to enter it in AI SecOps (Step 2) |
|---|---|
| Destination URL (Data Collection Endpoint) | Connection tab > Destination URL |
| Token URL | Connection tab > Token URL |
| Client ID (Entra Application ID) | Connection tab > Client ID |
| Client secret (Entra application secret value) | Connection tab > Client secret |
Scope (https://monitor.azure.com/.default) | Connection tab > Scope |
| Tenant ID (Directory ID) | Already part of the Token URL; keep for reference |
| Data Collection Rule Immutable ID | Payload tab > DCR immutable ID |
Stream Name (Custom-NetskopeAISecOps_CL) | Payload tab > DCR stream name |
Note: The Token URL is generated for the Microsoft Entra authority of the Azure cloud your workspace is deployed in (commercial or Government), so copy it exactly as shown.
There is no shared or Netskope-provided client ID for this integration. The Client ID and Tenant ID belong to the app registration created in your own Entra tenant, so values copied from screenshots will not work in your environment.
Step 2 — Configure the webhook in AI SecOps
In your Netskope tenant, open AI SecOps → Configuration → Integrations → Outbound webhooks and create a webhook.
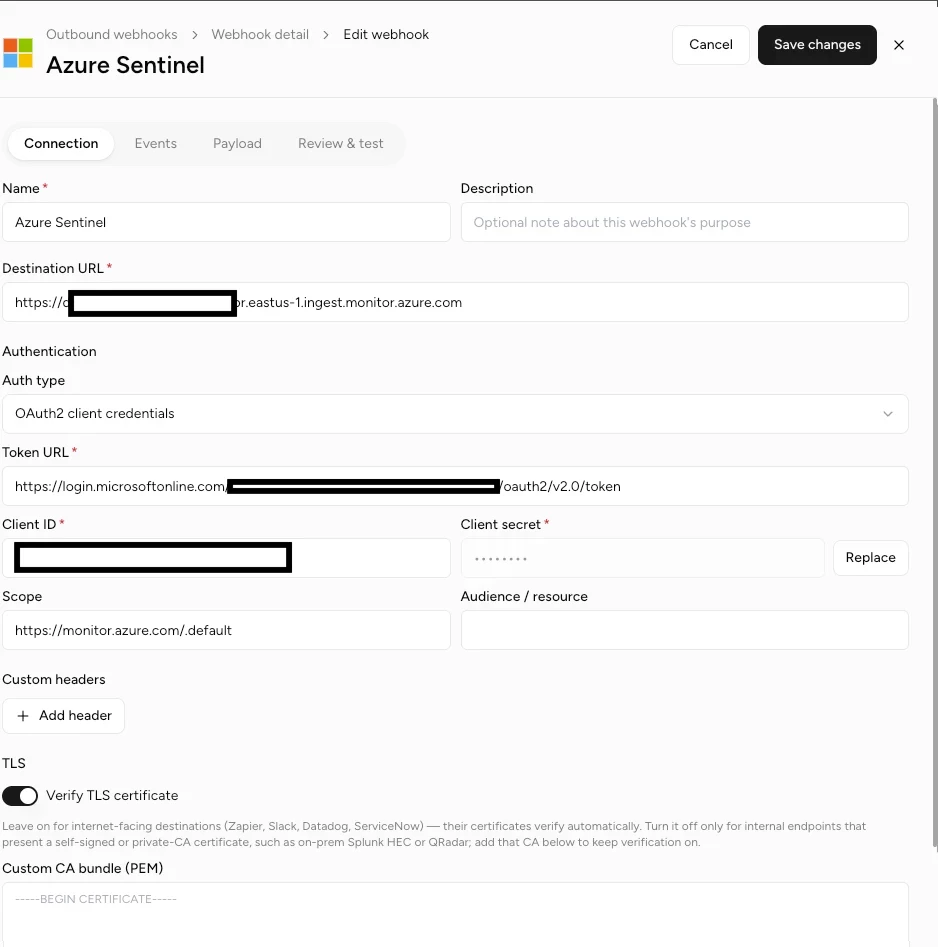
Connection tab
| Field | Value |
|---|---|
| Name | Any label, for example Azure Sentinel |
| Destination URL | The Destination URL (Data Collection Endpoint) from the connector page. Host only, for example https://dce-netskope-aisecops-xxxx.eastus-1.ingest.monitor.azure.com. Do not append the path or query string; the webhook builds the full URL from the Payload tab fields |
| Auth type | OAuth2 client credentials |
| Token URL | The Token URL from the connector page, in the form https://login.microsoftonline.com/<tenant-id>/oauth2/v2.0/token |
| Client ID | The Client ID (Entra Application ID) from the connector page |
| Client secret | The client secret Value shown once on the connector page (not a Secret ID) |
| Scope | https://monitor.azure.com/.default — required; an empty Scope fails the token request |
| Audience / resource | Leave empty |
| Custom headers | None |
| Verify TLS certificate | On. Leave the Custom CA bundle empty. Azure ingestion endpoints present publicly trusted certificates |
Events tab
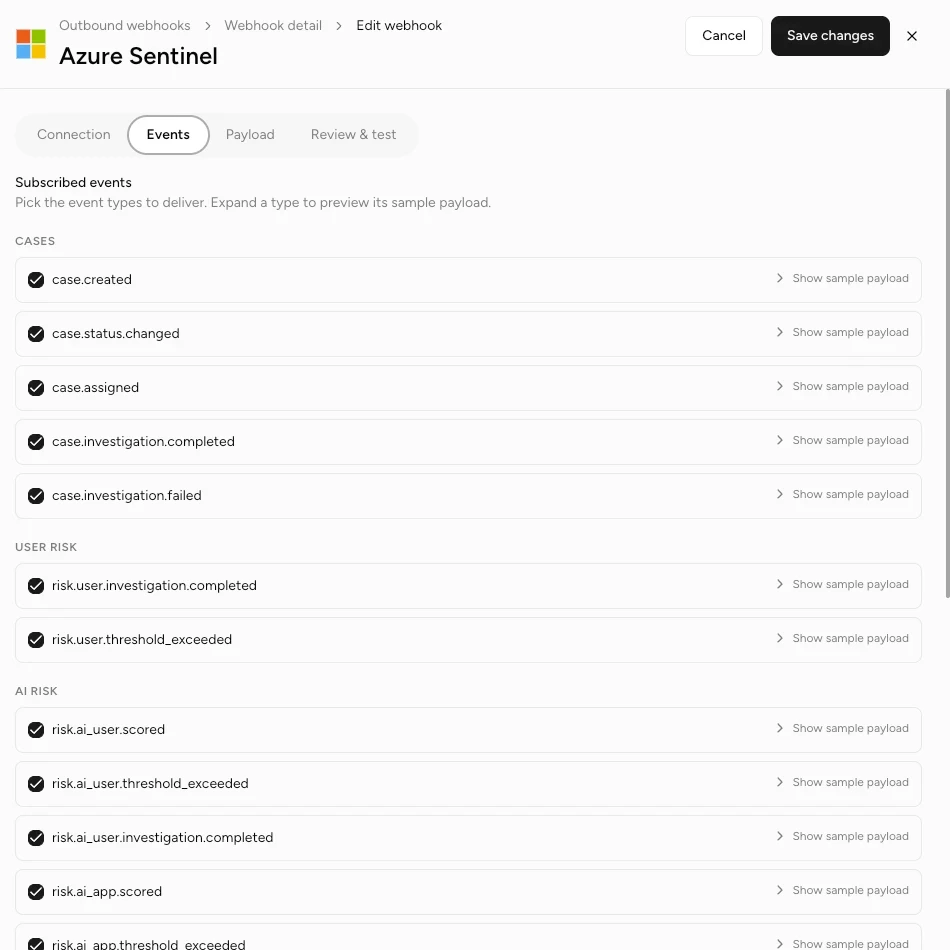
Select the event types to deliver. All Cases, User Risk, and AI Risk types can share this single webhook — the table and parser handle every type.
Payload tab
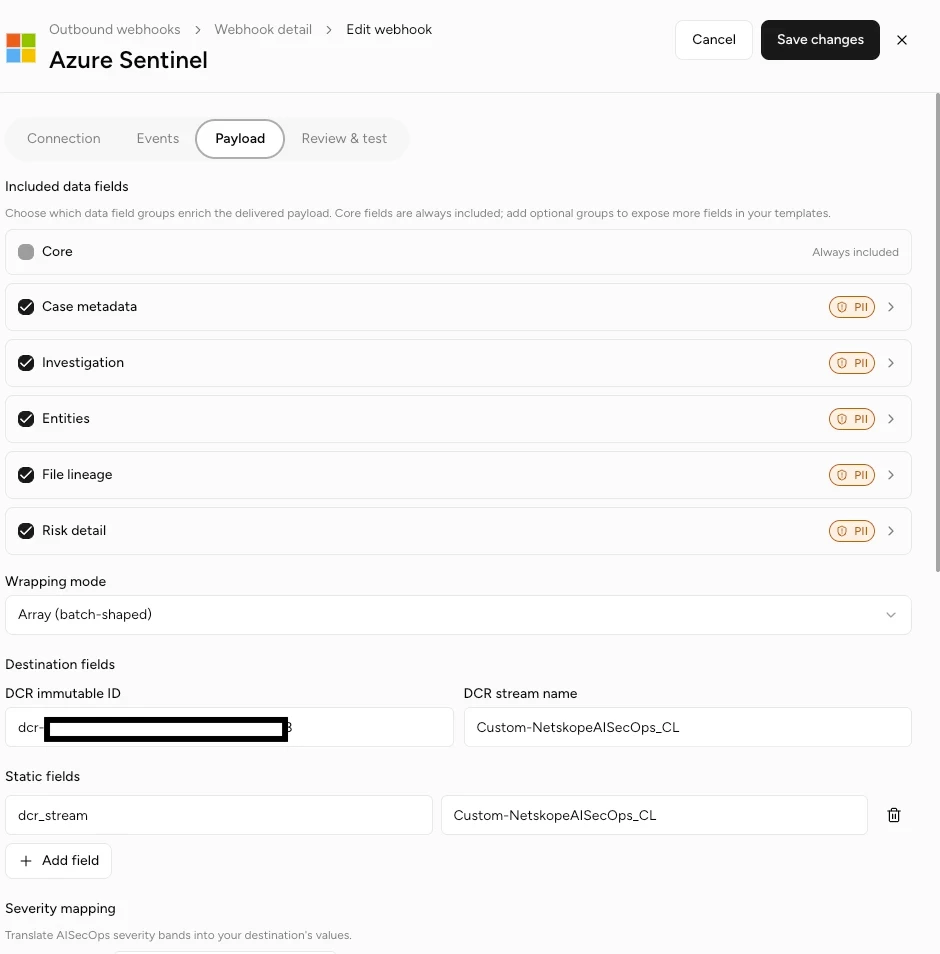
| Field | Value |
|---|---|
| Included data fields | Core plus any optional groups you want (Case metadata, Investigation, Entities, File lineage, Risk detail). Note the PII markers — enable groups per your data-handling policy |
| Wrapping mode | Array (batch-shaped) — the Logs Ingestion API requires a JSON array body |
| DCR immutable ID | The Data Collection Rule Immutable ID from the connector page |
| DCR stream name | Custom-NetskopeAISecOps_CL (the Stream Name on the connector page) |
| Static fields | None required |
| Severity mapping | Keep the defaults unless your workflow needs different labels |
| Content type | application/json — Compress body (gzip) off |
| Custom body template | Off |
Review & test tab
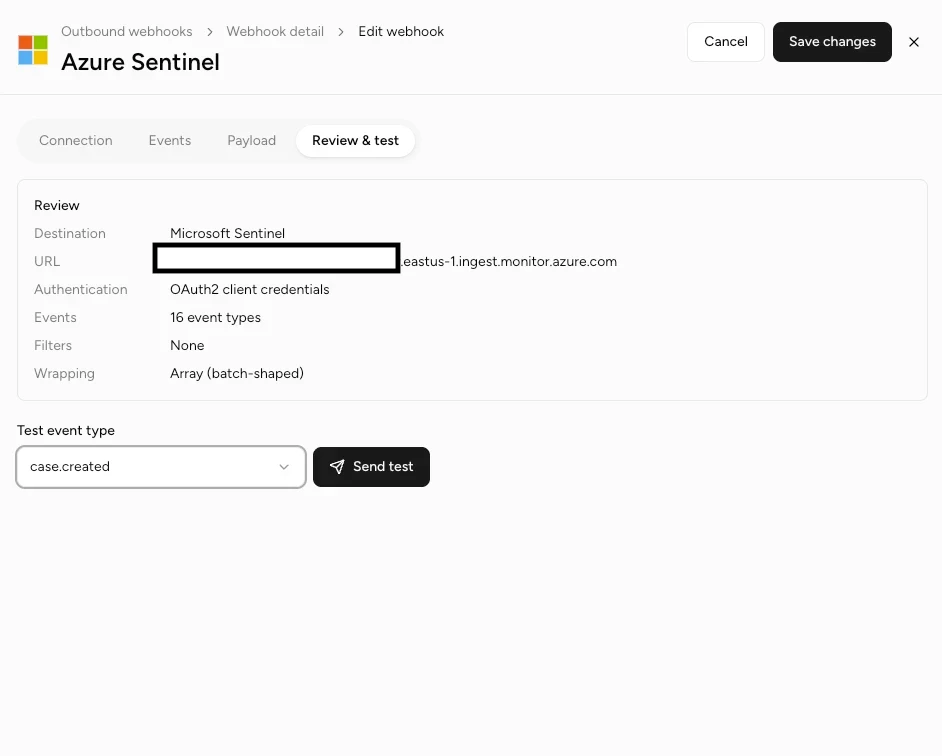
Step 3 — Test and verify
From Review & test, pick a real event type such as case.created and send a test. Prefer real event types over webhook.test: the synthetic test event carries no business fields and lands as a mostly empty row.
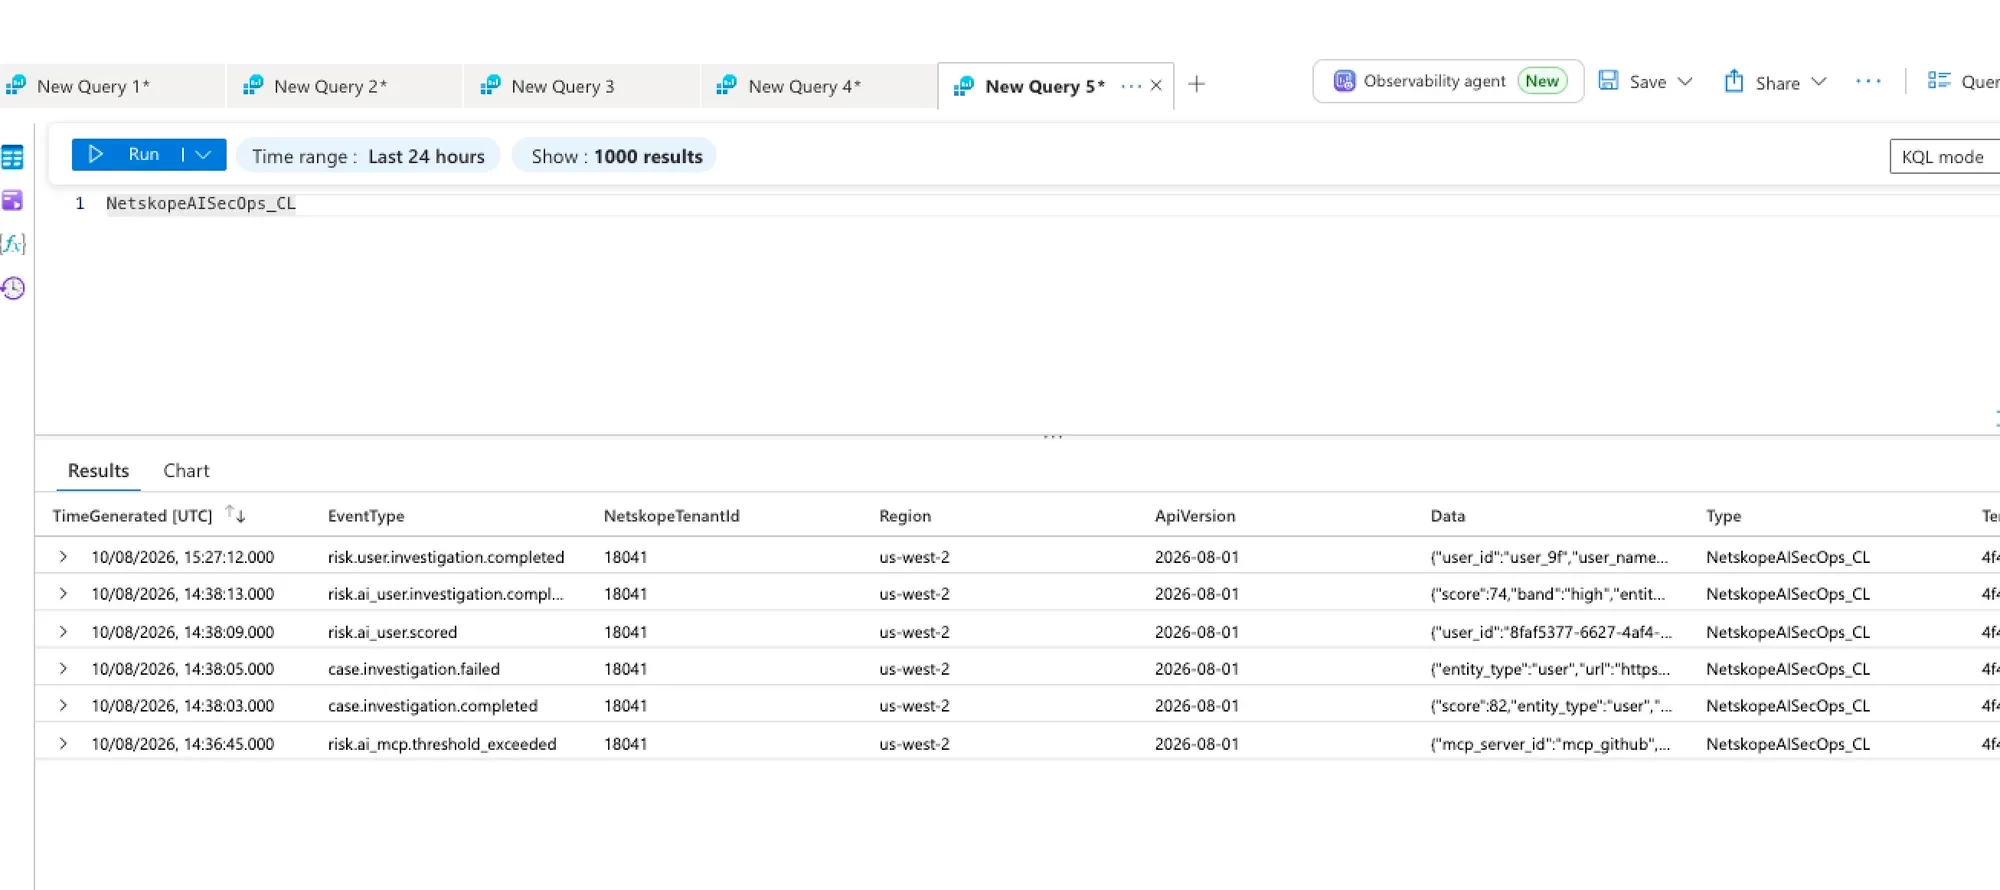
Allow a few minutes. Two timing behaviors are normal on a fresh setup: the first records into a new table take longer to appear, and DCR configuration changes take several minutes to reach the ingestion pipeline. Then query:
NetskopeAISecOps_CL
How the data is structured
Each webhook delivery is a JSON array. Each element is an envelope with delivery metadata at the top level and the actual event under data:
[
{
"id": "evt_...",
"timestamp": "2026-07-02T19:30:00Z",
"tenant_id": "1234",
"region": "us-west-2",
"api_version": "2026-08-01",
"type": "case.created",
"data": { "case_id": "case_01HXYZ", "severity": "high", "...": "..." }
}
]
The table stores the envelope in five typed columns and the event whole in Data:
| Column | Type | Source |
|---|---|---|
| TimeGenerated | datetime | envelope timestamp (delivery time) |
| EventType | string | envelope type |
| NetskopeTenantId | string | envelope tenant_id |
| Region | string | envelope region |
| ApiVersion | string | envelope api_version |
| Data | dynamic | envelope data — the complete event |
| Group | Columns |
|---|---|
| Cases — core | CaseId, EventTitle, Severity, RuleIds*, Url, User, EntityType, CreatedAt, Status, OldStatus, NewStatus, ChangedBy, Assignee, AssignedBy, InvestigationError, AlertCount, IncidentCount, DataSources*, AssignedTo, GroupId, ViewId, CreationSource, ClosureRecommendation |
| Cases — investigation | Verdict, Summary, SummaryMarkdown, RiskScore, RiskFactors*, RecommendedActions*, DataConfidence*, UserContext*, DataExposure*, IncidentsSummary*, Entities*, KeyEvidence*, FileLineage* |
| Risk — identity | UserId, UserName, AppId, AppName, McpServerId, McpServerName |
| Risk — scoring | Score, Band, PreviousBand, PreviousUci, RiskNote, RiskIndicators*, PrimaryDriver, CategorySubscores*, ScoredAt |
Columns marked * stay dynamic. Reach inside them with dot notation: FileLineage.files[0].md5, DataConfidence.score, RiskIndicators.policy_alerts. Fields not present on a given event type are null — filter with isnotempty().
Troubleshooting
| Symptom | Likely cause | Fix |
|---|---|---|
| Deploy push connector resources fails | Missing Entra or Azure permissions | Check the Prerequisites: Application Developer (or higher) in Entra, and Owner or User Access Administrator in Azure |
| Connection test fails with HTTP 400 from the token endpoint | Scope empty, a value in Audience/resource, or a v1 token URL (/oauth2/token) | Scope https://monitor.azure.com/.default, Audience empty, Token URL ending /oauth2/v2.0/token; save before retesting |
AADSTS7000215: Invalid client secret | Secret ID pasted instead of the secret Value, or an expired secret | Use the Value (contains ~ and dots); create a new secret in Entra if the Value was lost |
| Client secret lost after deployment | The secret is shown only once | Create a new secret on the app registration in Entra (Certificates & secrets) and use its Value |
Ingestion returns InvalidApiVersion | Full ingestion URL pasted into Destination URL | Destination URL must be the host only; the DCR immutable ID and stream name belong in the Payload tab |
| Ingestion returns 401 or 403 | Wrong credentials, or the Monitoring Metrics Publisher role is missing or not yet propagated | Re-copy the Client ID and secret from the connector page. Confirm the role is assigned on the DCR (Azure portal > the DCR > Access control (IAM)). Allow a few minutes after deployment |
| Rows appear but business columns are null | Deliveries processed while a DCR change was still propagating, or webhook.test events | Wait a few minutes and resend a real event type; filter noise with where EventType != "webhook.test" |
| Test returned success but no row appears | Ingestion latency, or the time picker excludes the event time | Wait 5–10 minutes; query with TimeGenerated > ago(1h) and widen the picker |
Maintenance
Client secret expiry. The client secret created by the connector expires on the date set at creation. Check the expiry in Microsoft Entra ID (App registrations > the app created by the connector > Certificates & secrets). Rotate it before it expires: create a new client secret, update the webhook's Client secret field in AI SecOps, verify a test delivery, then remove the old secret in Entra. An expired secret stops deliveries without any error visible on the Azure side.
Revoking access. To stop the integration, click Revoke Access on the connector page, and delete or disable the outbound webhook in AI SecOps.