

Device Tags for Classification
API Guide for Integration Partners
Introduction
The Netskope Device Classification API enables partners and administrators to programmatically manage device tags within their Netskope environment. Device tags provide a flexible classification mechanism to organize and apply policies to devices based on custom risk assessment, device type, department, or any other business classification criteria.
This guide demonstrates how to view existing device tags, create new tags, apply them to devices, and manage tag lifecycle through RESTful API endpoints.
We will use both Device Tags and Device Classification. Here is a short description of both.
Device Classifications vs Device Tags
Device Classifications
- Purpose: Automatic, rule-based classification system
- How they work: You create rules that automatically apply classifications to devices based on conditions (OS type, presence of other tags, etc.)
- API Endpoints:
- Create: POST /api/v2/deviceclassification/tags
- Create rules: POST /api/v2/deviceclassification/rules
- List: GET /api/v2/deviceclassification/tags
- Examples: ID 18006 ("low risk"), 16341 ("medium risk"), 7841 ("Risky Device")
- Applied by: Rules engine (automatic)
- Use case: Static classification based on device characteristics
Device Tags
- Purpose: Manual, explicit tagging system for direct device assignment
- How they work: You directly assign tags to specific devices via API calls
- API Endpoints:
- Apply: POST /api/v2/devices/device/tags/bulkreplace
- Retrieve: POST /api/v2/devices/device/tags/gettags
- Remove: DELETE /api/v2/devices/device/tags/{id}
- Examples: ID 1137 ("low risk"), 912 ("Medium Risk")
- Applied by: Direct API calls (manual)
- Use case: Dynamic tagging based on real-time risk assessment from third-party tools
Prerequisites
Before using the Device Classification API, ensure the following:
- API Access: The Device Classification APIs are currently in beta. Contact your Netskope account team to request access.
- API Token: Generate an API token with appropriate functional area permissions from your Netskope tenant.
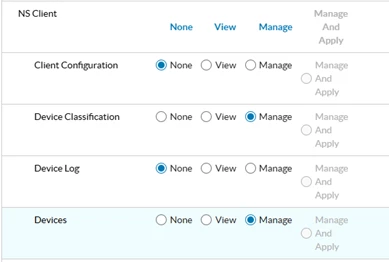
- Functional Areas: In your Netskope tenant, enable the following functional areas: Access Control > NS Client
- Set both Device Classification and Devices to Manage
- CASB > CCI to view
- User-Agent String: Include a user-agent string in the format <Vendor-product-version> in all API requests.
Things to note
1. Batch Processing & Performance Optimization
- Devices are processed in batches of 100 (TAG_DEVICE_BATCH_SIZE)
- Large device sets are split into multiple sequential batches
- Each batch triggers a separate Netskope API call
2. Tag Validation & Constraints
- Maximum tag length: 80 characters
- Maximum tags per device: 5 (Netskope platform limit)
- For Replace action, only the first 5 sorted tags are applied
- Tag name format:
- Allows only alphanumeric characters, hyphens, and spaces
3. Comma-Separated Value Handling
- Tags: Split and processed as individual tags
- User Key: Split and processed individually
- Device UID: Comma-separated values are rejected
- Empty values after splitting are detected and rejected with validation errors
Available Endpoints
The following endpoints are available for managing device classification tags:
Tag Management Endpoints
| Method | Endpoint | Description |
| GET | /api/v2/deviceclassification/tags | List all device tags |
| POST | /api/v2/deviceclassification/tags | Create a new device tag |
| GET | /api/v2/deviceclassification/tags/{id} | Retrieve specific tag by ID |
| PUT | /api/v2/deviceclassification/tags/{id} | Update entire tag |
| PATCH | /api/v2/deviceclassification/tags/{id} | Partially update tag |
| DELETE | /api/v2/deviceclassification/tags/{id} | Delete a device tag |
| GET | /api/v2/deviceclassification/options | Get available classification options |
Device Tag Application Endpoints
| Method | Endpoint | Description |
| POST | /api/v2/devices/device/tags | Apply tags to a device |
| POST | /api/v2/devices/device/tags/gettags | Get tags for a specific device |
| DELETE | /api/v2/devices/device/tags/{id} | Remove tag from a device |
| PATCH | /api/v2/devices/device/tags/{id} | Update device tag assignment |
| GET | /api/v2/deviceclassification/rules | List classification rules |
API Examples
Viewing Device Tags
To retrieve all device tags in your Netskope environment, make a GET request to the tags endpoint:
GET /api/v2/deviceclassification/tags
Response Example:
[ {
"id": 8505,
"priority": 7,
"name": "Low Risk",
"description": "the risk of this device is low",
"modifiedBy": "test@test.com",
"modifiedTime": "2025-07-28T08:48:14.000Z",
"policyNames": ["Low-Risk device"]
}
]
Creating a New Device Classification Tag
To create a new device classification tag (label), make a POST request with the tag details. The request body must be an array of tag objects:
POST /api/v2/deviceclassification/tags
Request Body:
[
{
"name": "low risk",
"description": "Devices with low risk classification"
}
]
Response Example:
{
"status": true,
"data": [18006]
}
Notice that when you create it, it is missing a Rule / OS.

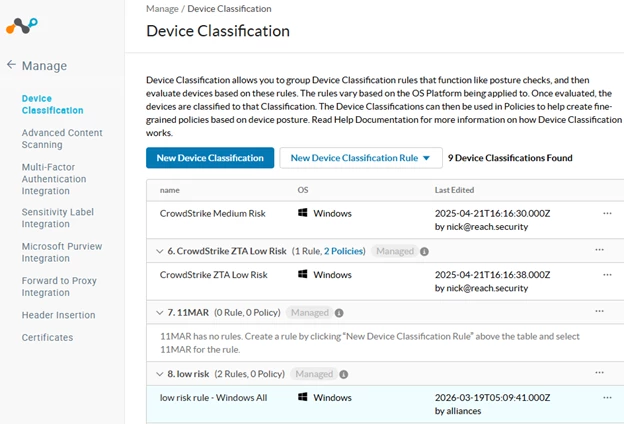
Creating a Device Classification Rule
Device Classification Rules define how devices are automatically tagged based on specific criteria. Create rules using the POST endpoint. The request body must be an array of rule objects:
POST /api/v2/deviceclassification/rules
Request Body Example - Operating System Criteria:
[
{
"name": "low risk rule - Windows All",
"label": "low risk",
"os": "windows",
"conditions": {
"$and": [
{
"$and": [
{
"$or": [
{
"min_os_version_check": {
"min_os_version": "0",
"edition": "Windows All"
}
}
]
}
]
}
]
}
}
]
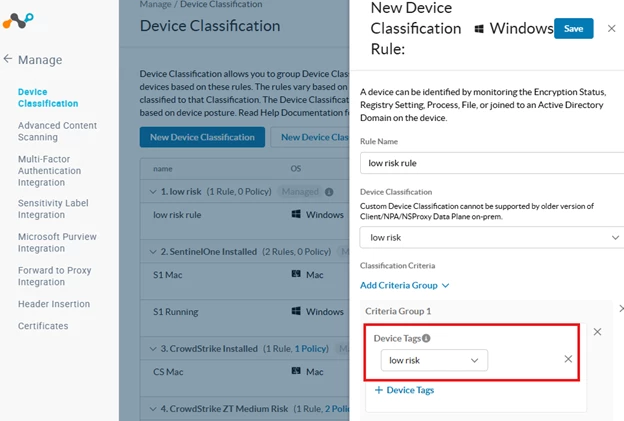
Second POST - You must do both. Request Body Example - Device Tag Criteria:
[
{
"name": "low risk tag rule",
"label": "low risk",
"os": "windows",
"conditions": {
"$and": [
{
"$and": [
{
"$and": [
{"device_tag_check": {"tag_id": 1137[1] }}
]
}
]
}
]
}
}
]
Note: the tag_id in this second POST is the device_tag. Use /api/v2/devices/device/tags/gettags to find the id. I will show you how below.
Important Notes:
- Request body must be an array of rule objects
- Use "label" field with the tag name (not tag_id)
- Use "os" field to specify the operating system (windows, mac, linux, android, ios)
- Conditions support multiple criteria types: min_os_version_check, device_tag_check, av_check, domain_check, file_check, etc.
- For OS edition criteria, use min_os_version_check with edition values like "Windows All", "Windows 10", "Windows 11"
- Status 201 indicates successful rule creation
Finding Devices by Status Query
Before applying tags to devices, you need to find the nsdeviceuid. Use the device status endpoint to query devices by time range:
GET /api/v2/events/datasearch/clientstatus
Request Body:
- starttime - Unix timestamp for query start time
- endtime - Unix timestamp for query end time
- fields - Comma-separated list of fields to return
Example URL:
GET /api/v2/events/datasearch/clientstatus?starttime= [removed by moderator] &endtime= [removed by moderator] &fields=nsdeviceuid,hostname,os,client_version
Response Example:
{
"result": [
{
"_id": "019888fb-f0eb-4d4f-806e-ac0f066201eb",
"client_version": "135.1.10.2611",
"nsdeviceuid": "416012FE-E4CD-860D-0DAE-A6432CB21A76",
"hostname": "nskp-w11-joe-3",
"os": "Windows"
},
{
"_id": "fc18ce47-e4f7-429c-9345-7853fe29ffbe",
"client_version": "135.1.10.2611",
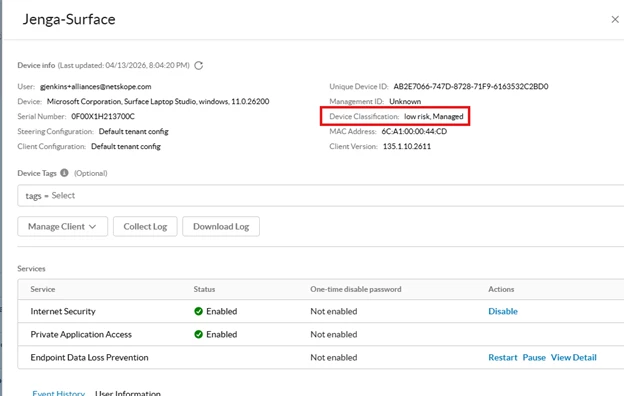
"nsdeviceuid": "AB2E7066-747D-8728-71F9-6163532C2BD0",
"hostname": "Jenga-Surface",
"os": "Windows"
}
],
"status": {
"count": 10,
"execution": "SUCCESS",
"message": "Executed Successfully",
"status_code": 200
}
}
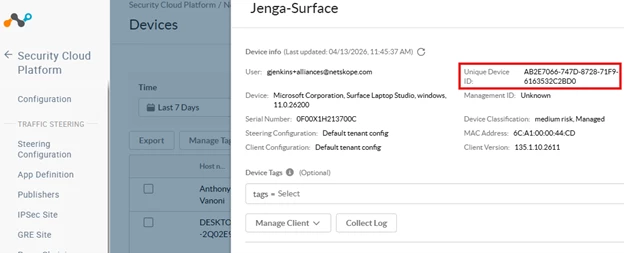
Creating Device Tags
Before we can apply a device tag to a system, we need to know the tag id. Query any device and it returns all available tags in the system with their IDs and names:
POST /api/v2/devices/device/tags
Request Body:
{
"name": "low risk",
"description": "Devices with low risk classification"
}
Response Example:
{
"success": true,
"data": {
"id": 1137,
"name": "low risk",
"description": "Devices with low risk classification"
}
}
Finding Device Tags
If the tags are already created, before we can apply a device tag to a system, we need to know the tag id. Query any device and it returns all available tags in the system with their IDs and names:
POST /api/v2/devices/device/tags/gettags
curl -X POST "https://<tenant>.goskope.com/api/v2/devices/device/tags/gettags" \
-H "Authorization: Bearer YOUR_API_TOKEN" \
-H "Content-Type: application/json" \
-H "User-Agent: Partner-RiskAssessment-1.0" \
-d '{"device_id": "AB2E7066-747D-8728-71F9-6163532C2BD0"}'
Response Example:
{
"data": [
{"id": 1137, "name": "low risk"},
{"id": 912, "name": "Medium Risk"},
{"id": 7841, "name": "Risky Device"}
]
}
Applying Tags to Devices
To apply one or more tags to one or more devices, use the bulkreplace endpoint. This endpoint replaces all tags on the specified devices with the tags provided:
POST /api/v2/devices/device/tags/bulkreplace
Request Body:
{
"tags": [1137],
"devices": [
{
"nsdeviceuid": "AB2E7066-747D-8728-71F9-6163532C2BD0",
"userkey": "AB2E7066-747D-8728-71F9-6163532C2BD0",
"hostname": "Jenga-Surface"
}
],
"device_classifications": []
}
Request Parameters:
- tags - Array of tag IDs to apply to the devices
- devices - Array of device objects with nsdeviceuid and userkey
- device_classifications - Array of device classification IDs (use empty array for device tags)
Response Example:
{
"success": true,
"data": {
"affected_device_tags": 1,
"affected_device_classification_tags": 0,
"message": "Tags replaced successfully"
}
}
Test Functionality
Test Overview
This section demonstrates a complete end-to-end workflow for creating a device classification tag and identifying a target device. The test uses a real Windows 11 device and creates a "medium risk" tag that can be applied to devices. Follow these steps to verify the device classification functionality in your environment.
Step 1: Create Device Classification Tag
Create a new device classification tag named "medium risk"
Action: POST /api/v2/deviceclassification/tags
- Tag Details:
- Name: medium risk
- Description: devices that are at medium risk
Result: HTTP 201 Created
- Tag ID: 16224
- Status: Successfully created (or already exists)
Step 2: Find Target Device
Query for the device used by [removed by moderator]
Action: GET /api/v2/events/datasearch/clientstatus
- Query Parameters:
- starttime: [removed by moderator] (last 24 hours)
- endtime: [removed by moderator]
- fields: device_id,hostname,user,os,client_version
Result: HTTP 200 OK
- Device Found: Surface
- Device ID: m0iIawJYwjxM1Zb9YLIW_AB2E7066-747D-8728-71F9-6163532C2BD0
- User: [removed by moderator]
- OS: Windows 11
- Client Version: 135.0.0.2631 (64-bit)
Step 3: Create Device Classification Rule
Create a device classification rule that applies the "medium risk" tag to Windows devices
Action: POST /api/v2/deviceclassification/rules
- Rule Configuration:
- Name: medium risk rule - Windows
- Label: medium risk
- OS: windows
- Conditions: device_tag_check with tag_id 16224 (nested in $and operators)
Result: HTTP 201 Created
- Rule Status: Active and visible in Netskope admin console
- Console Display: medium risk (1 Rule, 0 Policies)
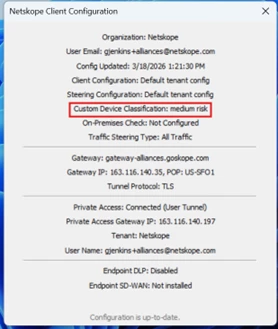
Step 4: Verify in Netskope Client
Once the device classification rule is created and applied, the tag will appear in the Netskope client. The user should see the "medium risk" classification displayed in their Netskope client settings.
Before Policy would be applied for this traffic, you will need to add a Realtime Policy to match
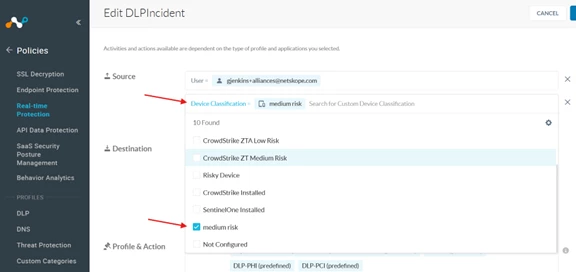
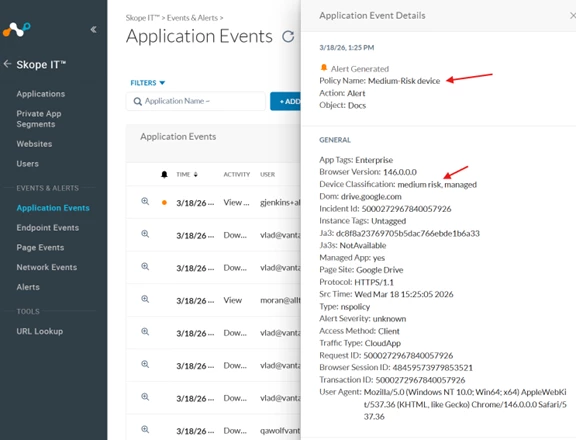
I did a basic Alert action on this policy for testing.
Test Results Summary
| Component | Value |
| Tag Name | medium risk |
| Tag ID | 16224 |
| Rule Name | medium risk rule - Windows |
| Rule OS Target | Windows |
| Device | Surface (m0iIawJYwjxM1Zb9YLIW_AB2E7066-747D-8728-71F9-6163532C2BD0) |
Best Practices
- Use meaningful names and descriptions for tags to ensure clarity across your organization.
- Establish a priority numbering scheme that aligns with your risk assessment framework (lower numbers = higher priority).
- Test tag creation and application in a non-production environment before deploying to production.
- Always include a User-Agent header in API requests for proper tracking and support.
- Implement error handling and retry logic for API calls to ensure robustness.
- Use PATCH requests for partial updates when you only need to modify specific fields.
Support and Additional Resources
For detailed API documentation, visit the Netskope Help Center at https://docs.netskope.com
For API support and troubleshooting, contact your Netskope account team.
[1]This is the device tag_id, not device_classification


