

Introduction
Fingerprint 2.0 has introduced the ability to generate hashes offline and upload them into an existing fingerprint group via API. The ability to upload the file itself via API is still possible, however the offline generation of hashes remains a preferred option for those customers who don’t want to send their files outside their organization. Besides, there is an additional advantage, which is the different maximum size limit that is different depending on the channel used to upload the file into the fingerprint group.
In particular the following service limits apply:
- A tenant is allowed to create up to 100 fingerprint groups.
- A tenant is allowed to upload up to 10K image files for fingerprinting.
- A tenant is allowed to upload 1,000,000 total files for fingerprinting (this includes image based, text based and exclusion files).
- Minimum accepted image size is 100×100 pixels.
- Minimum text file size is 20 bytes (for better efficacy, Netskope does not encourage fingerprinting a short sentence).
- WebUI upload file size limit is 8MB.
- API directly upload file size limit is 16MB.
- Offline fingerprint generation file size limit is 100MB.
The following process shows how the Fingerprint 2.0 API can be leveraged to upload files or hashes generated offline.
Architecture
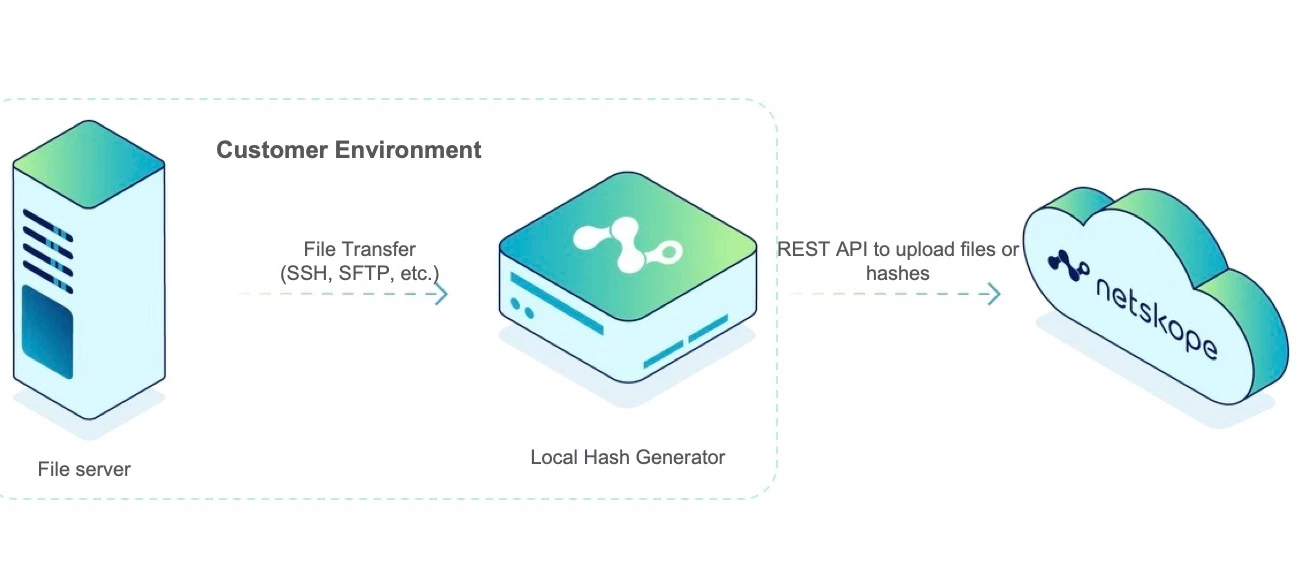
The following diagram shows the architecture for offline file upload or offline hash generation and upload:
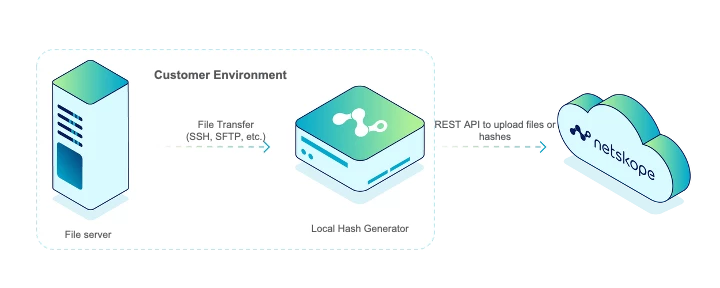
In particular an intermediate server is needed to fetch (or store directly) the files to be uploaded to the fingerprint groups in the Netskope tenant, or that can be used to generate locally the hashes, which in this case will be uploaded to the fingerprint group, in case the organization does not want the original files to leave the corporate perimeter.
In this second scenario the operating system must necessarily be Ubuntu since this is the platform supported by the Netskope packages that must be installed for offline file generation (see below).
Requirements
The following requirements must be met:
-
Fingerprint 2.0 must be enabled in the target tenant (contact your local Netskope representative).
-
A valid API token with permissions in the DLP functional area must be enabled in the tenant.
-
Additional requirements are needed for the offline hash generation, described later in the document.
Direct Upload of the Fingerprint Files
This is the simplest case. You need to have the source files and an existing fingerprint group configured in the Netskope tenant. This guide assumes that the fingerprint group is already created, manually or through the /api/v2/services/dlp/fingerprints endpoint (method POST, documentation available inside the tenant).
Identify the Target Fingerprint Group ID
The first step involves identifying the target fingerprint group ID in the Netskope tenant. This can be accomplished invoking the /api/v2/services/dlp/fingerprints endpoint (method GET). Below an example with curl where the '-i' option is also used to check the response header.
example with curl where the '-i' option is also used to check the response header
curl -i -X 'GET' \
  'https://<YOUR TENANT NAME>/api/v2/services/dlp/fingerprints' \
  -H 'accept: application/json' \
  -H 'Authorization: Bearer <YOUR API TOKEN>'
This query returns the existing fingerprint groups.
HTTP/1.1 200 OK
Server: nginx
Date: Wed, 22 Apr 2026 08:34:43 GMT
Content-Type: application/json
Content-Length: 611
Connection: keep-alive
Vary: Accept-Encoding
RateLimit-Remaining: 3
RateLimit-Reset: 1
X-RateLimit-Limit-Second: 4
X-RateLimit-Remaining-Second: 3
RateLimit-Limit: 4
Cache-Control: no-cache, no-store, max-age=0
Pragma: no-cache
Expires: -1
X-Download-Options: noopen
X-Kong-Upstream-Latency: 15
X-Kong-Proxy-Latency: 177
X-Netskope-Request-Id: 1776846883.f420117447939e3b964d86e230578652
Strict-Transport-Security: max-age=31536000; includeSubDomains
{
"fingerprintGroups": [
{
"id": "6524394992306074591",
"name": "My Fingerprint Group",
"status": "created",
"type": "text",
"description": "",
"version": 0,
"region": null,
"modifiedBy": "user@netskope.com",
"threshold": 0.8500000238418579,
"imgThreshold": 0.6000000238418579,
"negThreshold": 0.8999999761581421,
"created": 1776846836697,
"updated": 1776846836697,
"lastUploaded": 0,
"overallStatus": {
"invalid": 0,
"valid": 0,
"negative": 0,
"errMsg": null
}
}
]
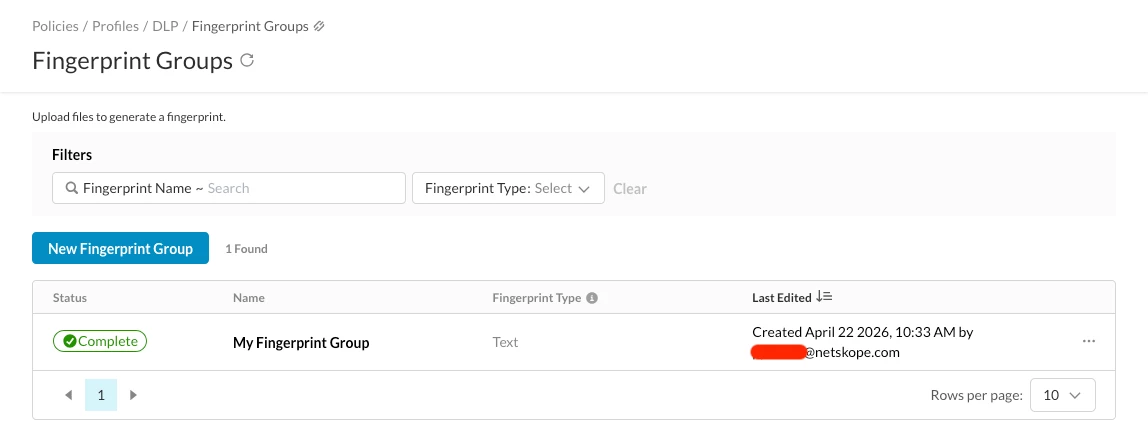
}In particular in this tenant there is a single fingerprint group called ‘My Fingerprint Group’, whose ‘id’ is ‘6524394992306074591’. The latter (the finger group id) is the parameter necessary to upload the files in the next step.
Upload the File via API
Once the fingerprint group ID has been identified, it is possible to invoke the api/v2/services/dlp/fingerprints/<fingerpring group ID>/files endpoint to upload the files. An example with curl is provided below, where fingerprint group ID identified in the previous step is used to upload a file called ‘fingerprintfile.pdf’
curl -i -X POST "https://<YOUR TENANT NAME>/api/v2/services/dlp/fingerprints/6524394992306074591/files" \ -H "Netskope-Api-Token: <YOUR API TOKEN>" \ -H "x-netskope-user-email: user@netskope.com" \ -H "Content-Type: multipart/form-data" \ -F "upload=@fingerprintfile.pdf"The message below indicates that the upload was successful:
HTTP/1.1 200 OK
Server: nginx
Date: Wed, 22 Apr 2026 08:48:40 GMT
Content-Length: 197
Connection: keep-alive
X-RateLimit-Remaining-Second: 3
RateLimit-Limit: 4
RateLimit-Remaining: 3
RateLimit-Reset: 1
X-RateLimit-Limit-Second: 4
Cache-Control: no-cache, no-store, max-age=0
Pragma: no-cache
Expires: -1
X-Download-Options: noopen
X-Kong-Upstream-Latency: 187
X-Kong-Proxy-Latency: 70
X-Netskope-Request-Id: 1776847720.33d87e5e3785ed520a1f3ace325ac485
Strict-Transport-Security: max-age=31536000; includeSubDomains

{"fingerprints":[{"filename":"fingerprintfile.pdf","status":"created","type":"text"}],"id":"6524394992306074591","lastUpdate":1776847720371,"ssid":"0","txid":"0","uploadFile":"fingerprintfile.pdf"}
Check That the Upload Was Successful
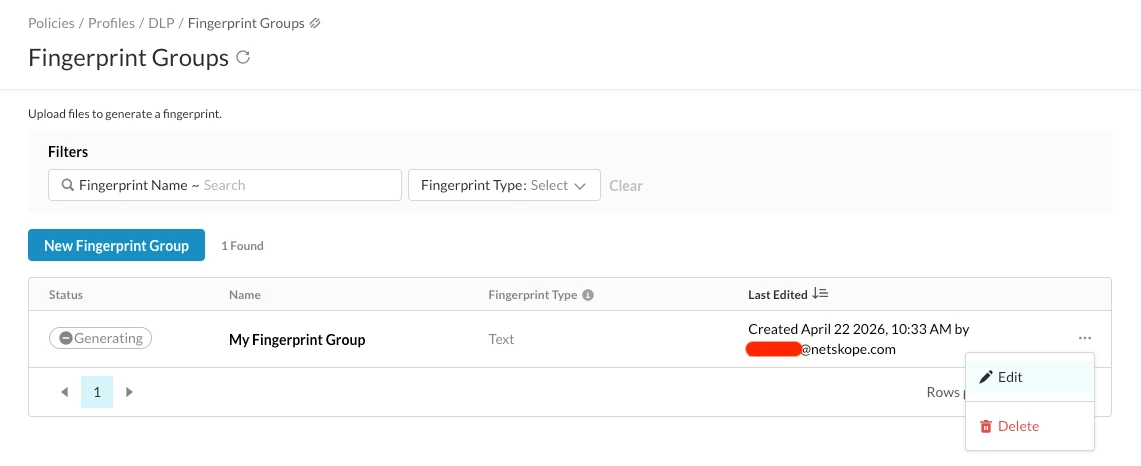
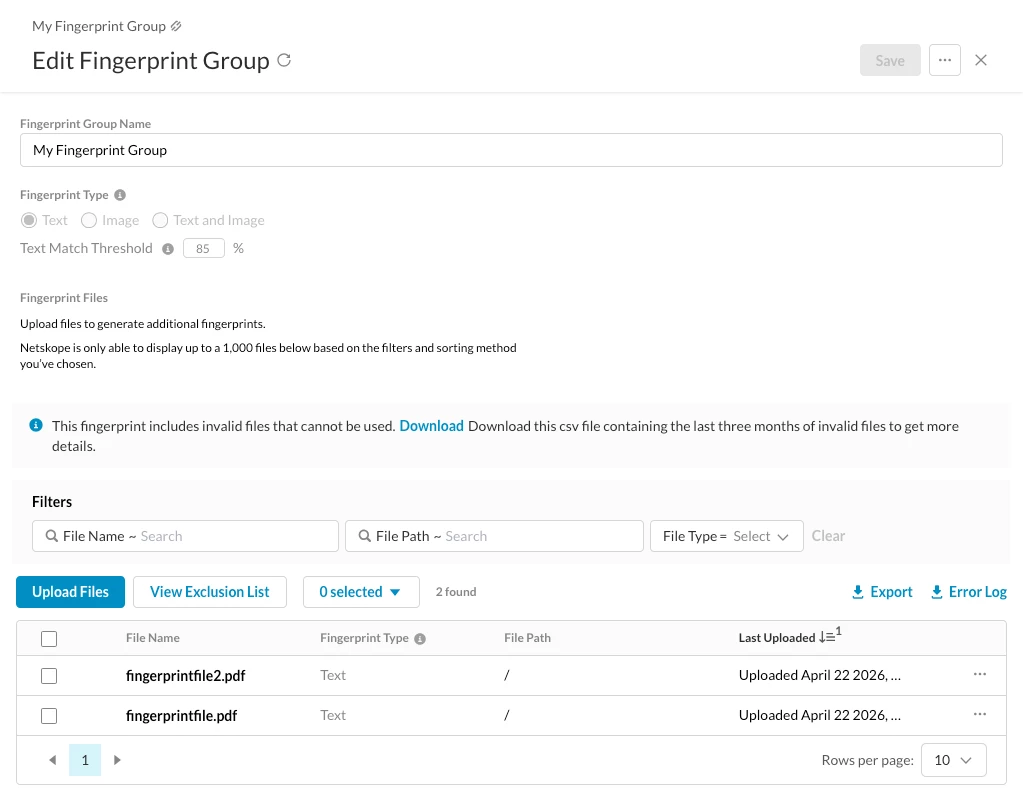
After this step, the fingerprint group in the Netskope tenant shows the uploaded file (click ‘Edit’ from the three dots on the right):
Inside the fingerprint group it is visible the file being used for the fingerprint generation.
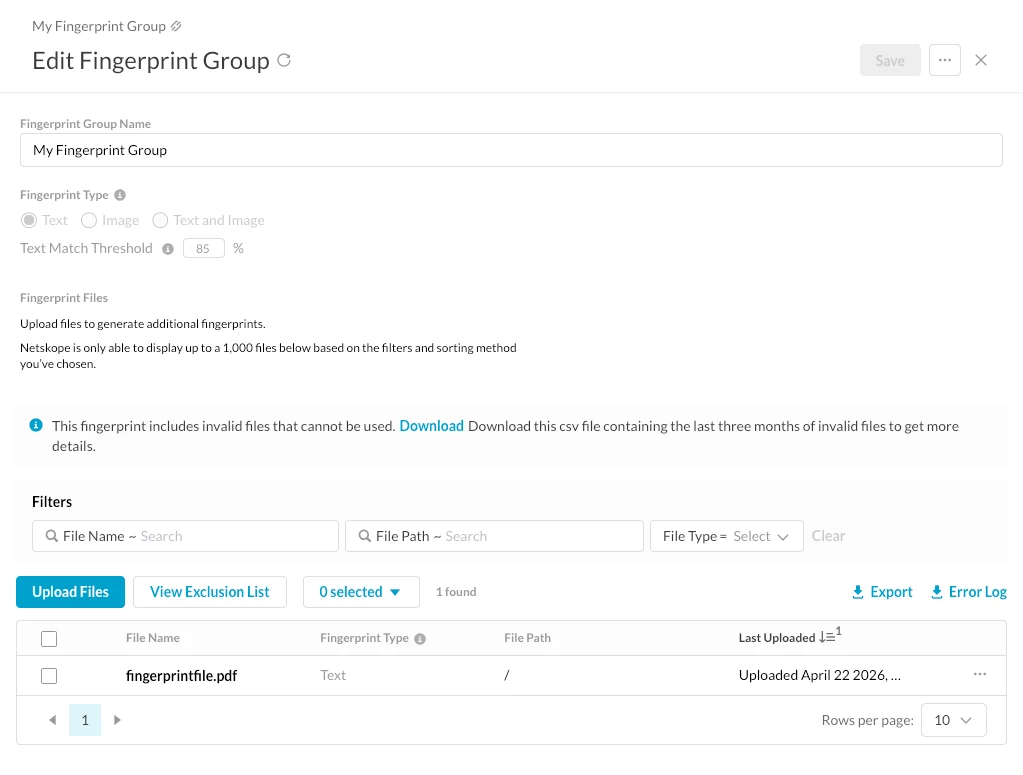
The process takes a few minutes, and at the end the status of the fingerprint group appears as ‘Complete’.
Now the fingerprint group is ready to be inserted into a DLP profile and hence in a DLP policy!
Offline Generation and Upload of the Hashes
As mentioned previously, fingerprint 2.0 provides the possibility to generate hashes offline and upload them instead of the source files. This is a preferable approach for those customers who don’t want to send their files to Netskope.
Additional Requirements
Besides the requirements for the direct upload the following additional requirements are needed in case you want to generate the hashes offline
-
An Ubuntu server at version at least 20.04 (the following procedure was tested on Ubuntu 22.04).
-
The offline creation of the hashes requires the following packages, which must be requested from Netskope, and installed in the very same order indicated below, with the command:
sudo dpkg -i --force-overwrite package_file.deb-
The installation order is:
-
keyview.ns
-
dlpcicontent.ns
-
dlpdata.ns
-
dplib.ns
-
dlptools.ns
Generate the Offline Hashes
Once all the packages are correctly installed, it is possible to use the binary /opt/ns/bin/nsdlp/dlp-fingerprint20 to generate the hashes:
/opt/ns/bin/nsdlp/dlp-fingerprint20
nsdlp-fingerprint scans the file/directory, generates fingerprints for files and push it to the cloud.
  -f <input file/directory>  Input file/directory to be scanned.
  -c <classification > classification name (configure in UI for dlp fp).
  -i <classification id> Classification id.
  -o <output directory> Output directory to store the generated files.
  -e <extract directory> Directory for extracting the files.
  -p <prefix directory> Directory prefix to be used when storing the file path.
  -t tenant ID
  -v check if file format is supported. when this option is enabled only -f is mandatory
  -d <debug level> Debug Level
-h Display this help menu-
-f: the file or directory to scan (can also provide a path or a .zip file containing the files to scan) -
-c: indicating the classification name, i.e. the name of the fingerprint group configured in the Netskope Tenant. -
-o: the output directory to store the generated files -
-e: the directory for extracting the files -
-t: the tenant ID (it is also used in the name of the fingerprint) -
-i: a classification ID (it is also used in the name of the fingerprint)
With this in mind, the following command will generate a hash with the options explained below:
/opt/ns/bin/nsdlp/dlp-fingerprint20 -c 'My Fingerprint Group' -f fingerprintfile2.pdf -o output/ -e extract/ -i 1 -t 8307-f: the filename isfingerprintfile2.pdf
-
-c: the classification name is the name of the fingerprint group defined in the tenant -
-o: the output will be written inside the directoryoutput/ -
-e: the files will be extracted into the directoryextract/(not needed in this case, but-eis a mandatory option) -
-t: the tenant is 8307 -
-i: the classification id is 1
At this point inside the directory output/ there is a file called fingerprint20_8307_1.json (please notice the tenant ID and the classification ID in the name) that will need to be uploaded via API into the existing fingerprint group in the next stage.
~/output$ ls -l
total 8
drwxrwxr-x 2 ubuntu ubuntu 4096 Apr 22 12:35 1
-rw-rw-r-- 1 ubuntu ubuntu 1823 Apr 22 12:35 fingerprint20_8307_1.json
Upload the Hash via API
Once the hash file has been created and the fingerprint group ID is known, it is possible to invoke the endpoint api/v2/services/dlp/fingerprints/<fingerpring group ID>/hashes to upload the hash file to the fingerprint group. An example with curl is provided below, where the hash file 'fingerprint20_8307_1.json' is uploaded to the fingerprint group 'My Fingerprint Group' used before, characterized by the fingerprint group id '6524394992306074591'.
curl -i -X POST "https://<YOUR TENANT NAME>/api/v2/services/dlp/fingerprints/6524394992306074591/hashes" \
    -H "Netskope-Api-Token: <YOUR API TOKEN>" \
    -H "x-netskope-user-email: user@netskope.com" \
    -H "Content-Type: multipart/form-data" \
    -F "upload=@output/fingerprint20_8307_1.json"
In case of a successful submission, this is the response:
HTTP/1.1 200 OK
Server: nginx
Date: Wed, 22 Apr 2026 12:54:03 GMT
Content-Length: 249
Connection: keep-alive
RateLimit-Remaining: 3
RateLimit-Reset: 1
X-RateLimit-Limit-Second: 4
X-RateLimit-Remaining-Second: 3
RateLimit-Limit: 4
Cache-Control: no-cache, no-store, max-age=0
Pragma: no-cache
Expires: -1
X-Download-Options: noopen
X-Kong-Upstream-Latency: 187
X-Kong-Proxy-Latency: 65
X-Netskope-Request-Id: 1776862443.168914612fc3ff75ae37cfd928930c0a
Strict-Transport-Security: max-age=31536000; includeSubDomains

{"_id":"0","fingerprints":[{"filename":"fingerprintfile2.pdf","status":"created","type":"text"}],"fpGroupId":"6524394992306074591","isHashFile":true,"lastUpdate":{"$date":1776862443454},"ssid":"0","txid":"0","uploadFile":"fingerprint20_8307_1.json"}
Check That the Upload Is Successful
Now, the fingerprint group in the Netskope tenant shows the status as ‘Generating’ and the uploaded file is visible inside the fingerprint group in addition to the file that was previously uploaded (or in general any preexisting file), that is the new file has been added to the fingerprint group:
Once the status of the fingerprint group appears as ‘Complete’, the updated fingerprint group is available for the DLP profile.


