


Netskope Global Technical Success (GTS)
Different Ways to Disable the Netskope Internet Access Tunnel (SWG)
Netskope Cloud Version - 135
Overview
The Netskope Client steers endpoint traffic through two separate tunnel types: the Internet Access tunnel, which inspects web and SaaS traffic via Netskope's NewEdge network, and the Private Access (NPA) tunnel, which enables zero-trust access to private applications.
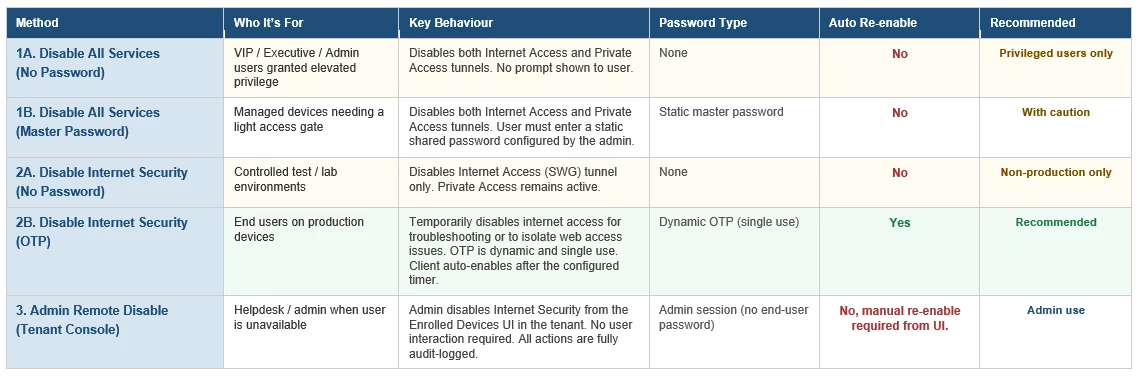
This document focuses exclusively on methods available to disable the Internet Access tunnel. There are five distinct options that an administrator can enable in the Netskope tenant, each offering a different balance of security, control, and user impact.
Prerequisites:
- All the mentioned options are configured in the Netskope tenant under Settings > Security Cloud Platform > Netskope Client > Client Configuration. If you do not see any of these options, reach out to your Netskope representative or open a support ticket to have them enabled.
- Make sure your Netskope client is running at least the n-2 supported version, where n represents the golden release version.
Setup and Comparison:
Option 1A — Allow Disabling of All Client Services (No Password)
What It Does:
When this option is enabled without a Master Password, any user on the endpoint can disable both the Internet Access tunnel and the Private Access tunnel simultaneously, with no authentication required. The tray icon will show a Disable option that executes immediately on click.
What Gets Disabled:
• Internet Access tunnel — web and SaaS traffic inspection stops.
• Private Access (NPA) tunnel — zero-trust application tunnels also stop.
• All Netskope steering halts until the client is re-enabled.
How to Enable (Admin)
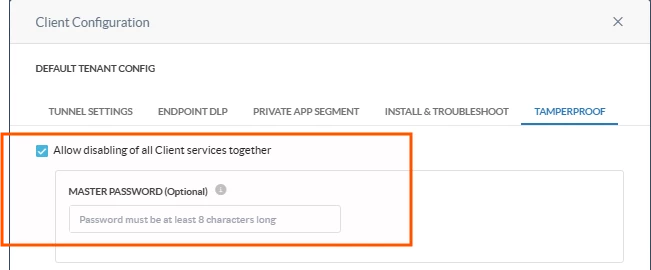
• In Client Configuration, check Allow disabling of all Client services together.
• Leave the Master Password field empty.
How to Use (User/Endpoint):
• Click the Netskope system tray icon.
• Select Disable — no password prompt appears.
• Both tunnels stop immediately.
When to Use This:
This option should be reserved exclusively for VIP, Executive, or Admin users who have been granted elevated privilege to disable the Netskope client without any password gate. It is not suitable for general users or standard managed devices. Because no authentication is required, access to this capability must be tightly controlled through the Client Configuration and assigned only to designated privileged user groups.
Option 1B — Allow Disabling of All Client Services (With Master Password)
What It Does:
This is the same as Option 1A but adds a static password gate. The user must enter the Master Password before either tunnel is disabled. The password is set once by the administrator and applies to all users and devices under that Client Configuration.
What Gets Disabled:
• Internet Access tunnel.
• Private Access tunnel.
• All Netskope steering halts until re-enabled.
How to Enable (Admin):
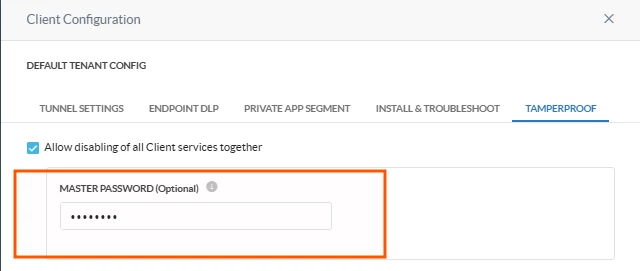
• Check Allow disabling of all Client services together.
• Enter a value in the Master Password (Optional) field.
How to Use (User/Endpoint):
• Click the system tray icon and select Disable.
• A password prompt appears >> enter the Master Password.
• Both tunnels stop upon successful authentication.
Important Considerations:
• The Master Password is a shared static secret , it does not rotate per user or per session.
• Anyone who knows the password can disable both tunnels on any enrolled device.
When to Use This:
Use when you need to disable the Netskope client on a device using a static password as the access gate. This is appropriate for managed devices where full client disablement is occasionally required and a shared password provides acceptable control. Because the Master Password is static and shared across all devices in the configuration, it should be treated as a low-security mechanism — not suitable for high-compliance environments.
Option 2A — Allow Disabling of Internet Security (No Password)
What It Does:
This option allows the user to disable the Internet Access tunnel only, without touching the Private Access tunnel. No authentication is required. This is the most targeted form of no-auth disablement , it leaves NPA connectivity intact while stopping web and SaaS traffic inspection.
What Gets Disabled:
• Internet Access tunnel only — web/SaaS steering stops.
• Private Access tunnel remains active — private app connectivity is unaffected.
How to Enable (Admin):
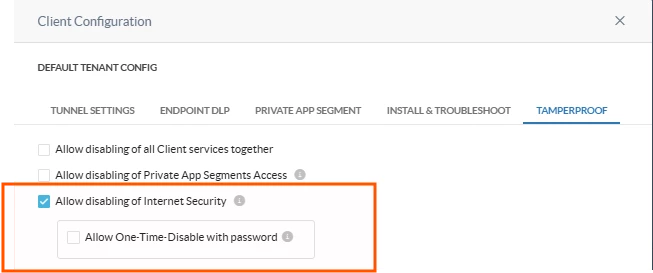
• Check Allow disabling of Internet Security.
• Do not check Allow One-Time-Disable with password (or leave it unchecked).
How to Use (User/Endpoint):
• Click the system tray icon.
• Select the Disable Internet Security option (distinct from the all-services disable).
• The Internet Access tunnel stops immediately — no password prompt.
When to Use This:
Use when you need to disable the Internet Access tunnel without requiring a password, and without disrupting Private Access connectivity. Since there is no authentication barrier, this option should be limited to controlled test or lab environments. Not recommended for production deployments.
Option 2B — Allow Disabling of Internet Security (One-Time Password)
What It Does:
This is the most secure and recommended option for disabling the Internet Access tunnel in production environments. The administrator generates a time-limited, single-use OTP from the Netskope tenant console. The user enters this OTP to disable the IA tunnel for a configurable duration after which it automatically re-enables.
What Gets Disabled:
• Internet Access tunnel only — for the configured time duration.
• Private Access (NPA) tunnel remains fully active.
• Internet Access automatically re-enables when the duration expires.
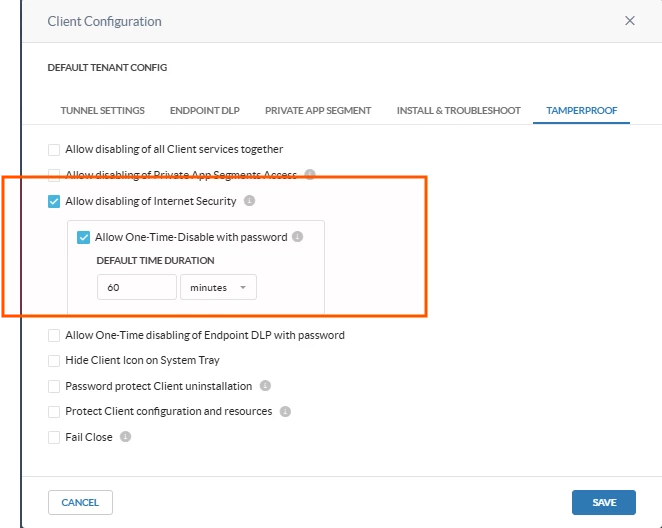
How to Enable (Admin):
• Check Allow disabling of Internet Security.
• Check Allow One-Time-Disable with password.
• Set the Default Time Duration (e.g., 60 minutes as shown in the configuration screenshot).
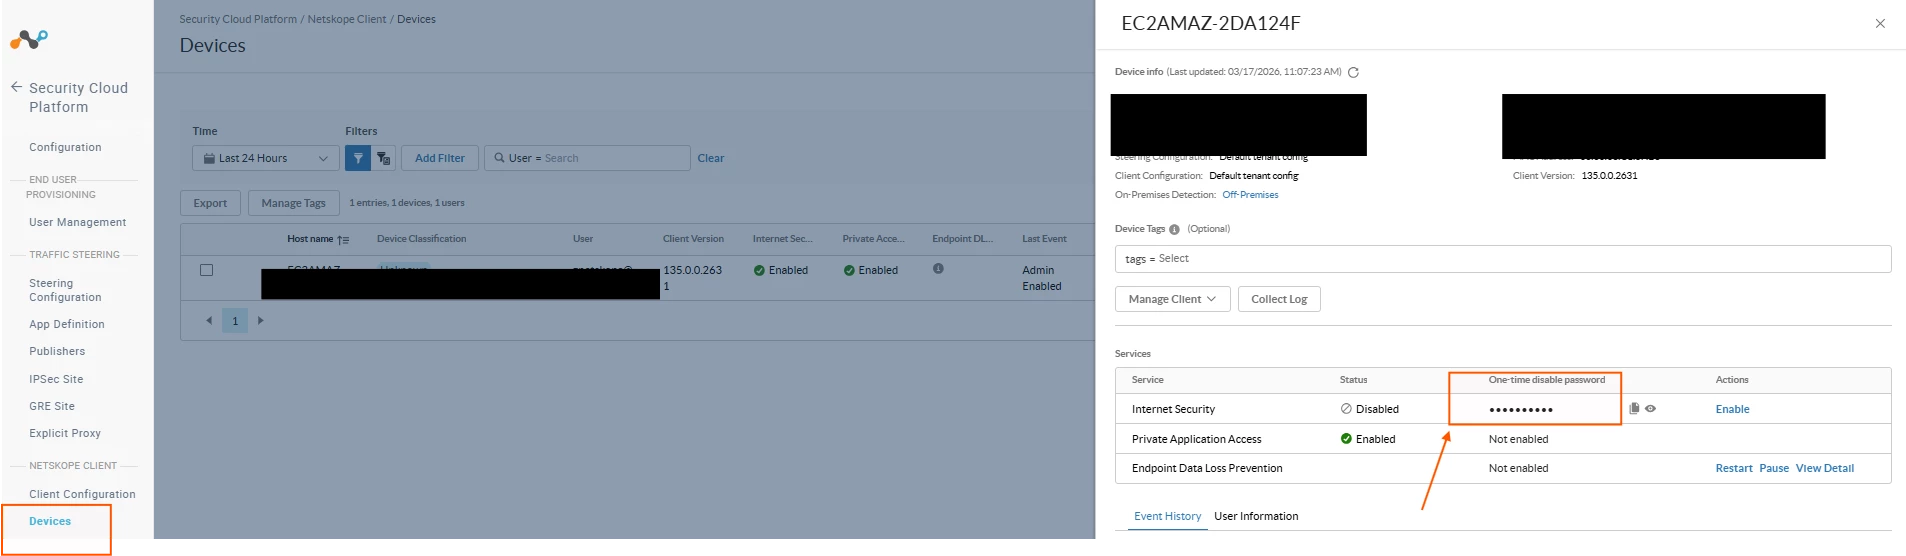
How to Generate an OTP (Admin):
• Go to Settings > Security Cloud Platform > Netskope Client > Devices
• Locate the target device by hostname or username.
• Copy the OTP.
• Share the OTP with the user via your ticket/support channel.
How to Use (User/Endpoint):
• Click the system tray icon and select Disable Internet Security.
• Enter the OTP provided by the administrator.
• The Internet Access tunnel disables for the configured duration, then auto-recovers.
Key Advantages Over Other Options:
• Single-use: the OTP cannot be reused after it has been entered once.
• Time-limited: the tunnel automatically re-enables — no risk of indefinite bypass.
• Scoped: only the Internet Access tunnel is disabled; NPA remains active throughout.
• No shared secret: there is no static password that can be leaked or shared across devices.
When to Use This:
This is the recommended method for all production end users. It allows the user to temporarily bypass the Secure Web Gateway (SWG) to troubleshoot web access issues or isolate whether Netskope inspection is the cause of a connectivity problem. The OTP is dynamically generated per request, is single-use, and cannot be reused. The client automatically re-enables after the configured timer expires — no manual intervention required. Private Access remains active throughout.
Option 3 — Admin Remote Disable from Tenant Console (Enrolled Devices
What It Does:
An administrator can disable the Internet Security service for any enrolled device directly from the Netskope tenant UI without requiring any action from the user on the endpoint. This is done from the Enrolled Devices page.
What Gets Disabled:
• Internet Security tunnel only — the admin clicks Disable next to the Internet Security row.
• Private Application Access remain unaffected.
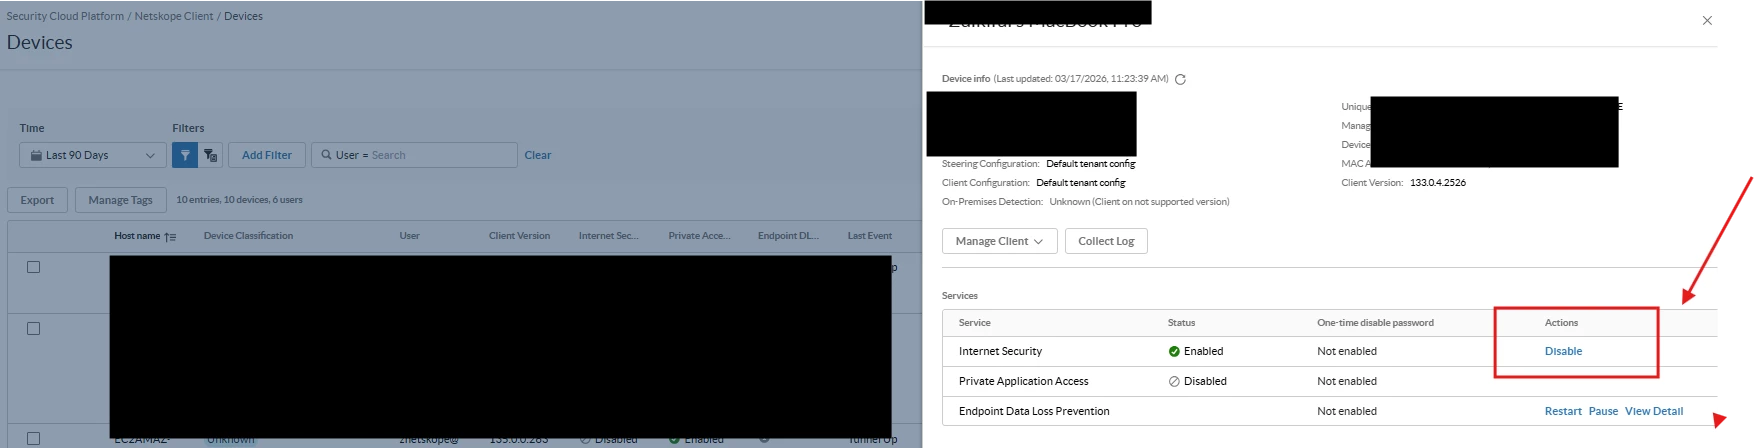
How to Use (Admin):
• Navigate to Settings > Security Cloud Platform > Netskope Client > Enrolled Devices.
• Search for the target device by hostname, username, or serial number.
• Click on the device row to open the device detail panel.
• Under the Services section, locate the Internet Security row — status will show Enabled.
• Click the Disable button.
When to Use This:
This method is ideal when the user is unavailable or unable to interact with the tray icon — for example, during a remote support session, an automated remediation workflow, or when the endpoint is experiencing a UI-level issue with the Netskope client. It is also the most direct way for an admin to validate service status and take action without relying on the user to follow steps correctly.
Important Considerations:
• Requires the device to be online and actively checking in to the Netskope cloud.
• The disable action propagates on the next client heartbeat — it is not instantaneous.
• There is no automatic re-enable timer for admin-initiated remote disable — the admin must manually re-enable on UI.
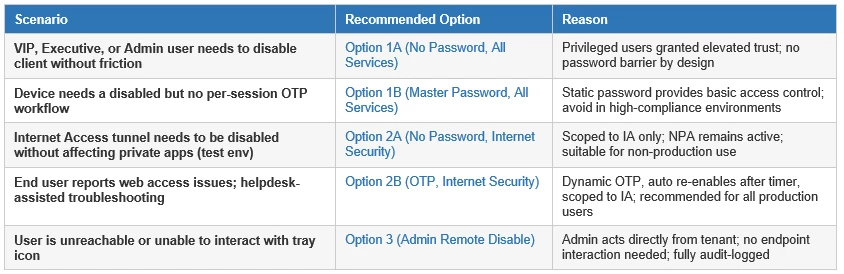
When to Use Which Option:
Terms and Conditions
- All documented information undergoes testing and verification to ensure accuracy.
- In the future, it is possible that the application's functionality may be altered by the vendor. If any such changes are brought to our attention, we will promptly update the documentation to reflect them.
Notes
- This article is authored by Netskope Global Technical Success (GTS).
- For any further inquiries related to this article, please contact Netskope suppot by submitting a support case with 'Case Type – How To Questions'.


